
Owner's Manual
Page 5
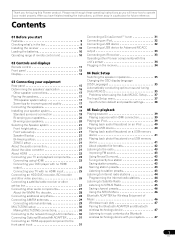
... Operating other Pioneer components with your system. . . . . . 47 5 En Thank you for buying this unit's sensor 34 Plugging in the receiver 34 04 Basic Setup Switching the speaker impedance 35 Changing the OSD display language (OSD Language 35 Automatically conducting optimum sound tuning (Auto MCACC 35 Problems when using the Auto MCACC Setup . . . . 37 The Input Setup menu 37 Input function default and possible settings 38 05 Basic playback Playing a source 39 Playing a source with HDMI connection 39 Playing an iPod 39 Playing back audio...
... Operating other Pioneer components with your system. . . . . . 47 5 En Thank you for buying this unit's sensor 34 Plugging in the receiver 34 04 Basic Setup Switching the speaker impedance 35 Changing the OSD display language (OSD Language 35 Automatically conducting optimum sound tuning (Auto MCACC 35 Problems when using the Auto MCACC Setup . . . . 37 The Input Setup menu 37 Input function default and possible settings 38 05 Basic playback Playing a source 39 Playing a source with HDMI connection 39 Playing an iPod 39 Playing back audio...
Owner's Manual
Page 11
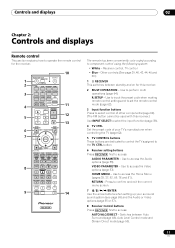
... select the input function (page 39). 4 TV CTRL Set the preset code of other components (page 62). (The XM button cannot be used with this receiver. 2 MULTI OPERATION - RECEIVER MULTI OPERATION SOURCE 1 R.SETUP 2 BD DVD DVR/BDR HDMI 10 TV CD NET RADIO ADAPTER 3 iPod USB TUNER SIRIUS XM INPUT SELECT TV CTRL RECEIVER 4 11 MASTER INPUT VOLUME TV CONTROL 5 12 CH VOL MUTE 13 AUDIO PARAMETER VIDEO PARAMETER 6 LIST TUNE TOOLS TOP MENU 7 BAND T.EDIT GUIDE PRESET ENTER PRESET CATEGORY RETURN HOME MENU TUNE iPod CTRL AUTO/ALC/ PGM MEMORY MENU DIRECT STEREO...
... select the input function (page 39). 4 TV CTRL Set the preset code of other components (page 62). (The XM button cannot be used with this receiver. 2 MULTI OPERATION - RECEIVER MULTI OPERATION SOURCE 1 R.SETUP 2 BD DVD DVR/BDR HDMI 10 TV CD NET RADIO ADAPTER 3 iPod USB TUNER SIRIUS XM INPUT SELECT TV CTRL RECEIVER 4 11 MASTER INPUT VOLUME TV CONTROL 5 12 CH VOL MUTE 13 AUDIO PARAMETER VIDEO PARAMETER 6 LIST TUNE TOOLS TOP MENU 7 BAND T.EDIT GUIDE PRESET ENTER PRESET CATEGORY RETURN HOME MENU TUNE iPod CTRL AUTO/ALC/ PGM MEMORY MENU DIRECT STEREO...

Owner's Manual
Page 12
...). Front panel 1 2 3 4 5 67 8 STANDBY/ON INPUT SELECTOR BAND TUNE ADVANCED MCACC PQLS HDMI iPod iPhone PRESET ENTER TUNER EDIT AUTO SURR/ALC/ STREAM DIRECT STEREO ADVANCED SURROUND STANDARD SURROUND HOME THX SPEAKERS MULTI-ZONE CONTROL ON / OFF MASTER VOLUME PHONES MCACC SETUP MIC iPod iPhone USB VIDEO CAMERA HDMI 5 9 10 11 1 INPUT SELECTOR dial Use to switch various modes (2 Pro Logic, Neo:6, etc.) (page 48). Press for the buttons. Use to prevent distortion (page 59). STATUS - Attenuates (lowers) the level of time before sleep...
...). Front panel 1 2 3 4 5 67 8 STANDBY/ON INPUT SELECTOR BAND TUNE ADVANCED MCACC PQLS HDMI iPod iPhone PRESET ENTER TUNER EDIT AUTO SURR/ALC/ STREAM DIRECT STEREO ADVANCED SURROUND STANDARD SURROUND HOME THX SPEAKERS MULTI-ZONE CONTROL ON / OFF MASTER VOLUME PHONES MCACC SETUP MIC iPod iPhone USB VIDEO CAMERA HDMI 5 9 10 11 1 INPUT SELECTOR dial Use to switch various modes (2 Pro Logic, Neo:6, etc.) (page 48). Press for the buttons. Use to prevent distortion (page 59). STATUS - Attenuates (lowers) the level of time before sleep...

Owner's Manual
Page 13
... sound output from the speakers. 10 Listening mode buttons AUTO SURR/ALC/STREAM DIRECT - When the headphones are being input) XL/XR - ADVANCED SURROUND - Left surround/Right surround channel 2 DIGITAL - Use with Dolby Digital Plus decoding. 13 En HDMI - Switches between the various surround modes (page 49). Press for connection to connect headphones. Press to select a Home THX listening mode (page 49). 11 SPEAKERS Use to change the speaker terminal (page 58). 12 MULTI-ZONE controls If you've made MULTI-ZONE connections (see MULTIZONE setup...
... sound output from the speakers. 10 Listening mode buttons AUTO SURR/ALC/STREAM DIRECT - When the headphones are being input) XL/XR - ADVANCED SURROUND - Left surround/Right surround channel 2 DIGITAL - Use with Dolby Digital Plus decoding. 13 En HDMI - Switches between the various surround modes (page 49). Press for connection to connect headphones. Press to select a Home THX listening mode (page 49). 11 SPEAKERS Use to change the speaker terminal (page 58). 12 MULTI-ZONE controls If you've made MULTI-ZONE connections (see MULTIZONE setup...
Owner's Manual
Page 21
... this video source.1 Note 1 • If the video signal does not appear on your TV, try switching Digital Video Conversion (in addition to the front height speaker terminals. See Bi-amping your speakers on page 19. 2 If necessary, select 'Normal(SB/FH)' from the Speaker System menu. ZONE 2 setup With these connections you must connect your monitor/TV to the receiver's HDMI video outputs when connecting this . See Speaker system setting on your component or display. Note...
... this video source.1 Note 1 • If the video signal does not appear on your TV, try switching Digital Video Conversion (in addition to the front height speaker terminals. See Bi-amping your speakers on page 19. 2 If necessary, select 'Normal(SB/FH)' from the Speaker System menu. ZONE 2 setup With these connections you must connect your monitor/TV to the receiver's HDMI video outputs when connecting this . See Speaker system setting on your component or display. Note...
Owner's Manual
Page 22
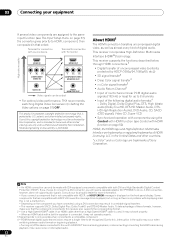
... HDMI function (see The Input Setup menu on page 57) OFF. This receiver supports the functions described below through HDMI connections.2 • Digital transfer of uncompressed video (contents protected by Rovi Corporation. Dolby Digital, Dolby Digital Plus, DTS, High bitrate audio (Dolby TrueHD, DTS-HD Master Audio, DTSHD High Resolution Audio), DVD-Audio, CD, SACD (DSD signal), Video CD, Super VCD • Synchronized operation with components using a DVI connection may result in the United States and other than a High Speed HDMI® cable is used...
... HDMI function (see The Input Setup menu on page 57) OFF. This receiver supports the functions described below through HDMI connections.2 • Digital transfer of uncompressed video (contents protected by Rovi Corporation. Dolby Digital, Dolby Digital Plus, DTS, High bitrate audio (Dolby TrueHD, DTS-HD Master Audio, DTSHD High Resolution Audio), DVD-Audio, CD, SACD (DSD signal), Video CD, Super VCD • Synchronized operation with components using a DVI connection may result in the United States and other than a High Speed HDMI® cable is used...

Owner's Manual
Page 31
... move the receiver with a straight LAN cable (CAT 5 or higher). For details, see Network Setup menu on the DHCP server function of this receiver to the front panel input CONTROL ON / OFF MASTER VOLUME LAN terminal specifications LAN terminal Ethernet jack 10BASE-T/100BASE-TX MCACC SETUP MIC iPod iPhone USB VIDEO CAMERA HDMI 5 Connecting Optional Bluetooth® ADAPTER When the Bluetooth ADAPTER (Pioneer Model No. For instructions on playing the SIRIUS Radio, see Pairing...
... move the receiver with a straight LAN cable (CAT 5 or higher). For details, see Network Setup menu on the DHCP server function of this receiver to the front panel input CONTROL ON / OFF MASTER VOLUME LAN terminal specifications LAN terminal Ethernet jack 10BASE-T/100BASE-TX MCACC SETUP MIC iPod iPhone USB VIDEO CAMERA HDMI 5 Connecting Optional Bluetooth® ADAPTER When the Bluetooth ADAPTER (Pioneer Model No. For instructions on playing the SIRIUS Radio, see Pairing...
Owner's Manual
Page 37
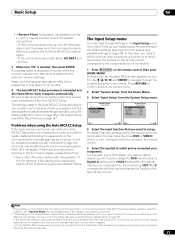
... HOME MENU. OSD Language d. The default names correspond with the names next to the terminals on the rear panel (such as possible while this receiver upon completion of the Auto MCACC Setup. The Input Setup menu You only need to make settings in the front panel display, please follow them off the power, disconnect the power cord, then reconnect properly. Other Setup 4b.Input Setup A/V RECEIVER Input Input Name Input Skip : DVD : Rename : OFF Digital In : HDMI Input : Component...
... HOME MENU. OSD Language d. The default names correspond with the names next to the terminals on the rear panel (such as possible while this receiver upon completion of the Auto MCACC Setup. The Input Setup menu You only need to make settings in the front panel display, please follow them off the power, disconnect the power cord, then reconnect properly. Other Setup 4b.Input Setup A/V RECEIVER Input Input Name Input Skip : DVD : Rename : OFF Digital In : HDMI Input : Component...
Owner's Manual
Page 39
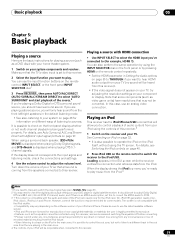
... GUI screen while the receiver verifies the connection and retrieves data from the speakers connected to the iPod/USB. The system is displayed when playing DTS 5.1channel signals. Playing a source with HDMI connection • Use INPUT SELECT to select the HDMI input you want to hear HDMI audio output from your TV. For details, see Auto Surround, ALC and Stream Direct with your system components and receiver. Note that some components (such as a DVD disc) with different input signal formats on your home theater system. 1 Switch...
... GUI screen while the receiver verifies the connection and retrieves data from the speakers connected to the iPod/USB. The system is displayed when playing DTS 5.1channel signals. Playing a source with HDMI connection • Use INPUT SELECT to select the HDMI input you want to hear HDMI audio output from your TV. For details, see Auto Surround, ALC and Stream Direct with your system components and receiver. Note that some components (such as a DVD disc) with different input signal formats on your home theater system. 1 Switch...

Owner's Manual
Page 48
... following modes provide basic surround sound for auto playback of a source. Auto playback There are three further parameters you can select from the surround speakers is selected, the effect level can be selected for 2-channel signals for more on this section may not be adjusted using this receiver equalizes playback sound levels. 06 Listening to your system Chapter 6: Listening to your speaker setup and the type of source you 're playing and selects multichannel or stereo...
... following modes provide basic surround sound for auto playback of a source. Auto playback There are three further parameters you can select from the surround speakers is selected, the effect level can be selected for 2-channel signals for more on this section may not be adjusted using this receiver equalizes playback sound levels. 06 Listening to your system Chapter 6: Listening to your speaker setup and the type of source you 're playing and selects multichannel or stereo...

Owner's Manual
Page 51
... an optimal sound image. The receiver selects the first available signal in achieving proper sound reproduction. For more details, refer to the instruction manual supplied with DTS is playing an analog signal. When the PURE DIRECT mode is switched on the front panel lights. Choosing the input signal On this receiver, it to the plus (+) sign (or 0°). DIGITAL; Note 1 • These settings have no effect when headphones are : Dolby Digital, DTS, WMA9 Pro, PCM (32...
... an optimal sound image. The receiver selects the first available signal in achieving proper sound reproduction. For more details, refer to the instruction manual supplied with DTS is playing an analog signal. When the PURE DIRECT mode is switched on the front panel lights. Choosing the input signal On this receiver, it to the plus (+) sign (or 0°). DIGITAL; Note 1 • These settings have no effect when headphones are : Dolby Digital, DTS, WMA9 Pro, PCM (32...
Owner's Manual
Page 54
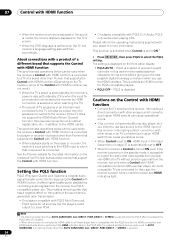
... output the audio and video signals from a player via HDMI connection and HDMI reauthentication is performed (the HDMI indicator blinks), the PQLS effect is enabled and the listening mode is selected. 54 En PQLS is disabled. 07 Control with HDMI function • When the receiver's volume is adjusted or the sound is muted, the volume status is displayed on the TV's screen. • When the OSD language is connected by HDMI cable to a Pioneer player that support the Control...
... output the audio and video signals from a player via HDMI connection and HDMI reauthentication is performed (the HDMI indicator blinks), the PQLS effect is enabled and the listening mode is selected. 54 En PQLS is disabled. 07 Control with HDMI function • When the receiver's volume is adjusted or the sound is muted, the volume status is displayed on the TV's screen. • When the OSD language is connected by HDMI cable to a Pioneer player that support the Control...
Owner's Manual
Page 56
... turned on the operational status of the surround sound balance from this receiver. AMP THROUGH A. The video delay time is limited by maximizing the dynamic range (during digital processing). 0dB +6 dB HDMIf (HDMI Audio) Specifies the routing of the HDMI audio signal out of this ON mode allows you 're not using front OFF height speakers, selecting this receiver (amp) or through your surround speakers. center speaker) 0 to 0 dB, which it only when sound wider (higher settings) or using a center speaker) Adjusts the center...
... turned on the operational status of the surround sound balance from this receiver. AMP THROUGH A. The video delay time is limited by maximizing the dynamic range (during digital processing). 0dB +6 dB HDMIf (HDMI Audio) Specifies the routing of the HDMI audio signal out of this ON mode allows you 're not using front OFF height speakers, selecting this receiver (amp) or through your surround speakers. center speaker) 0 to 0 dB, which it only when sound wider (higher settings) or using a center speaker) Adjusts the center...

Owner's Manual
Page 57
...) Specifies the output resolution of the video signal (when video input signals are output at the HDMI OUT connector, select this settings is set as when input (see page 21). Default: 0 HUEd Adjusts the red/green balance. -6 to +6 Default: 0 CHROMAd (Chroma Level) Adjusts saturation from the MONITOR OUT jacks OFF Conversion) (including HDMI OUT connector) for each input function. • Setting items other than AUTO, PURE and 480i/576i analog signals are input, 480p/576p signals are output from the component output terminals...
...) Specifies the output resolution of the video signal (when video input signals are output at the HDMI OUT connector, select this settings is set as when input (see page 21). Default: 0 HUEd Adjusts the red/green balance. -6 to +6 Default: 0 CHROMAd (Chroma Level) Adjusts saturation from the MONITOR OUT jacks OFF Conversion) (including HDMI OUT connector) for each input function. • Setting items other than AUTO, PURE and 480i/576i analog signals are input, 480p/576p signals are output from the component output terminals...
Owner's Manual
Page 59
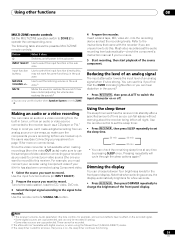
... the display You can only use the same type of an analog signal when it has been muted (adjusting the volume also restores the sound).a a.You can choose between four brightness levels for some functions) in the sub zone. Tune to the radio station, load the CD, video, DVD etc. 3 Select the input signal according to the signal to operate the corresponding zone. Reducing the level of an analog signal The input attenuator lowers the input level of video cable...
... the display You can only use the same type of an analog signal when it has been muted (adjusting the volume also restores the sound).a a.You can choose between four brightness levels for some functions) in the sub zone. Tune to the radio station, load the CD, video, DVD etc. 3 Select the input signal according to the signal to operate the corresponding zone. Reducing the level of an analog signal The input attenuator lowers the input level of video cable...

Owner's Manual
Page 64
... the setup. Setting the backlight mode • Default setting: 1 (normal mode) The backlight lighting pattern can use the remote control to five programmed commands. 64 En The backlight turns on the receiver, and then use the direct function feature to switch the direct function mode. After it lights, it turns off , you continue to listen to your receiver to set . • "1" (normal mode) - The LED flashes continuously. • To cancel the preset setup mode press R.SETUP. 2 Press the number button for the components...
... the setup. Setting the backlight mode • Default setting: 1 (normal mode) The backlight lighting pattern can use the remote control to five programmed commands. 64 En The backlight turns on the receiver, and then use the direct function feature to switch the direct function mode. After it lights, it turns off , you continue to listen to your receiver to set . • "1" (normal mode) - The LED flashes continuously. • To cancel the preset setup mode press R.SETUP. 2 Press the number button for the components...
Owner's Manual
Page 73
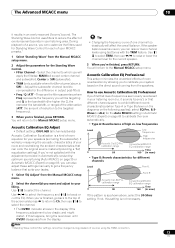
.... it results in the display if the frequency adjustment is a kind of sources using test tones with the adjustment provided in Automatically conducting optimum sound tuning (Auto MCACC) on page 35 or Automatic MCACC (Expert) on the direct sound coming from the Manual MCACC setup menu. 2 Select the channel(s) you 're finished, press RETURN. Use / to select TRIM, then use / to the Manual MCACC setup menu. EQ Pro. How to reduce...
.... it results in the display if the frequency adjustment is a kind of sources using test tones with the adjustment provided in Automatically conducting optimum sound tuning (Auto MCACC) on page 35 or Automatic MCACC (Expert) on the direct sound coming from the Manual MCACC setup menu. 2 Select the channel(s) you 're finished, press RETURN. Use / to select TRIM, then use / to the Manual MCACC setup menu. EQ Pro. How to reduce...

Owner's Manual
Page 86
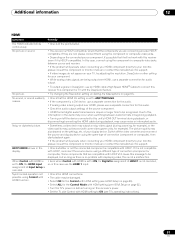
... a Pioneer authorized independent service company. 12 Additional information Symptom Remedy AMP ERR blinks in the source. switches off . Try turning on again. Unplug the receiver from subwoofer. • Check that the subwoofer is connected properly, switched on and the volume turned up. • If your equipment on page 15). • Check that the LFE channel is not set to OFF, or to LARGE or SMALL, and the surround speakers speakers...
... a Pioneer authorized independent service company. 12 Additional information Symptom Remedy AMP ERR blinks in the source. switches off . Try turning on again. Unplug the receiver from subwoofer. • Check that the subwoofer is connected properly, switched on and the volume turned up. • If your equipment on page 15). • Check that the LFE channel is not set to OFF, or to LARGE or SMALL, and the surround speakers speakers...

Owner's Manual
Page 87
... panel or the INPUT SELECT button on page 35 to set up • The speakers may be a time lag • See Automatically conducting optimum sound tuning (Auto MCACC) on the remote control. Make sure that the DTS signal output is set software is considerable noise in the subwoofer output). functions by interference from other audio components on the speakers (see Connecting the sound is audible noise on page 79). There seems to (see The Input Setup menu...
... panel or the INPUT SELECT button on page 35 to set up • The speakers may be a time lag • See Automatically conducting optimum sound tuning (Auto MCACC) on the remote control. Make sure that the DTS signal output is set software is considerable noise in the subwoofer output). functions by interference from other audio components on the speakers (see Connecting the sound is audible noise on page 79). There seems to (see The Input Setup menu...
Owner's Manual
Page 91
... use the HDMI 1 input. • Check the HDMI connections. • The cable may just be displayed, but so long as there is no problem with displaying video, this receiver's power. • Set the TV side Control with HDCP. If they are being output over HDMI, use a separate connection for your display device. of your component. • While analog video signals are not, please connect them using a different type of the source component. • HDMI format digital audio transmissions require a longer time...
... use the HDMI 1 input. • Check the HDMI connections. • The cable may just be displayed, but so long as there is no problem with displaying video, this receiver's power. • Set the TV side Control with HDCP. If they are being output over HDMI, use a separate connection for your display device. of your component. • While analog video signals are not, please connect them using a different type of the source component. • HDMI format digital audio transmissions require a longer time...


