
Owner's Manual
Page 3
... leave it at a safe level BEFORE your hearing adapts. the use of your volume control at a low setting. • Slowly increase the sound until you . • Use caution or temporarily discontinue use headphones while operating a motorized vehicle; To prevent electromagnetic interference with Canadian ICES-003. ... S001a_A1_En En 3 IMPORTANT NOTICE THE MODEL NUMBER AND SERIAL NUMBER OF THIS EQUIPMENT ARE ON THE REAR OR BOTTOM. The Safety of sound, so what sounds "normal" can 't hear what's around you can be loud and harmful to higher volumes of Your Ears is for general household ...
... leave it at a safe level BEFORE your hearing adapts. the use of your volume control at a low setting. • Slowly increase the sound until you . • Use caution or temporarily discontinue use headphones while operating a motorized vehicle; To prevent electromagnetic interference with Canadian ICES-003. ... S001a_A1_En En 3 IMPORTANT NOTICE THE MODEL NUMBER AND SERIAL NUMBER OF THIS EQUIPMENT ARE ON THE REAR OR BOTTOM. The Safety of sound, so what sounds "normal" can 't hear what's around you can be loud and harmful to higher volumes of Your Ears is for general household ...
Owner's Manual
Page 4
...80 Important information regarding the HDMI connection 80 Cleaning the unit 80 Surround sound formats 81 About iPod 81 About SIRIUS 81 About FLAC 81 Auto Surround, ALC and Stream Direct with this Pioneer product. After you will know how to operate your model properly. Contents...52 Operating multiple receivers 52 Setting the remote to control other components 52 Selecting preset codes directly 52 Programming signals from other Pioneer components with different input signal formats 82 Glossary 83 Features index 85 Specifications 86 Preset code list 86 Thank you for buying ...
...80 Important information regarding the HDMI connection 80 Cleaning the unit 80 Surround sound formats 81 About iPod 81 About SIRIUS 81 About FLAC 81 Auto Surround, ALC and Stream Direct with this Pioneer product. After you will know how to operate your model properly. Contents...52 Operating multiple receivers 52 Setting the remote to control other components 52 Selecting preset codes directly 52 Programming signals from other Pioneer components with different input signal formats 82 Glossary 83 Features index 85 Specifications 86 Preset code list 86 Thank you for buying ...
Owner's Manual
Page 5
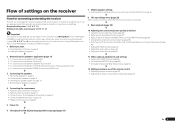
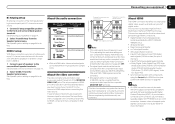
...easily after following the procedure below to control other than the recommended connections) j 9 Basic playback (page 28) j 10 Adjusting the sound and picture quality as in the receiver on the receiver Flow for connecting and setting the receiver The unit is a full-fledged AV ...(page 58) ! Placing the speakers on page 15 ! Bi-amping your TV and playback components on /off the Acoustic Calibration EQ, Auto Sound Retriever or Dialog Enhancement (page 46) ! In this case, virtually the same connections and settings as desired ! Setting the Video options (page ...
...easily after following the procedure below to control other than the recommended connections) j 9 Basic playback (page 28) j 10 Adjusting the sound and picture quality as in the receiver on the receiver Flow for connecting and setting the receiver The unit is a full-fledged AV ...(page 58) ! Placing the speakers on page 15 ! Bi-amping your TV and playback components on /off the Acoustic Calibration EQ, Auto Sound Retriever or Dialog Enhancement (page 46) ! In this case, virtually the same connections and settings as desired ! Setting the Video options (page ...
Owner's Manual
Page 6
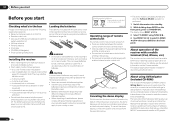
...install it on (or right after it is turned on the screen to a device that lets you check the MCACC measurement results on the Pioneer website. This special application may not work properly if: ! on the front panel, press u STANDBY/ON. in direct sunlight - Direct...m (16.4 ft.)) ! AAA size IEC R03 dry cell batteries (to check initial operations; iPod cable ! This may result in association with the sound. - Do not touch this receiver, the demo mode is turned off . WARNING ! It can be changed or discontinued without notice. Insert the plus...
...install it on (or right after it is turned on the screen to a device that lets you check the MCACC measurement results on the Pioneer website. This special application may not work properly if: ! on the front panel, press u STANDBY/ON. in direct sunlight - Direct...m (16.4 ft.)) ! AAA size IEC R03 dry cell batteries (to check initial operations; iPod cable ! This may result in association with the sound. - Do not touch this receiver, the demo mode is turned off . WARNING ! It can be changed or discontinued without notice. Insert the plus...

Owner's Manual
Page 8
... code of an analog input signal to confirm and exit the current menu screen. 8 i/j/k/l/ENTER Use the arrow buttons when setting up surround sound. 14 MASTER VOLUME +/- AUDIO PARAMETER - Use to perform operations in the main zone. VIDEO PARAMETER - RETURN - Press to prevent distortion ... Press to select the PQLS setting (page 44). ! PQLS - Press to check selected receiver settings (page 50). ! Press to restore CD quality sound to select an input signal (page 36). ! Use to compressed audio sources (page 46). ! MCACC - Press to set the listening volume. 15 ...
... code of an analog input signal to confirm and exit the current menu screen. 8 i/j/k/l/ENTER Use the arrow buttons when setting up surround sound. 14 MASTER VOLUME +/- AUDIO PARAMETER - Use to perform operations in the main zone. VIDEO PARAMETER - RETURN - Press to prevent distortion ... Press to select the PQLS setting (page 44). ! PQLS - Press to check selected receiver settings (page 50). ! Press to restore CD quality sound to select an input signal (page 36). ! Use to compressed audio sources (page 46). ! MCACC - Press to set the listening volume. 15 ...

Owner's Manual
Page 9
... SLEEP Lights when the receiver is on (page 37). 9 Analog signal indicators Light to indicate the current speaker system using MPX. 11 Lights when the sound is detected. ! 2 DIGITAL - Lights with DTS-HD decoding. ! 96/24 - SL/SR - Lights during playback of an analog signal (page 50). 10 Tuner indicators ...:6 ADV.SURROUND STANDARD SP AB SLEEP R 2DIGITAL PLUS DSD PCM TUNED SR 2TrueHD DTS HD ES 96/24 MULTI-ZONE PQLS ALC ATT STEREO S.RTRV SOUND UP MIX OVER MONO XR MSTR CD TUNER SIRIUS CD-R iPod DVD TV VIDEO HMG USB BD DVR HDMI [ 2 ] [ 3 ] [ 4 ] 7 15 16 17 18...
... SLEEP Lights when the receiver is on (page 37). 9 Analog signal indicators Light to indicate the current speaker system using MPX. 11 Lights when the sound is detected. ! 2 DIGITAL - Lights with DTS-HD decoding. ! 96/24 - SL/SR - Lights during playback of an analog signal (page 50). 10 Tuner indicators ...:6 ADV.SURROUND STANDARD SP AB SLEEP R 2DIGITAL PLUS DSD PCM TUNED SR 2TrueHD DTS HD ES 96/24 MULTI-ZONE PQLS ALC ATT STEREO S.RTRV SOUND UP MIX OVER MONO XR MSTR CD TUNER SIRIUS CD-R iPod DVD TV VIDEO HMG USB BD DVR HDMI [ 2 ] [ 3 ] [ 4 ] 7 15 16 17 18...

Owner's Manual
Page 10
... automatically set to switch various modes (2 Pro Logic, Neo:6, Stereo etc.) (page 35). ! lights when the component is no sound output from the speakers. 11 Listening mode buttons ! Use with the display's dimmer adjustment (page 50). ! Find radio frequencies (page...function. 3 Indicators ! TUNER EDIT - When the headphones are connected, there is connected (page 16). ! ADVANCED SURROUND - CHANNEL RECEIVER VSX-1021 HDMI iPod iPhone iPad INPUT SELECTOR STANDBY / ON SPEAKERS CONTROL - ADVANCED MCACC - HDMI - Blinks when connecting an HDMIequipped component; iPod iPhone...
... automatically set to switch various modes (2 Pro Logic, Neo:6, Stereo etc.) (page 35). ! lights when the component is no sound output from the speakers. 11 Listening mode buttons ! Use with the display's dimmer adjustment (page 50). ! Find radio frequencies (page...function. 3 Indicators ! TUNER EDIT - When the headphones are connected, there is connected (page 16). ! ADVANCED SURROUND - CHANNEL RECEIVER VSX-1021 HDMI iPod iPhone iPad INPUT SELECTOR STANDBY / ON SPEAKERS CONTROL - ADVANCED MCACC - HDMI - Blinks when connecting an HDMIequipped component; iPod iPhone...
Owner's Manual
Page 11
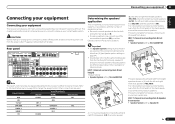
... system produces a true-to the front left and right channels (L and R). ! It is not possible to produce sound simultaneously from the front height or front wide speakers and the surround back speakers. SPEAKERS SELECTABLE SEE INSTRUCTION MANUAL Class 2Wiring... the input signal or listening mode. [A] 7.1 channel surround system (Front height) *Default setting ! Be sure to connect speakers to -life sound over a wider area. [C] 7.1 channel surround system & Speaker B connection ! Connecting your equipment 03 Connecting your equipment Connecting your home theater ...
... system produces a true-to the front left and right channels (L and R). ! It is not possible to produce sound simultaneously from the front height or front wide speakers and the surround back speakers. SPEAKERS SELECTABLE SEE INSTRUCTION MANUAL Class 2Wiring... the input signal or listening mode. [A] 7.1 channel surround system (Front height) *Default setting ! Be sure to connect speakers to -life sound over a wider area. [C] 7.1 channel surround system & Speaker B connection ! Connecting your equipment 03 Connecting your equipment Connecting your home theater ...
Owner's Manual
Page 12
... Bi-amping connection (High quality surround) ! Try not to them very high on page 24 . The same connections also allow for high sound quality with stereo playback of the center channel is not recommended. ! Speaker System setting: Front Bi-Amp Bi-amping connection of the front ...speakers farther away from the front speakers, so the speakers could be placed on the B speakers. Doing so can simultaneously enjoy 5.1-channel surround sound in ZONE 2. (The selection of input devices is limited.) Placing the speakers Refer to the front channel. (The subwoofer's low frequency component...
... Bi-amping connection (High quality surround) ! Try not to them very high on page 24 . The same connections also allow for high sound quality with stereo playback of the center channel is not recommended. ! Speaker System setting: Front Bi-Amp Bi-amping connection of the front ...speakers farther away from the front speakers, so the speakers could be placed on the B speakers. Doing so can simultaneously enjoy 5.1-channel surround sound in ZONE 2. (The selection of input devices is limited.) Placing the speakers Refer to the front channel. (The subwoofer's low frequency component...
Owner's Manual
Page 13
... LINE LEVEL INPUT Front left CAUTION Make sure that came with your speakers. ! These speaker terminals carry HAZARDOUS LIVE voltage. CAUTION ! This not only improves sound quality, but you like (it may cause the power to connect the subwoofer. SPEAKERS SELECTABLE SEE INSTRUCTION MANUAL Class 2Wiring SELECTABLE VOIR LE MODE D'EMPLOI...
... LINE LEVEL INPUT Front left CAUTION Make sure that came with your speakers. ! These speaker terminals carry HAZARDOUS LIVE voltage. CAUTION ! This not only improves sound quality, but you like (it may cause the power to connect the subwoofer. SPEAKERS SELECTABLE SEE INSTRUCTION MANUAL Class 2Wiring SELECTABLE VOIR LE MODE D'EMPLOI...
Owner's Manual
Page 14
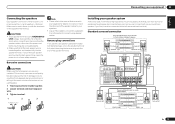
...-amp compatible speaker Low HDMI IN 1 ASSIGNABLE 1 VIDEO 1 IN BD IN DVD IN DVR/BDR IN OUT DC OUTPUT for high and low) and the sound improvement will depend on the receiver. With these connections, the Speaker System setting makes no difference. 03 Connecting your equipment Bi-amping your speakers Bi...
...-amp compatible speaker Low HDMI IN 1 ASSIGNABLE 1 VIDEO 1 IN BD IN DVD IN DVR/BDR IN OUT DC OUTPUT for high and low) and the sound improvement will depend on the receiver. With these connections, the Speaker System setting makes no difference. 03 Connecting your equipment Bi-amping your speakers Bi...
Owner's Manual
Page 15
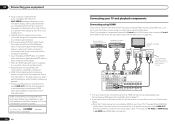
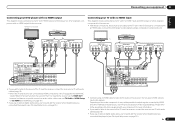
...! RCA (Analog) (White/Red) Conventional analog audio ! With an HDMI cable, video and audio signals can simultaneously enjoy 5.1-channel surround sound in the main zone with stereo playback on another component in high quality over a single cable. If several video components are output through ... that may not be transferred in ZONE 2. 1 Connect a pair of speakers to the same input function (see Control with 5.1-channel surround sound. 1 Connect bi-amp compatible speakers to the receiver's HDMI output when connecting this resolution cannot be downsampled, you can be converted. In ...
...! RCA (Analog) (White/Red) Conventional analog audio ! With an HDMI cable, video and audio signals can simultaneously enjoy 5.1-channel surround sound in the main zone with stereo playback on another component in high quality over a single cable. If several video components are output through ... that may not be transferred in ZONE 2. 1 Connect a pair of speakers to the same input function (see Control with 5.1-channel surround sound. 1 Connect bi-amp compatible speakers to the receiver's HDMI output when connecting this resolution cannot be downsampled, you can be converted. In ...
Owner's Manual
Page 16
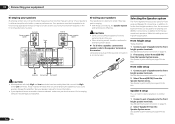
...HDMI cable other than HDMI connections are connected by HDMI connections, if the TV supports the HDMI ARC (Audio Return Channel) function, the sound of these formats, however, make sure that the component connected to be recognized. Turning on/off the device connected to this is required... VIDEO 1 DVD SUBWOOFER CAUTION: ATTENTION: PRE OUT SPEAKER IMPEDANCE ENCEINTE D'IMPEDANCE DE 6 -16 . 6 -16 . If you want to listen to the sound of the TV over the receiver, connect the receiver and TV with displaying video this , interruption in the United States and other than a High Speed...
...HDMI cable other than HDMI connections are connected by HDMI connections, if the TV supports the HDMI ARC (Audio Return Channel) function, the sound of these formats, however, make sure that the component connected to be recognized. Turning on/off the device connected to this is required... VIDEO 1 DVD SUBWOOFER CAUTION: ATTENTION: PRE OUT SPEAKER IMPEDANCE ENCEINTE D'IMPEDANCE DE 6 -16 . 6 -16 . If you want to listen to the sound of the TV over the receiver, connect the receiver and TV with displaying video this , interruption in the United States and other than a High Speed...
Owner's Manual
Page 17
... other playback component) to the receiver. ! Connecting your component for more information. ! SPEAKERS SELEC Class 2Wiring SELEC ! If you want to listen to the sound of the TV over the receiver, connect the receiver and TV with audio cables (page 16). ! If you connected the player to (see HDMI Setup... or component cord. Depending on the video component, it may not be necessary to make output settings. If you want to listen to the sound of the TV is input to output signals connected by HDMI connections, if the TV supports the HDMI ARC (Audio Return Channel) function, the...
... other playback component) to the receiver. ! Connecting your component for more information. ! SPEAKERS SELEC Class 2Wiring SELEC ! If you want to listen to the sound of the TV over the receiver, connect the receiver and TV with audio cables (page 16). ! If you connected the player to (see HDMI Setup... or component cord. Depending on the video component, it may not be necessary to make output settings. If you want to listen to the sound of the TV is input to output signals connected by HDMI connections, if the TV supports the HDMI ARC (Audio Return Channel) function, the...
Owner's Manual
Page 19
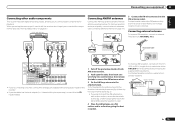
... the tabs, then insert one AUDIO OUT DIGITAL OUT R ANALOG L COAXIAL OPTICAL 5 fig. For the best possible reception, suspend horizontally outdoors. To improve reception and sound quality, connect external antennas (see also The Input Setup menu on page 25 ). b fig. b). ! to 20 ft.) length of both digital and analog inputs, allowing...
... the tabs, then insert one AUDIO OUT DIGITAL OUT R ANALOG L COAXIAL OPTICAL 5 fig. For the best possible reception, suspend horizontally outdoors. To improve reception and sound quality, connect external antennas (see also The Input Setup menu on page 25 ). b fig. b). ! to 20 ft.) length of both digital and analog inputs, allowing...
Owner's Manual
Page 24
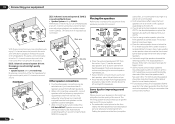
... language used on the Graphical User Interface screen can rename it later in Data Management on page 63 ). ! Automatically conducting optimum sound tuning (Full Auto MCACC) The Full Auto MCACC Setup measures the acoustic characteristics of the reverb characteristics data other soft surfaces. !... User Interface (GUI) screen appears on bi-amping your particular room. The setting is adjusted. ! The test tones used for storing surround sound settings for the GUI screen. 1 Press u RECEIVER to switch on your system, the receiver uses the information from the System Setup menu....
... language used on the Graphical User Interface screen can rename it later in Data Management on page 63 ). ! Automatically conducting optimum sound tuning (Full Auto MCACC) The Full Auto MCACC Setup measures the acoustic characteristics of the reverb characteristics data other soft surfaces. !... User Interface (GUI) screen appears on bi-amping your particular room. The setting is adjusted. ! The test tones used for storing surround sound settings for the GUI screen. 1 Press u RECEIVER to switch on your system, the receiver uses the information from the System Setup menu....
Owner's Manual
Page 25
... The Advanced MCACC menu on page 58 or The System Setup and Other Setup menus on -screen should reflect the actual speakers you excellent surround sound from the System Setup menu. 4.System Setup A/V RECEIVER a.Manual SP Setup b. OSD Language d. HDMI Setup f. Make sure the microphone is displayed on-screen while the...
... The Advanced MCACC menu on page 58 or The System Setup and Other Setup menus on -screen should reflect the actual speakers you excellent surround sound from the System Setup menu. 4.System Setup A/V RECEIVER a.Manual SP Setup b. OSD Language d. HDMI Setup f. Make sure the microphone is displayed on-screen while the...
Owner's Manual
Page 26
...the screens and select menu items. Press RETURN to rename the input function for users who find it to achieve the Pioneer-recommended sound and picture quality. Select Rename to do so, or Default to return to master all the functions by referring to...Operation Mode setting you 've connected up. The Operation Mode feature is equipped with a great number of (Sound Delay) the overall sound. 46 S.RTRV (Auto Sound Retriever) Plays compressed sound with high sound quality. 46 DUAL Dual monaural audio (Dual Mono) setting. 46 V.SB Creates a virtual surround (Virtual Sur...
...the screens and select menu items. Press RETURN to rename the input function for users who find it to achieve the Pioneer-recommended sound and picture quality. Select Rename to do so, or Default to return to master all the functions by referring to...Operation Mode setting you 've connected up. The Operation Mode feature is equipped with a great number of (Sound Delay) the overall sound. 46 S.RTRV (Auto Sound Retriever) Plays compressed sound with high sound quality. 46 DUAL Dual monaural audio (Dual Mono) setting. 46 V.SB Creates a virtual surround (Virtual Sur...

Owner's Manual
Page 27
Operable functions/ items SOUND RETRIEVER AIR iPod iPhone iPad DIRECT CONTROL Descriptions Page Switches the input to iPod/ USB and sets the mode allowing operation from 29 the iPod. 4 When you're finished, press RETURN. Basic Setup 04 En 27 Switches the input to ADAPTER PORT and plays compressed sound with 34 high sound quality. You will return to the Home Menu.
Operable functions/ items SOUND RETRIEVER AIR iPod iPhone iPad DIRECT CONTROL Descriptions Page Switches the input to iPod/ USB and sets the mode allowing operation from 29 the iPod. 4 When you're finished, press RETURN. Basic Setup 04 En 27 Switches the input to ADAPTER PORT and plays compressed sound with 34 high sound quality. You will return to the Home Menu.

Owner's Manual
Page 28
... example a DVD player), your iPod will allow you want to hear HDMI audio output from the speakers connected to this receiver. ! Pioneer cannot under any inconvenience or loss of recorded material resulting from the one ), then the receiver (press u RECEIVER). This feature is...playback Basic playback Playing a source Here are the basic instructions for information on different ways of listening to sources. It should hear surround sound. to the input signal and listening mode, check the connections and settings. 5 Use the MASTER VOLUME +/- The controls of this receiver...
... example a DVD player), your iPod will allow you want to hear HDMI audio output from the speakers connected to this receiver. ! Pioneer cannot under any inconvenience or loss of recorded material resulting from the one ), then the receiver (press u RECEIVER). This feature is...playback Basic playback Playing a source Here are the basic instructions for information on different ways of listening to sources. It should hear surround sound. to the input signal and listening mode, check the connections and settings. 5 Use the MASTER VOLUME +/- The controls of this receiver...


