Owner's Manual
Page 4
...the processing of this agreement. THIS IS A LEGAL AGREEMENT BETWEEN YOU, AS THE END USER, AND PIONEER ELECTRONICS (USA) INC. ("PIONEER"). THE SOFTWARE INSTALLED ON THE PIONEER PRODUCTS INCLUDES DATABASE OF Geographic Data Technology, Inc. ("GDT") AND NAVTECH Data OF Navigation Technologies Corporation ...to another party, provided that the party reads and agrees to operate a service bureau or for U.S.A. License Agreement ■PIONEER AVIC-90DVD (CNDV-20) - You shall not copy, reverse engineer, translate, port, modify or make derivative works of the Software by reverse ...
...the processing of this agreement. THIS IS A LEGAL AGREEMENT BETWEEN YOU, AS THE END USER, AND PIONEER ELECTRONICS (USA) INC. ("PIONEER"). THE SOFTWARE INSTALLED ON THE PIONEER PRODUCTS INCLUDES DATABASE OF Geographic Data Technology, Inc. ("GDT") AND NAVTECH Data OF Navigation Technologies Corporation ...to another party, provided that the party reads and agrees to operate a service bureau or for U.S.A. License Agreement ■PIONEER AVIC-90DVD (CNDV-20) - You shall not copy, reverse engineer, translate, port, modify or make derivative works of the Software by reverse ...
Owner's Manual
Page 7
...recognition function as "Pioneer") MAKES AND YOU... PLEASE RETURN THE PIONEER PRODUCTS (INCLUDING THE...THE PURCHASE PRICE OF THE PIONEER PRODUCTS. 1. You shall...Pioneer and its licensor(s) shall be collectively referred to use the software installed on the Pioneer...PIONEER ELECTRONICS OF CANADA, INC. ("PIONEER"). BY USING THE SOFTWARE INSTALLED ON THE PIONEER PRODUCTS, YOU ARE AGREEING TO BE BOUND BY THE TERMS OF THIS AGREEMENT. Pioneer and its accuracy, reliability or otherwise. 5 Pioneer... THE SOFTWARE INSTALLED ON THE PIONEER PRODUCTS INCLUDES ...Pioneer does not make derivative works ...
...recognition function as "Pioneer") MAKES AND YOU... PLEASE RETURN THE PIONEER PRODUCTS (INCLUDING THE...THE PURCHASE PRICE OF THE PIONEER PRODUCTS. 1. You shall...Pioneer and its licensor(s) shall be collectively referred to use the software installed on the Pioneer...PIONEER ELECTRONICS OF CANADA, INC. ("PIONEER"). BY USING THE SOFTWARE INSTALLED ON THE PIONEER PRODUCTS, YOU ARE AGREEING TO BE BOUND BY THE TERMS OF THIS AGREEMENT. Pioneer and its accuracy, reliability or otherwise. 5 Pioneer... THE SOFTWARE INSTALLED ON THE PIONEER PRODUCTS INCLUDES ...Pioneer does not make derivative works ...
Owner's Manual
Page 14
... to Use the Map...37 How to see 40 12 for AVIC-9DVD 23 About the difference in the operation of the Remote Control 23 Installing the Program ...25 Chapter 1 Basic Operation 29 Switching On and Off...29 Types of Menu...30 Main menu...30 Shortcut menu ...31 Basic ... menu 33 How to use this manual 22 Operation of DVD player 22 Terminology...23 For "AVIC-9DVD" users 23 Dipswitch settings for U.S.A 2 PIONEER AVIC-90DVD (CNDV-20) - for Canada 5 NAVTECH ...7 GDT ...10 Table of Contents...12 Important Safety Information 18 Notes Before Using the System 19 After-sales service ...
... to Use the Map...37 How to see 40 12 for AVIC-9DVD 23 About the difference in the operation of the Remote Control 23 Installing the Program ...25 Chapter 1 Basic Operation 29 Switching On and Off...29 Types of Menu...30 Main menu...30 Shortcut menu ...31 Basic ... menu 33 How to use this manual 22 Operation of DVD player 22 Terminology...23 For "AVIC-9DVD" users 23 Dipswitch settings for U.S.A 2 PIONEER AVIC-90DVD (CNDV-20) - for Canada 5 NAVTECH ...7 GDT ...10 Table of Contents...12 Important Safety Information 18 Notes Before Using the System 19 After-sales service ...
Owner's Manual
Page 16
... Checking the Navigation Status 94 Checking positioning information by satellite 94 Checking sensor learning status and driving status 95 Checking the connections of leads and installation positions 96 14
... Checking the Navigation Status 94 Checking positioning information by satellite 94 Checking sensor learning status and driving status 95 Checking the connections of leads and installation positions 96 14
Owner's Manual
Page 24
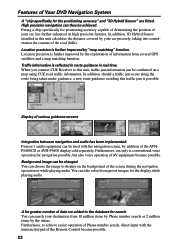
Display of the AVHP6400CD or AVH-P6400 display sold separately. Pioneer's audio equipment can be confirmed on the background of the screen during the navigation operation or while playing audio. Furthermore, to this unit, ... of information from several GPS satellites and a map matching function. Location precision is further improved by your car precisely, taking into consideration the contour of the road (hills). In addition, 3D Hybrid Sensor installed in real time. When you connect CUE Receiver to achieve easier operation of Phone number search, direct input...
Display of the AVHP6400CD or AVH-P6400 display sold separately. Pioneer's audio equipment can be confirmed on the background of the screen during the navigation operation or while playing audio. Furthermore, to this unit, ... of information from several GPS satellites and a map matching function. Location precision is further improved by your car precisely, taking into consideration the contour of the road (hills). In addition, 3D Hybrid Sensor installed in real time. When you connect CUE Receiver to achieve easier operation of Phone number search, direct input...
Owner's Manual
Page 28
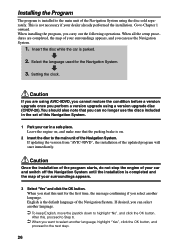
... 1. Caution Once the installation of the program starts, do not stop the engine of your car and switch off the Navigation System until the installation is completed and the map of your dealer already performed the installation. Installing the Program The program is installed to the main unit of... the Navigation System using a version upgrade disc (CNDV-20). When all the...
... 1. Caution Once the installation of the program starts, do not stop the engine of your car and switch off the Navigation System until the installation is completed and the map of your dealer already performed the installation. Installing the Program The program is installed to the main unit of... the Navigation System using a version upgrade disc (CNDV-20). When all the...

Owner's Manual
Page 29
Installation of the languages you can use appears. During the installation, the following display appears to highlight the language you chose, begins. The list of the program, in the language you want. 5 Click the OK button. Pacific Standard Time 27 4 Select the language from the list. Move the joystick up or down to show the progress. When the installation is complete, the opening display appears. 6 Check the details of the cautionary message and click the OK button. 7 Set the clock.
Installation of the languages you can use appears. During the installation, the following display appears to highlight the language you chose, begins. The list of the program, in the language you want. 5 Click the OK button. Pacific Standard Time 27 4 Select the language from the list. Move the joystick up or down to show the progress. When the installation is complete, the opening display appears. 6 Check the details of the cautionary message and click the OK button. 7 Set the clock.
Owner's Manual
Page 95
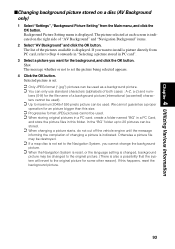
...card, create a folder named "BG" in a PC Card, and store the picture files in PC card". 3 Select a picture you want to install a picture directly from the Main menu, and click the OK button. Shot The message whether or not to Step 4 onwards in "Selecting a picture stored in... to the Navigation System, you want for the file name of a background picture (international (accented) characters cannot be used). ➲ Up to 20 pictures can only use standard characters (alphabets of both cases : A-Z, a-z) and num- The list of changing a picture is also a possibility that the ...
...card, create a folder named "BG" in a PC Card, and store the picture files in PC card". 3 Select a picture you want to install a picture directly from the Main menu, and click the OK button. Shot The message whether or not to Step 4 onwards in "Selecting a picture stored in... to the Navigation System, you want for the file name of a background picture (international (accented) characters cannot be used). ➲ Up to 20 pictures can only use standard characters (alphabets of both cases : A-Z, a-z) and num- The list of changing a picture is also a possibility that the ...
Owner's Manual
Page 98
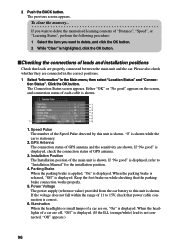
...brake on while checking that power cable connection is displayed. When the headlights of leads and installation positions Check that leads are properly connected between the main unit and the car. GPS Antenna The connection status of GPS antenna and the sensitivity are off, "Off" is... 15V, check that the parking brake connection works properly. 5. Power Voltage The power supply (reference value) provided from the car battery to "Installation Manual" for the installation position. 4. If "No good" is displayed, refer to this unit is displayed, check the connection status of each cable...
...brake on while checking that power cable connection is displayed. When the headlights of leads and installation positions Check that leads are properly connected between the main unit and the car. GPS Antenna The connection status of GPS antenna and the sensitivity are off, "Off" is... 15V, check that the parking brake connection works properly. 5. Power Voltage The power supply (reference value) provided from the car battery to "Installation Manual" for the installation position. 4. If "No good" is displayed, refer to this unit is displayed, check the connection status of each cable...
Owner's Manual
Page 99
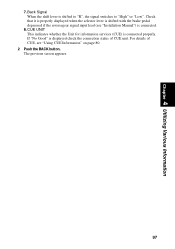
Back Signal When the shift lever is displayed check the connection status of CUE, see "Installation Manual") is connected properly. If "No Good" is shifted to "R", the signal switches to "High" or "Low". For details of CUE unit. The previous screen ...
Back Signal When the shift lever is displayed check the connection status of CUE, see "Installation Manual") is connected properly. If "No Good" is shifted to "R", the signal switches to "High" or "Low". For details of CUE unit. The previous screen ...
Owner's Manual
Page 106
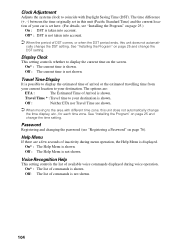
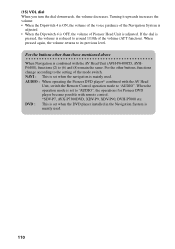
...on page 76). Off : The Help Menu is not shown. On* : The list of commands is shown. Password Registering and changing the password (see "Installing the Program" on page 25.) On : DST is shown. Off : Neither ETA nor Travel Time are : ETA : The Estimated Time of inactivity during ... is taken into account. Help Menu If there are a few seconds of Arrival is displayed. Voice Recognition Help This setting controls the list of your car is set here. (For details, see "Registering a Password" on page 25 and change the DST setting. Off* : DST is not taken into account...
...on page 76). Off : The Help Menu is not shown. On* : The list of commands is shown. Password Registering and changing the password (see "Installing the Program" on page 25.) On : DST is shown. Off : Neither ETA nor Travel Time are : ETA : The Estimated Time of inactivity during ... is taken into account. Help Menu If there are a few seconds of Arrival is displayed. Voice Recognition Help This setting controls the list of your car is set here. (For details, see "Registering a Password" on page 25 and change the DST setting. Off* : DST is not taken into account...
Owner's Manual
Page 107
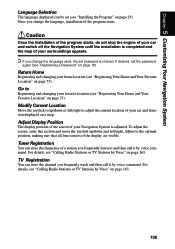
... the program starts, do not stop the engine of your car and switch off the Navigation System until the installation is completed and the map of the display are visible. Return Home Registering and changing your car and direction displayed on page 25). For details, see "Calling Radio ... If you change the language used, the set password is adjusted. Adjust to up /down or left /right. Once you change the language, installation of your favorite location (see "Registering Your Home and Your Favorite Location" on page 73). To adjust the screen, enter this section and move...
... the program starts, do not stop the engine of your car and switch off the Navigation System until the installation is completed and the map of the display are visible. Return Home Registering and changing your car and direction displayed on page 25). For details, see "Calling Radio ... If you change the language used, the set password is adjusted. Adjust to up /down or left /right. Once you change the language, installation of your favorite location (see "Registering Your Home and Your Favorite Location" on page 73). To adjust the screen, enter this section and move...
Owner's Manual
Page 110
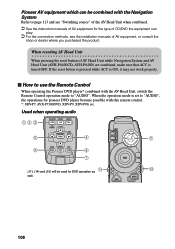
... AV Head Unit when combined. ➲ See the instruction manuals of AV equipment for the type of CD/DVD the equipment can be used for pioneer DVD player become possible with this remote control. *: SDV-P7, AVX-P7300DVD, XDV-P9, XDV-P90, etc. Used when operating audio 123 NAVI/AV N/A 5 ...operation mode to "AUDIO", the operations for DVD operation as 14 MENU well. 11 15 TOP MENU 108 Pioneer AV equipment which can play. ➲ For the connection methods, see the installation manuals of AV equipment, or consult the shop or dealer where you purchased the product. When resetting AV ...
... AV Head Unit when combined. ➲ See the instruction manuals of AV equipment for the type of CD/DVD the equipment can be used for pioneer DVD player become possible with this remote control. *: SDV-P7, AVX-P7300DVD, XDV-P9, XDV-P90, etc. Used when operating audio 123 NAVI/AV N/A 5 ...operation mode to "AUDIO", the operations for DVD operation as 14 MENU well. 11 15 TOP MENU 108 Pioneer AV equipment which can play. ➲ For the connection methods, see the installation manuals of AV equipment, or consult the shop or dealer where you purchased the product. When resetting AV ...
Owner's Manual
Page 112
... above When Navigation is set when the DVD player installed in the Navigation System is adjusted. When the operation mode is combined with the AV Head Unit, switch the Remote Control operation mode to (6) and (8) remain the same. AUDIO : When operating the Pioneer DVD player* combined with the AV Head Unit (AVH...
... above When Navigation is set when the DVD player installed in the Navigation System is adjusted. When the operation mode is combined with the AV Head Unit, switch the Remote Control operation mode to (6) and (8) remain the same. AUDIO : When operating the Pioneer DVD player* combined with the AV Head Unit (AVH...

Owner's Manual
Page 113
... AVIC-9DVD, see the "Operation manual" of AVIC-9DVD. ➲ In case of DVD player installed in AVIC-90DVD, see "Hardware manual" of Pioneer Head Unit is adjusted. Chapter 6 Combining and Using Pioneer AV Equipment 9 (9) Transmitter Signals of the Remote Control are transmitted from here. 10 12 14 MENU TOP MENU 16 18...
... AVIC-9DVD, see the "Operation manual" of AVIC-9DVD. ➲ In case of DVD player installed in AVIC-90DVD, see "Hardware manual" of Pioneer Head Unit is adjusted. Chapter 6 Combining and Using Pioneer AV Equipment 9 (9) Transmitter Signals of the Remote Control are transmitted from here. 10 12 14 MENU TOP MENU 16 18...
Owner's Manual
Page 115
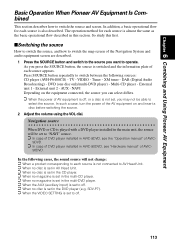
...AV equipment is off, or a disc is not set, you press the SOURCE button, the source is switched and the information plate of DVD player installed in the multi-DVD player. ➲ When the AUX (auxiliary input) is also described. As you may not be set to off . ➲...source will be able to switch the source and screen. DVD (one disc only/multi-DVD player) - Chapter 6 Combining and Using Pioneer AV Equipment Basic Operation When Pioneer AV Equipment Is Combined This section describes how to select the source. NAVI Depending on and insert a disc before switching the source....
...AV equipment is off, or a disc is not set, you press the SOURCE button, the source is switched and the information plate of DVD player installed in the multi-DVD player. ➲ When the AUX (auxiliary input) is also described. As you may not be set to off . ➲...source will be able to switch the source and screen. DVD (one disc only/multi-DVD player) - Chapter 6 Combining and Using Pioneer AV Equipment Basic Operation When Pioneer AV Equipment Is Combined This section describes how to select the source. NAVI Depending on and insert a disc before switching the source....
Owner's Manual
Page 142
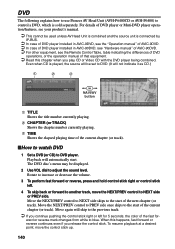
... once skips to control a DVD, which is connected by IP-BUS. ➲ In case of DVD player installed in AVIC-9DVD, see the "Operation manual" of AVIC-9DVD. ➲ In case of DVD player installed in AVIC-90DVD, see "Hardware manual" of AVIC-90DVD. ➲ For other equipment, see your product's manual... time of the current chapter (or track). ■How to watch DVD 1 Set a DVD (or CD) to blue. DVD The following explains how to use Pioneer AV Head Unit (AVH-P6400CD or AVH-P6400) to the start of the current chapter (or track).
... once skips to control a DVD, which is connected by IP-BUS. ➲ In case of DVD player installed in AVIC-9DVD, see the "Operation manual" of AVIC-9DVD. ➲ In case of DVD player installed in AVIC-90DVD, see "Hardware manual" of AVIC-90DVD. ➲ For other equipment, see your product's manual... time of the current chapter (or track). ■How to watch DVD 1 Set a DVD (or CD) to blue. DVD The following explains how to use Pioneer AV Head Unit (AVH-P6400CD or AVH-P6400) to the start of the current chapter (or track).
Owner's Manual
Page 163
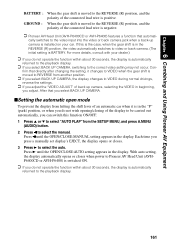
... with your car. Chapter 6 Combining and Using Pioneer AV Equipment BATTERY : GROUND : When the gear shift is moved to the correct video setting may not occur. If this function ON/OFF. 1 Press 5 or ∞ to select "AUTO FLAP" from hitting the shift lever of an automatic car when it ...drivings, reverse the settings. ➲ If you select BACK UP CAMERA, the display changes to video or back camera. (The initial setting is installed on your dealer.) ➲ If you do not operate the function within about 30 seconds, the display is automatically returned to the playback display....
... with your car. Chapter 6 Combining and Using Pioneer AV Equipment BATTERY : GROUND : When the gear shift is moved to the correct video setting may not occur. If this function ON/OFF. 1 Press 5 or ∞ to select "AUTO FLAP" from hitting the shift lever of an automatic car when it ...drivings, reverse the settings. ➲ If you select BACK UP CAMERA, the display changes to video or back camera. (The initial setting is installed on your dealer.) ➲ If you do not operate the function within about 30 seconds, the display is automatically returned to the playback display....
Owner's Manual
Page 179
...not comprehensive, it should answer your dealer or the nearest authorized Pioneer service facility. ellite" on page 94) and the position of the GPS aerial if necessary, or continue driving until reception improves. (2) Check that installed the system. (4) Connect the speed signal input (pink lead ... in an unsuitable location. • Obstacles are listed below, along with extreme angle exceeding the limitation of the installation angle. (7) Indication of the position of your car is bad. • Signals from the satellites. • The position of Defense, and the US government reserves...
...not comprehensive, it should answer your dealer or the nearest authorized Pioneer service facility. ellite" on page 94) and the position of the GPS aerial if necessary, or continue driving until reception improves. (2) Check that installed the system. (4) Connect the speed signal input (pink lead ... in an unsuitable location. • Obstacles are listed below, along with extreme angle exceeding the limitation of the installation angle. (7) Indication of the position of your car is bad. • Signals from the satellites. • The position of Defense, and the US government reserves...
Owner's Manual
Page 180
Possible causes: Installation or connection has been carried out incorrectly. Solutions: Check the volume setting on the display or turn the volume up according to "Hardware Volume" (see "Hardware Volume" on page 103) and/or turn up . The display is extremely low. Possible causes: (1) The car's light is ... of "Monitor Type" (see "Day/Night Map Display" on "Day/Night Map Display." (2) The Orange/white lead is used even when the car lights are properly inserted according to the receiver on the display unit. (5) Set the Mode switch (or the dipswitch) of the Remote Control correctly ...
Possible causes: Installation or connection has been carried out incorrectly. Solutions: Check the volume setting on the display or turn the volume up according to "Hardware Volume" (see "Hardware Volume" on page 103) and/or turn up . The display is extremely low. Possible causes: (1) The car's light is ... of "Monitor Type" (see "Day/Night Map Display" on "Day/Night Map Display." (2) The Orange/white lead is used even when the car lights are properly inserted according to the receiver on the display unit. (5) Set the Mode switch (or the dipswitch) of the Remote Control correctly ...

