Owner's Manual
Page 4
... FULL REFUND OF THE PURCHASE PRICE OF THE PIONEER PRODUCTS. 1. GRANT OF LICENSE Pioneer grants to you a non-transferable, non exclusive license to derive the source code or structure of this agreement.... License Agreement ■PIONEER AVIC-90DVD (CNDV-20) - PLEASE CAREFULLY READ THE TERMS AND CONDITIONS OF THIS AGREEMENT BEFORE USING THE SOFTWARE INSTALLED ON THE PIONEER PRODUCTS. You shall not...or on such Pioneer products. THIS IS A LEGAL AGREEMENT BETWEEN YOU, AS THE END USER, AND PIONEER ELECTRONICS (USA) INC. ("PIONEER"). THE SOFTWARE INSTALLED ON THE PIONEER PRODUCTS INCLUDES DATABASE...
... FULL REFUND OF THE PURCHASE PRICE OF THE PIONEER PRODUCTS. 1. GRANT OF LICENSE Pioneer grants to you a non-transferable, non exclusive license to derive the source code or structure of this agreement.... License Agreement ■PIONEER AVIC-90DVD (CNDV-20) - PLEASE CAREFULLY READ THE TERMS AND CONDITIONS OF THIS AGREEMENT BEFORE USING THE SOFTWARE INSTALLED ON THE PIONEER PRODUCTS. You shall not...or on such Pioneer products. THIS IS A LEGAL AGREEMENT BETWEEN YOU, AS THE END USER, AND PIONEER ELECTRONICS (USA) INC. ("PIONEER"). THE SOFTWARE INSTALLED ON THE PIONEER PRODUCTS INCLUDES DATABASE...
Owner's Manual
Page 7
...use it in or on such Pioneer products. You may contain some nonconformities, defects or errors. DISCLAIMER OF WARRANTY The Software and related documentation are provided to you a non-transferable, nonexclusive license to use the software installed on the Pioneer...use or for your license rights in the Software. You shall not use the Software to operate a service bureau or for Canada THIS IS A LEGAL AGREEMENT BETWEEN YOU, AS THE END USER, AND PIONEER ELECTRONICS OF CANADA, INC. ("PIONEER"). Pioneer.... GRANT OF LICENSE Pioneer grants to derive, the source code or structure of the...
...use it in or on such Pioneer products. You may contain some nonconformities, defects or errors. DISCLAIMER OF WARRANTY The Software and related documentation are provided to you a non-transferable, nonexclusive license to use the software installed on the Pioneer...use or for your license rights in the Software. You shall not use the Software to operate a service bureau or for Canada THIS IS A LEGAL AGREEMENT BETWEEN YOU, AS THE END USER, AND PIONEER ELECTRONICS OF CANADA, INC. ("PIONEER"). Pioneer.... GRANT OF LICENSE Pioneer grants to derive, the source code or structure of the...
Owner's Manual
Page 12
... to third parties, except together with the system for a particular purpose or non-infringement. ■GDT END USER LICENSE AGREEMENT PLEASE READ THIS AGREEMENT CAREFULLY BEFORE USING THE NAVIGATION SYSTEM THIS IS A LICENSE AGREEMENT FOR YOUR COPY OF THE MAP DATABASE ("The DATABASE"), ORIGINALLY MADE... not warrant that you a non-exclusive license to grant sub-licenses. LIMITATIONS ON USE The DATABASE is restricted for which it was created, provided that the DATABASE is or will be error free. BY USING THE DATABASE, YOU ACCEPT AND AGREE TO ALL TERMS AND CONDITIONS SET FORTH BELOW.
... to third parties, except together with the system for a particular purpose or non-infringement. ■GDT END USER LICENSE AGREEMENT PLEASE READ THIS AGREEMENT CAREFULLY BEFORE USING THE NAVIGATION SYSTEM THIS IS A LICENSE AGREEMENT FOR YOUR COPY OF THE MAP DATABASE ("The DATABASE"), ORIGINALLY MADE... not warrant that you a non-exclusive license to grant sub-licenses. LIMITATIONS ON USE The DATABASE is restricted for which it was created, provided that the DATABASE is or will be error free. BY USING THE DATABASE, YOU ACCEPT AND AGREE TO ALL TERMS AND CONDITIONS SET FORTH BELOW.
Owner's Manual
Page 14
...-sales service for Pioneer products 19 Features of Your DVD Navigation System 21 How to Read This Manual 22 How to use this manual 22 Operation of DVD player 22 Terminology...23 For "AVIC-9DVD" users 23 Dipswitch settings for U.S.A 2 PIONEER AVIC-90DVD (CNDV-20) - for AVIC-9DVD 23 About the difference in the operation of the Remote Control 23 Installing...
...-sales service for Pioneer products 19 Features of Your DVD Navigation System 21 How to Read This Manual 22 How to use this manual 22 Operation of DVD player 22 Terminology...23 For "AVIC-9DVD" users 23 Dipswitch settings for U.S.A 2 PIONEER AVIC-90DVD (CNDV-20) - for AVIC-9DVD 23 About the difference in the operation of the Remote Control 23 Installing...
Owner's Manual
Page 24
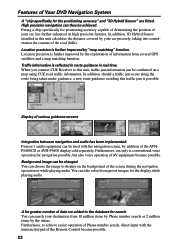
...positioning accuracy capable of determining the position of your car precisely, taking into consideration the contour of AV equipment became possible. Traffic information is conventional voice operation for the display while playing audio. When you connect CUE Receiver to display on a map using... CUE road traffic information. You can thus be changed. Furthermore, to achieve easier operation of Phone number search, direct... has been implemented. Pioneer's audio equipment can be used with the numeric keypad of the...
...positioning accuracy capable of determining the position of your car precisely, taking into consideration the contour of AV equipment became possible. Traffic information is conventional voice operation for the display while playing audio. When you connect CUE Receiver to display on a map using... CUE road traffic information. You can thus be changed. Furthermore, to achieve easier operation of Phone number search, direct... has been implemented. Pioneer's audio equipment can be used with the numeric keypad of the...
Owner's Manual
Page 78
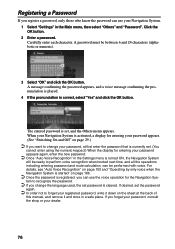
...menu, then select "Others" and "Password". If desired, set , and the Others menu appears. When your Navigation System is activated, a display for entering your password appears again, enter the new password. ➲ Once "Auto Voice Recognition" in the Settings menu is turned ON, the Navigation ...want to recognize the password. ➲ If you change your password, at the back of this manual, and remove it down on the sheet at first enter the password that is currently set password is registered, you can use the voice operation for entering your password appears. (See "...
...menu, then select "Others" and "Password". If desired, set , and the Others menu appears. When your Navigation System is activated, a display for entering your password appears again, enter the new password. ➲ Once "Auto Voice Recognition" in the Settings menu is turned ON, the Navigation ...want to recognize the password. ➲ If you change your password, at the back of this manual, and remove it down on the sheet at first enter the password that is currently set password is registered, you can use the voice operation for entering your password appears. (See "...
Owner's Manual
Page 82
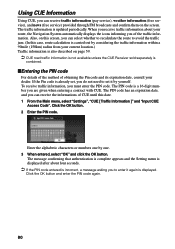
... authentication is complete appears and the Setting menu is a 16-digit number you must enter the PIN code. Enter the alphabetic characters or numbers...service), weather information (free service), and news (free service) provided through FM broadcasts and confirm them on page 59. ➲ CUE road traffic information is not available unless the CUE Receiver sold separately is combined. ■Entering the PIN code... location.) Traffic information is updated periodically. Click the OK button. 2 Enter the PIN code. Using CUE Information Using CUE, you can select whether to...
... authentication is complete appears and the Setting menu is a 16-digit number you must enter the PIN code. Enter the alphabetic characters or numbers...service), weather information (free service), and news (free service) provided through FM broadcasts and confirm them on page 59. ➲ CUE road traffic information is not available unless the CUE Receiver sold separately is combined. ■Entering the PIN code... location.) Traffic information is updated periodically. Click the OK button. 2 Enter the PIN code. Using CUE Information Using CUE, you can select whether to...
Owner's Manual
Page 98
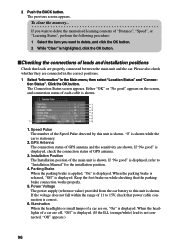
...power cable connection is shown. Illumination When the headlights or small lamps of leads and installation positions Check that leads are properly connected between the main unit and the car. Please also check whether they are on the screen, and connection status of GPS antenna. 3. Either "OK" or "No good.... 6. "0" is shown while the car is displayed. GPS Antenna The connection status of 11 to "Installation Manual" for the installation position. 4. The Connection Status screen appears. Installation Position The Installation position of "Distance", "Speed", or "...
...power cable connection is shown. Illumination When the headlights or small lamps of leads and installation positions Check that leads are properly connected between the main unit and the car. Please also check whether they are on the screen, and connection status of GPS antenna. 3. Either "OK" or "No good.... 6. "0" is shown while the car is displayed. GPS Antenna The connection status of 11 to "Installation Manual" for the installation position. 4. The Connection Status screen appears. Installation Position The Installation position of "Distance", "Speed", or "...
Owner's Manual
Page 137
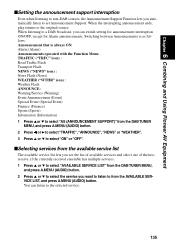
... listen to from the DAB TUNER MENU, and press A.MENU (AUDIO) button. 2 Press 5 or ∞ to set Announcement Support. Chapter 6 Combining and Using Pioneer AV Equipment ■Setting the announcement support interruption Even when listening to non-DAB sources, the Announcement Support Function lets you automatically listen to select the service you can listen to the original source.
... listen to from the DAB TUNER MENU, and press A.MENU (AUDIO) button. 2 Press 5 or ∞ to set Announcement Support. Chapter 6 Combining and Using Pioneer AV Equipment ■Setting the announcement support interruption Even when listening to non-DAB sources, the Announcement Support Function lets you automatically listen to select the service you can listen to the original source.

Owner's Manual
Page 153
... display is automati- CONTROL:INTERNAL" or "REAR SPEAKER:SUBWOOFER", you can operate a desired function. CONTROL:EXTERNAL" is set in INITIAL SETTINGS MENU. (SUB WOOFER is not displayed.) ➲ When the subwoofer controller setting is only displayed when "S.W. CONTROL:EXTERNAL", you ...WOOFER". (Refer to page 159.) ➲ When the subwoofer controller setting is only "S.W. For details, refer to the playback display, press BAND/ESC button. ➲ When the setting is REAR SPEAKER:SUBWOOFER, FADER/BALANCE indications are for each source display. Chapter 6 Combining and Using Pioneer...
... display is automati- CONTROL:INTERNAL" or "REAR SPEAKER:SUBWOOFER", you can operate a desired function. CONTROL:EXTERNAL" is set in INITIAL SETTINGS MENU. (SUB WOOFER is not displayed.) ➲ When the subwoofer controller setting is only displayed when "S.W. CONTROL:EXTERNAL", you ...WOOFER". (Refer to page 159.) ➲ When the subwoofer controller setting is only "S.W. For details, refer to the playback display, press BAND/ESC button. ➲ When the setting is REAR SPEAKER:SUBWOOFER, FADER/BALANCE indications are for each source display. Chapter 6 Combining and Using Pioneer...
Owner's Manual
Page 157
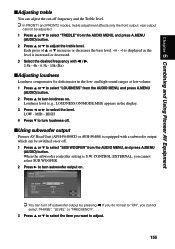
...set to "ON", you cannot select "PHASE", "LEVEL" or "FREQUENCY". 3 Press 5 or ∞ to select the item you cannot select SUB WOOFER. 2 Press 3 to turn subwoofer output on. ➲ You can be adjusted. 1 Press 5 or ∞ to select "TREBLE" from the AUDIO MENU, and press A.MENU (AUDIO) button. Chapter 6 Combining and Using Pioneer..."SUB WOOFER" from the AUDIO MENU, and press A.MENU (AUDIO) button. 2 Press 5 or ∞ to turn loudness on. Loudness level (e.g., LOUDNESS:ON/MODE:MID) appears in the low- LOW - HIGH 4 Press ∞ to turn off . ■Using subwoofer output Pioneer AV ...
...set to "ON", you cannot select "PHASE", "LEVEL" or "FREQUENCY". 3 Press 5 or ∞ to select the item you cannot select SUB WOOFER. 2 Press 3 to turn subwoofer output on. ➲ You can be adjusted. 1 Press 5 or ∞ to select "TREBLE" from the AUDIO MENU, and press A.MENU (AUDIO) button. Chapter 6 Combining and Using Pioneer..."SUB WOOFER" from the AUDIO MENU, and press A.MENU (AUDIO) button. 2 Press 5 or ∞ to turn loudness on. Loudness level (e.g., LOUDNESS:ON/MODE:MID) appears in the low- LOW - HIGH 4 Press ∞ to turn off . ■Using subwoofer output Pioneer AV ...
Owner's Manual
Page 163
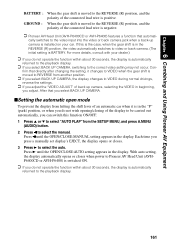
... is moved to REVERSE from the SETUP MENU, and press A.MENU (AUDIO) button. 2 Press 2 to the REVERSE (R) position, and the polarity of the connected lead wire is positive. Press 2 until the OPEN/CLOSE:AUTO setting appears in the display. Press 3 until the OPEN/CLOSE:MANUAL setting appears in the display. After that directly after changing the setting, it is in beginning, you...
... is moved to REVERSE from the SETUP MENU, and press A.MENU (AUDIO) button. 2 Press 2 to the REVERSE (R) position, and the polarity of the connected lead wire is positive. Press 2 until the OPEN/CLOSE:AUTO setting appears in the display. Press 3 until the OPEN/CLOSE:MANUAL setting appears in the display. After that directly after changing the setting, it is in beginning, you...
Owner's Manual
Page 167
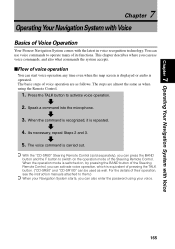
For the details of their operation, see the instruction manuals attached to operate many of Voice Operation Your Pioneer Navigation System comes with the latest in voice recognition technology. The steps are as when using your voice. 165 Speak a command into the microphone. 3. Press the TALK button to switch on , by... commands, and also what commands the system accepts. ■Flow of voice operation You can also enter the password using the Remote Control. 1. The voice command is repeated. 4. When the command is recognized, it is carried out. ➲ With the "CD-SR80...
For the details of their operation, see the instruction manuals attached to operate many of Voice Operation Your Pioneer Navigation System comes with the latest in voice recognition technology. The steps are as when using your voice. 165 Speak a command into the microphone. 3. Press the TALK button to switch on , by... commands, and also what commands the system accepts. ■Flow of voice operation You can also enter the password using the Remote Control. 1. The voice command is repeated. 4. When the command is recognized, it is carried out. ➲ With the "CD-SR80...
Owner's Manual
Page 179
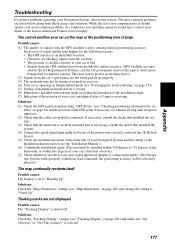
.... (2) Check that installed the system. (4) Connect the speed signal input (pink lead wire) of the power wire correctly, and reset the 3D Hybrid Sensor. (5) Check the attachment position of the main unit of your Navigation System and the setting of the Installation direction lever (see the "Installation Manual"). (6) Confirm the installation angle. (This unit must be found here, contact your car on page...
.... (2) Check that installed the system. (4) Connect the speed signal input (pink lead wire) of the power wire correctly, and reset the 3D Hybrid Sensor. (5) Check the attachment position of the main unit of your Navigation System and the setting of the Installation direction lever (see the "Installation Manual"). (6) Confirm the installation angle. (This unit must be found here, contact your car on page...
Owner's Manual
Page 181
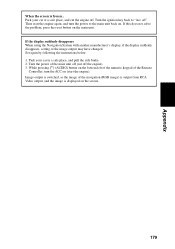
... When using the Navigation System with another manufacturer's display, if the display suddenly disappears, setting of the...power to "Acc off the engine). 3. Park your car at a safe place, and cut off ". Image output is switched, as the image of the image output may have changed. Set again by following the instructions... below. 1. Turn the ignition key back to the main unit back on. Appendix When the screen is displayed on the screen. 179 Park your car in a safe place, and pull the side brake. 2. If this does not solve the problem...
... When using the Navigation System with another manufacturer's display, if the display suddenly disappears, setting of the...power to "Acc off the engine). 3. Park your car at a safe place, and cut off ". Image output is switched, as the image of the image output may have changed. Set again by following the instructions... below. 1. Turn the ignition key back to the main unit back on. Appendix When the screen is displayed on the screen. 179 Park your car in a safe place, and pull the side brake. 2. If this does not solve the problem...
Owner's Manual
Page 182
...lead wire) of the positioning will be affected by dead reckoning" on , and then try to use this system (including the old version map disc). (2) If you may be affected by a large vibration. When: While the car is stationed, the Navigation System is installed at the place where the main unit may be displayed by your Pioneer...do : Re-install the main unit of the power cord is detected. Please turn off the system and check the connections. System will not be less accurate (see error messages other than those shown here. When: The speed signal input (pink lead wire) of the ...
...lead wire) of the positioning will be affected by dead reckoning" on , and then try to use this system (including the old version map disc). (2) If you may be affected by a large vibration. When: While the car is stationed, the Navigation System is installed at the place where the main unit may be displayed by your Pioneer...do : Re-install the main unit of the power cord is detected. Please turn off the system and check the connections. System will not be less accurate (see error messages other than those shown here. When: The speed signal input (pink lead wire) of the ...
Other Manual
Page 7
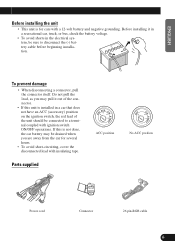
... be drained when you may be connected to disconnect the (-) battery cable before beginning installation. Parts supplied OF OF F ACC O ACC position T N STAR F O N STAR T No ACC position DEUTSCH FRANÇAIS ITALIANO NEDERLANDS Power cord Connector 26 pin-RGB cable 6 ENGLISH ESPAÑOL Before installing the unit • This unit is installed in the electrical system, be sure...
... be drained when you may be connected to disconnect the (-) battery cable before beginning installation. Parts supplied OF OF F ACC O ACC position T N STAR F O N STAR T No ACC position DEUTSCH FRANÇAIS ITALIANO NEDERLANDS Power cord Connector 26 pin-RGB cable 6 ENGLISH ESPAÑOL Before installing the unit • This unit is installed in the electrical system, be sure...
Other Manual
Page 12
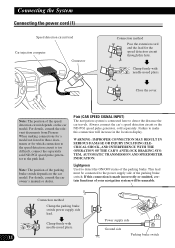
... on the car model. If this hole. Connecting the System Connecting the power cord (1) Speed detection circuit lead Car injection computer Connector Connection method Pass the extension cord and the lead for the speed detection circuit through this connection is too difficult, connect the separately sold separately. Note: The position of the parking brake switch depends on the car model. When making connections for a model not listed...
... on the car model. If this hole. Connecting the System Connecting the power cord (1) Speed detection circuit lead Car injection computer Connector Connection method Pass the extension cord and the lead for the speed detection circuit through this connection is too difficult, connect the separately sold separately. Note: The position of the parking brake switch depends on the car model. When making connections for a model not listed...
Other Manual
Page 16
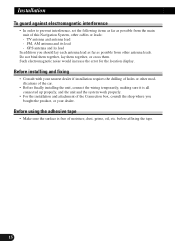
... lead In addition you bought the product, or your nearest dealer if installation requires the drilling of holes or other modifications of the car. • Before finally installing the unit, connect the wiring temporarily, making sure it is free of moisture, dust, grime, oil, etc. Do not bind them together, lay them together, or cross them. Before using...
... lead In addition you bought the product, or your nearest dealer if installation requires the drilling of holes or other modifications of the car. • Before finally installing the unit, connect the wiring temporarily, making sure it is free of moisture, dust, grime, oil, etc. Do not bind them together, lay them together, or cross them. Before using...

Other Manual
Page 23
... antenna is very powerful, and the lead may affect its performance. When installing the GPS antenna, be knocked off and scratch the car body. • Do not paint the GPS antenna, as possible. Installation notes • The antenna should be installed on the outside of the GPS antenna. • Take care not to use an extension to...
... antenna is very powerful, and the lead may affect its performance. When installing the GPS antenna, be knocked off and scratch the car body. • Do not paint the GPS antenna, as possible. Installation notes • The antenna should be installed on the outside of the GPS antenna. • Take care not to use an extension to...


