Owner's Manual
Page 6
...Connecting a USB device 75 Introduction 75 About network playback 75 Windows Media Connect 75 Windows Media DRM 75 DLNA 75 Content playable over a network 76 About playback behavior over a network 76 Authorizing this receiver 76 Playback with Home Media Gallery 76 Playing...The Other Setup menu 94 Multi Channel Input Setup 94 ZONE Audio Setup 95 SR+ Setup for Pioneer flat panel TVs 95 Flicker Reduction Setup 95 13 Using other functions Setting the Audio options 96 ...the HDMI output 100 Checking your system settings 100 Resetting the system 100 Default system settings 101 6 En
...Connecting a USB device 75 Introduction 75 About network playback 75 Windows Media Connect 75 Windows Media DRM 75 DLNA 75 Content playable over a network 76 About playback behavior over a network 76 Authorizing this receiver 76 Playback with Home Media Gallery 76 Playing...The Other Setup menu 94 Multi Channel Input Setup 94 ZONE Audio Setup 95 SR+ Setup for Pioneer flat panel TVs 95 Flicker Reduction Setup 95 13 Using other functions Setting the Audio options 96 ...the HDMI output 100 Checking your system settings 100 Resetting the system 100 Default system settings 101 6 En
Owner's Manual
Page 7
...124 Windows Media Audio 9 Professional 124 About THX 125 About Neural - 14 Controlling the rest of the remote control button settings 103 Resetting the remote control presets 104 Confirming preset codes 104 Renaming input source names 104 Direct function 104 Multi Operation and System Off 105 ... sequence 105 Using multi operations 106 Using System off 106 Controls for TVs 106 Controls for other components 107 Operating other Pioneer components with different input signal formats. . . . 133 Specifications 134 Cleaning the unit 135 Our philosophy 135 Features 135 7 En
...124 Windows Media Audio 9 Professional 124 About THX 125 About Neural - 14 Controlling the rest of the remote control button settings 103 Resetting the remote control presets 104 Confirming preset codes 104 Renaming input source names 104 Direct function 104 Multi Operation and System Off 105 ... sequence 105 Using multi operations 106 Using System off 106 Controls for TVs 106 Controls for other components 107 Operating other Pioneer components with different input signal formats. . . . 133 Specifications 134 Cleaning the unit 135 Our philosophy 135 Features 135 7 En
Owner's Manual
Page 33
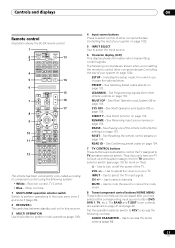
...input source button (DVD, DVR 1, TV, etc.). See Resetting the remote control presets on page 102. READ ID - Thus if you 're setting the remote to the TV operation selector switch (see page 102 for this receiver. 3 MULTI OPERATION Use this button to perform multi operations... on your system on page 104. VOL +/- - RENAME - RESET - See Direct function on page 102): SETUP - Use to TV operation selector switch. Controls and displays 04 Remote control Illustration shows the SC-07 remote control. 1 RECEIVER MAIN SOURCE 2 ZONE2 3 3 MULTI OPERATION DVD BD DVR1 DVR2...
...input source button (DVD, DVR 1, TV, etc.). See Resetting the remote control presets on page 102. READ ID - Thus if you 're setting the remote to the TV operation selector switch (see page 102 for this receiver. 3 MULTI OPERATION Use this button to perform multi operations... on your system on page 104. VOL +/- - RENAME - RESET - See Direct function on page 102): SETUP - Use to TV operation selector switch. Controls and displays 04 Remote control Illustration shows the SC-07 remote control. 1 RECEIVER MAIN SOURCE 2 ZONE2 3 3 MULTI OPERATION DVD BD DVR1 DVR2...
Owner's Manual
Page 63
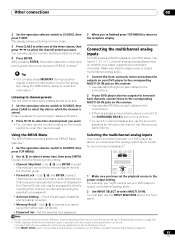
...MULTI CH IN inputs, it to the reception display. Channels put under parental lock. Set the parental lock password. Note 1 You can reset the Channel presets, Memory, Channel Skip/Add, Parental Lock and Password settings in which the channel is set , use the number buttons to... You can also use a 5.1-channel speaker set to output multichannel analog audio. 1 Connect the front, surround, center and subwoofer outputs on this receiver. • Use standard RCA/phono jack cables for the surround channel, not the surround back channel. For example, you want . The display ...
...MULTI CH IN inputs, it to the reception display. Channels put under parental lock. Set the parental lock password. Note 1 You can reset the Channel presets, Memory, Channel Skip/Add, Parental Lock and Password settings in which the channel is set , use the number buttons to... You can also use a 5.1-channel speaker set to output multichannel analog audio. 1 Connect the front, surround, center and subwoofer outputs on this receiver. • Use standard RCA/phono jack cables for the surround channel, not the surround back channel. For example, you want . The display ...

Owner's Manual
Page 81
... to the same stations, re-register after resetting. 4 Access the special Pioneer Internet radio site from the special Pioneer site With the receiver, broadcast stations not included on the special Pioneer Internet radio site, the registered ID and password are received. After registering on the list of the special Pioneer Internet radio site is displayed. The access...
... to the same stations, re-register after resetting. 4 Access the special Pioneer Internet radio site from the special Pioneer site With the receiver, broadcast stations not included on the special Pioneer Internet radio site, the registered ID and password are received. After registering on the list of the special Pioneer Internet radio site is displayed. The access...
Owner's Manual
Page 100
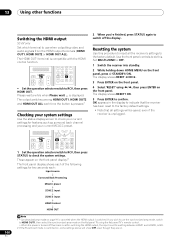
...MENU 1 Set the operation selector switch to RCV, then press STATUS to RCV, then press HDMI OUT. 13 Using other functions Switching the HDMI output SC-07 only Set which terminal to use the synchronized amp mode, switch to HDMI OUT1, then select the synchronized amp mode on the flat panel... HDMI output, the input is set to the factory default. OK appears in the display to indicate that the receiver has been reset to the factory default settings. • Note that all the receiver's settings to a setting between HDMI1 and HDMI3, or BD. 2 If the Pure Direct mode is switched on the ...
...MENU 1 Set the operation selector switch to RCV, then press STATUS to RCV, then press HDMI OUT. 13 Using other functions Switching the HDMI output SC-07 only Set which terminal to use the synchronized amp mode, switch to HDMI OUT1, then select the synchronized amp mode on the flat panel... HDMI output, the input is set to the factory default. OK appears in the display to indicate that the receiver has been reset to the factory default settings. • Note that all the receiver's settings to a setting between HDMI1 and HDMI3, or BD. 2 If the Pure Direct mode is switched on the ...

Owner's Manual
Page 104
... shows OK to confirm the setting. 104 En Note 1 When Selecting preset codes directly on the remote prompts you select (using your receiver to your VCR while you for the button of DVR 1 to its original (default) name, select NAME RST above. 5 Edit ...[space] Direct function • Default setting: ON You can operate the remote control without affecting the receiver. 1 While pressing MULTI OPERATION, press HOME MENU. This function is convenient when you want to reset some but not all preset remote control preset codes and programmed buttons.1 1 While pressing MULTI OPERATION, ...
... shows OK to confirm the setting. 104 En Note 1 When Selecting preset codes directly on the remote prompts you select (using your receiver to your VCR while you for the button of DVR 1 to its original (default) name, select NAME RST above. 5 Edit ...[space] Direct function • Default setting: ON You can operate the remote control without affecting the receiver. 1 While pressing MULTI OPERATION, press HOME MENU. This function is convenient when you want to reset some but not all preset remote control preset codes and programmed buttons.1 1 While pressing MULTI OPERATION, ...


