Owner's Manual
Page 1
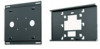
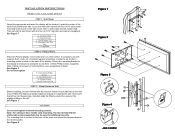
... Figure 4 INSTALLATION INSTRUCTIONS PWM-6111 FLAT PLASMA MOUNT STEP 1 - Drill ¼" pilot holes into the marked wall. The mounting hole is located in the back of the display. See Figure 1 A- See Figure 2 Do not over tighten the 8mm mounting screws. Carefully slide the Plasma down on Wall Before installing, become familiar with the four (4) 5/16" lag bolts and washers (supplied). Wall Mount Select the appropriate wall were the display will be used for...
... Figure 4 INSTALLATION INSTRUCTIONS PWM-6111 FLAT PLASMA MOUNT STEP 1 - Drill ¼" pilot holes into the marked wall. The mounting hole is located in the back of the display. See Figure 1 A- See Figure 2 Do not over tighten the 8mm mounting screws. Carefully slide the Plasma down on Wall Before installing, become familiar with the four (4) 5/16" lag bolts and washers (supplied). Wall Mount Select the appropriate wall were the display will be used for...
Owner's Manual
Page 2
For further information or ordering assistance contact us at least five (5) times the plasma displays. If not, the ceiling must be adhered to do so could result in the installation instructions must be reinforced. Proper installation procedure by qualified personnel as outlined in serious personal injury. Failure to . For Service and Parts Contact The wall should be capable of supporting a weight of at the address shown on the front of this page.
For further information or ordering assistance contact us at least five (5) times the plasma displays. If not, the ceiling must be adhered to do so could result in the installation instructions must be reinforced. Proper installation procedure by qualified personnel as outlined in serious personal injury. Failure to . For Service and Parts Contact The wall should be capable of supporting a weight of at the address shown on the front of this page.


