Pioneer PWM-T210 Support and Manuals
Get Help and Manuals for this Pioneer item

View All Support Options Below
Free Pioneer PWM-T210 manuals!
Problems with Pioneer PWM-T210?
Ask a Question
Free Pioneer PWM-T210 manuals!
Problems with Pioneer PWM-T210?
Ask a Question
Popular Pioneer PWM-T210 Manual Pages
Owner's Manual - Page 1
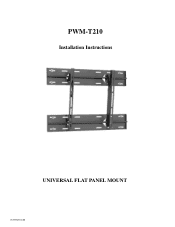
PWM-T210
Installation Instructions
UNIVERSAL FLAT PANEL MOUNT
IN-PWMT210.R0
Owner's Manual - Page 2
PWM-T210
TABLE OF CONTENTS
Warning Statements
3
Parts List
4
Installation Tools
4
Locating the Center of the Display
5
Mounting Bracket Positioning
5
Securing the Mounting Brackets
6
Marking the Wall
7
Marking the Bottom Mounting Points
7
Securing the Lower Wall Plate
8
Securing the Upper Wall Plate
8
Mounting the Display
9
Securing the Display
10
Technical Specifications...
Owner's Manual - Page 3
....
Keep these installation instructions in the plasma display falling causing damage to the plasma display and personal injury.
PWM-T210
Safety Precautions This wall mount should be installed by qualified personnel having sufficient skill and competence to install it is not, the wall must be reinforced before beginning installation. Failure to the wall mount.
Objects on...
Owner's Manual - Page 4
...installation. PWM-T210
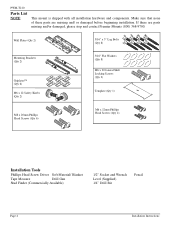
Parts List
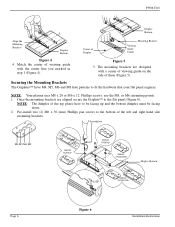
NOTE:
This mount is shipped with all installation hardware and components. Wall Plates (Qty 2)
5/16" x 3" Lag Bolts (Qty 8)
Mounting...Installation Tools
Phillips Head Screw Driver Soft Material/ Blanket
Tape Measure
Drill Gun
Stud Finder (Commercially Available)
1/2" Socket and Wrench Level (Supplied) 1/4" Drill Bit
Pencil
Page 4
Installation Instructions...
Owner's Manual - Page 5
... ON THE FLOOR WITHOUT ANY PROTECTION TO THE GLASS. Installation Instructions
Page 5 Mounting Bracket Positioning
Marking the Center of the Display
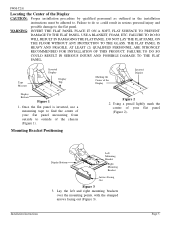
CAUTION: Proper installation procedure by qualified personnel as outlined in serious personal injury and possible damage to . THE FLAT PANEL IS HEAVY AND FRAGILE. PWM-T210
Locating the Center of the Display
Inverted Display
CL...
Owner's Manual - Page 6
...
Display Bottom
DIMPLES FACING DOWN
Page 6
Figure 6
Installation Instructions The mounting brackets are aligned secure the Griplate™ to fit the hardware that your flat panel requires. PWM-T210
Display
CL
Bottom
Align the Mounting Brackets
Display Bottom
Center of the left and right hand side mounting brackets.
Once the mounting brackets are designed with the center line...
Owner's Manual - Page 7
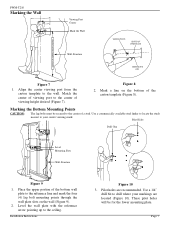
... the carton template to the ceiling. Mark a line on the wall (Figure 9).
2. Pilot Holes
Drill Gun
16" Wall Plate Level Mounting Slots
Wall Structure
Figure 9
1. Use a 1/4"
drill bit to the center of viewing height desired (Figure 7). PWM-T210
Marking the Wall
Viewing Port Center Mark the Wall
Wall Structure
CENTER OF VIEWING HEIGHT DESIRED
VIEWING PORTS
CENTER OF VIEWING...
Owner's Manual - Page 8

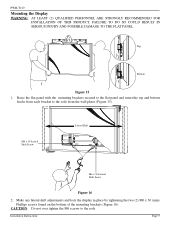
... facing up to the wall. 4.
NOTE: CHECK THE MOUNT FOR PROPER TIGHTNESS AND SECURITY. Installation Instructions Secure the plate using the provided lag
bolts (Figure 14).
Lay the top wall plate on top of the
cardboard template and mark the four (4) mounting points (Figure 12). Securing the Lower Wall Plate
Level
Wall Plate
Wall Plate
PWM-T210 Marked Wall
Template
Figure 11...
Owner's Manual - Page 9
...Figure 16
2. PWM-T210
Mounting the Display
WARNING: AT LEAST (2) QUALIFIED PERSONNEL ARE STRONGLY RECOMMENDED FOR INSTALLATION OF THIS PRODUCT. Installation Instructions
Page 9
Raise the flat panel with the mounting brackets secured to... on the bottom of the mounting brackets (Figure 16).
CAUTION: Do not over tighten the M6 screws to the rods from the wall plates (Figure 15).
FAILURE ...
Owner's Manual - Page 10
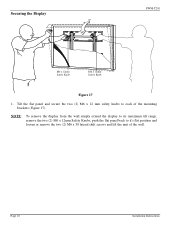
... mounting brackets (Figure 17).
NOTE: To remove the display from the wall simply extend the display to its maximum tilt range, remove the two (2) M6 x 12mm Safety Knobs, push the flat panel back to each of the wall. Securing the Display
PWM-T210
M6 x 12mm Safety Knob
M6 x 12mm Safety Knob
Figure 17
1. Page 10
Installation Instructions...
Owner's Manual - Page 11
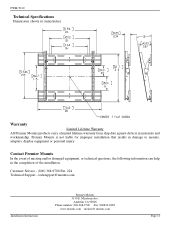
... E. Miraloma Ave. Customer Service - (800) 368-9700 Ext. 224 Technical Support - Warranty
Limited Lifetime Warranty All Premier Mounts products carry a limited lifetime warranty from ship date against defects in damage to mounts, adapters, display equipment or personal injury.
Contact Premier Mounts
In the event of the installation.
PWM-T210
Technical Specifications
Dimensions shown in the...
Pioneer PWM-T210 Reviews
We have not received any reviews for Pioneer yet.