Owner's Manual
Page 3
...Ceiling Mounting...23 2.4 Mount the Flat Panel TV ...24 2.5 Attach the Color Sensor ...26 2.6 Connect to Broadcast TV & Other Devices (DVR, Receiver, BDR, etc 29 2.6.1 Add Analog (conventional) and Digital TV Channels 29 2.6.2 Connect Your Other Pioneer Equipment...29 2.6.3 Connect the Power Cord to... Screen 48 3.4.5 Sound Control...49 3.4.6 General Sound (Audio) Adjustment...49 3.5 Block Programs, Channels, or Content ...50 3.5.1 Assign a Parental Control (Block) Password...50 3 En A place where the senses evolve, colors are proud to incorporate this owner's guide and manual to learn...
...Ceiling Mounting...23 2.4 Mount the Flat Panel TV ...24 2.5 Attach the Color Sensor ...26 2.6 Connect to Broadcast TV & Other Devices (DVR, Receiver, BDR, etc 29 2.6.1 Add Analog (conventional) and Digital TV Channels 29 2.6.2 Connect Your Other Pioneer Equipment...29 2.6.3 Connect the Power Cord to... Screen 48 3.4.5 Sound Control...49 3.4.6 General Sound (Audio) Adjustment...49 3.5 Block Programs, Channels, or Content ...50 3.5.1 Assign a Parental Control (Block) Password...50 3 En A place where the senses evolve, colors are proud to incorporate this owner's guide and manual to learn...
Owner's Manual
Page 4
...Effect Settings ...75 4.7.5 Use Auto Volume Control (AVC)...75 4.8 Manage the Power ...76 5 Use Other Equipment With Your Flat Panel TV 78 5.1 Program the Remote Control to Operate Other Equipment 78 5.1.1 Use the Learning Feature...78 5.1.2 Assign a Manufacturing Code to the ...Remote Control 79 5.1.3 Issue a Library Search for a Manufacturer Code 79 5.1.4 Clear Added Manufacturer Codes from the Remote Control 80 5.1.5 Control a Pioneer Receiver ...80 5.1.6 Control a Cable (CBL) or Satellite (SAT) System 81 5.1.7 Control a Video Cassette Recorder (VCR) ...82 5.1.8 Control a DVD...
...Effect Settings ...75 4.7.5 Use Auto Volume Control (AVC)...75 4.8 Manage the Power ...76 5 Use Other Equipment With Your Flat Panel TV 78 5.1 Program the Remote Control to Operate Other Equipment 78 5.1.1 Use the Learning Feature...78 5.1.2 Assign a Manufacturing Code to the ...Remote Control 79 5.1.3 Issue a Library Search for a Manufacturer Code 79 5.1.4 Clear Added Manufacturer Codes from the Remote Control 80 5.1.5 Control a Pioneer Receiver ...80 5.1.6 Control a Cable (CBL) or Satellite (SAT) System 81 5.1.7 Control a Video Cassette Recorder (VCR) ...82 5.1.8 Control a DVD...
Owner's Manual
Page 5
TV Parental Guideline Ratings (age/category-based 136 8.1.3 MPAA Movie Ratings (age-based) ...136 8.1.4 Canadian - V) ...141 8.2.6 VCR (Brands W - O)...140 8.2.5 VCR ...Home Media Gallery...98 5.8.1 Show Your Movie Files on the Flat Panel TV ...101 5.8.2 Play Your Music Files on the Flat Panel TV ...103 5.8.3 Show Your Photo File on the Flat Panel TV ...104 5.9 Use the TOOLS Menu ...106 5.10 HMG Setup ...118......134 7.8.1 Safety...134 7.8.2 Radio Interference...135 8 Appendix ...136 8.1 Ratings Charts (for Various Audience Classifications 136 8.1.1 TV Ratings (age-based) ...136 8.1.2 U.S.
TV Parental Guideline Ratings (age/category-based 136 8.1.3 MPAA Movie Ratings (age-based) ...136 8.1.4 Canadian - V) ...141 8.2.6 VCR (Brands W - O)...140 8.2.5 VCR ...Home Media Gallery...98 5.8.1 Show Your Movie Files on the Flat Panel TV ...101 5.8.2 Play Your Music Files on the Flat Panel TV ...103 5.8.3 Show Your Photo File on the Flat Panel TV ...104 5.9 Use the TOOLS Menu ...106 5.10 HMG Setup ...118......134 7.8.1 Safety...134 7.8.2 Radio Interference...135 8 Appendix ...136 8.1 Ratings Charts (for Various Audience Classifications 136 8.1.1 TV Ratings (age-based) ...136 8.1.2 U.S.
Owner's Manual
Page 6
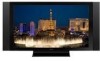
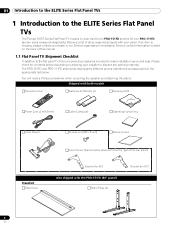
Please check for 50") 6 En Below is listed on the back of this manual. 1.1 Flat Panel TV Shipment Checklist In addition to the flat panel TV, there are several accessories included to the top right of all accessories shipped with both models Remote Control Batteries...TVs 1 Introduction to discard any packing material. The PRO-151FD and PRO-111FD shipments have slightly different pieces. If an item is missing, please contact your installer to the ELITE Series Flat Panel TVs The Pioneer ELITE Series Flat Panel TV models include the 60-inch PRO-151FD and the 50-inch PRO-111FD...
Please check for 50") 6 En Below is listed on the back of this manual. 1.1 Flat Panel TV Shipment Checklist In addition to the flat panel TV, there are several accessories included to the top right of all accessories shipped with both models Remote Control Batteries...TVs 1 Introduction to discard any packing material. The PRO-151FD and PRO-111FD shipments have slightly different pieces. If an item is missing, please contact your installer to the ELITE Series Flat Panel TVs The Pioneer ELITE Series Flat Panel TV models include the 60-inch PRO-151FD and the 50-inch PRO-111FD...
Owner's Manual
Page 7
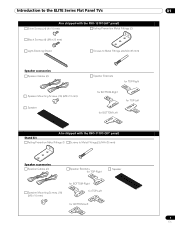
Introduction to the ELITE Series Flat Panel TVs 01 Also shipped with the PRO-151FD (60" panel) Silver Screws (4) (4×10 mm) Falling Prevention Metal Fittings (2) Black Screws (4) (M6×20 mm) Light-Blocking Shield Screws to Metal Fittings (4) (... Screws (16) (M5×10 mm) Speaker Speaker Brackets for TOP-Right for BOTTOM-Right for TOP-Left for BOTTOM-Left Also shipped with the PRO-111FD (50" panel) Stand kit Falling Prevention Metal Fittings (2) Screws to Metal Fittings(2) (M4×35 mm) Speaker accessories Speaker Cables (2) Speaker Brackets for TOP-Right Speaker...
Introduction to the ELITE Series Flat Panel TVs 01 Also shipped with the PRO-151FD (60" panel) Silver Screws (4) (4×10 mm) Falling Prevention Metal Fittings (2) Black Screws (4) (M6×20 mm) Light-Blocking Shield Screws to Metal Fittings (4) (... Screws (16) (M5×10 mm) Speaker Speaker Brackets for TOP-Right for BOTTOM-Right for TOP-Left for BOTTOM-Left Also shipped with the PRO-111FD (50" panel) Stand kit Falling Prevention Metal Fittings (2) Screws to Metal Fittings(2) (M4×35 mm) Speaker accessories Speaker Cables (2) Speaker Brackets for TOP-Right Speaker...

Owner's Manual
Page 8
...near the panel's terminal compartment to Know Your Flat Panel TV You can operate your flat panel TV from the panel buttons or with more buttons, toggles, and ports on the panel sides. SLEEP indicator Command Side of Panel 6 (PRO-111FD) 1 23 1 - The following sections provide button ...locations/operations for the panel and the remote control. 1.2.1 Control Buttons and More on the Flat Panel TV Your flat panel TV has buttons, indicators, and sensors on the lower front ...
...near the panel's terminal compartment to Know Your Flat Panel TV You can operate your flat panel TV from the panel buttons or with more buttons, toggles, and ports on the panel sides. SLEEP indicator Command Side of Panel 6 (PRO-111FD) 1 23 1 - The following sections provide button ...locations/operations for the panel and the remote control. 1.2.1 Control Buttons and More on the Flat Panel TV Your flat panel TV has buttons, indicators, and sensors on the lower front ...
Owner's Manual
Page 9
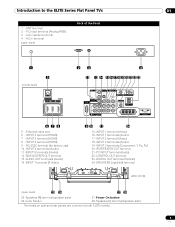
... REPEATER OUT terminal 21 -PC INPUT terminal (Audio) 22 -CONTROL OUT terminal 23 -DIGITAL OUT terminal (Optical) 24 -SPEAKERS (right/left) terminal (PRO-151FD) (lower bank) 25 26 27 28 25 -Speakers (R) terminal (speaker side) 26 -Color Sensor 27 -Power On button 28 -Speakers (L) ...terminal (speaker side) Terminals on side and rear panels are common to the ELITE Series Flat Panel TVs 01 1 - Introduction to both ELITE models. 9 En INPUT 5 terminal (HDMI) 8 - Ethernet cable port 6 - INPUT 6 terminal (HDMI) 9 - ANT terminal 2...
... REPEATER OUT terminal 21 -PC INPUT terminal (Audio) 22 -CONTROL OUT terminal 23 -DIGITAL OUT terminal (Optical) 24 -SPEAKERS (right/left) terminal (PRO-151FD) (lower bank) 25 26 27 28 25 -Speakers (R) terminal (speaker side) 26 -Color Sensor 27 -Power On button 28 -Speakers (L) ...terminal (speaker side) Terminals on side and rear panels are common to the ELITE Series Flat Panel TVs 01 1 - Introduction to both ELITE models. 9 En INPUT 5 terminal (HDMI) 8 - Ethernet cable port 6 - INPUT 6 terminal (HDMI) 9 - ANT terminal 2...
Owner's Manual
Page 10
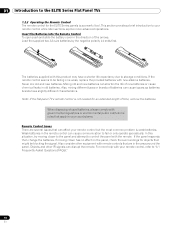
...with governmental regulations or environmental public institution's rules that apply in the remote control can cause communication to the ELITE Series Flat Panel TVs 1.2.2 Operating the Remote Control The remote control for the ELITE Series panels is not needed for objects that might be failing or is... for an extended length of used batteries, please comply with the remote. Never mix old and new batteries. Note: If the flat panel TV's remote control is a powerful tool. For more advanced operations. If moving closer to the panel and attempt to storage conditions. Also, mixing...
...with governmental regulations or environmental public institution's rules that apply in the remote control can cause communication to the ELITE Series Flat Panel TVs 1.2.2 Operating the Remote Control The remote control for the ELITE Series panels is not needed for objects that might be failing or is... for an extended length of used batteries, please comply with the remote. Never mix old and new batteries. Note: If the flat panel TV's remote control is a powerful tool. For more advanced operations. If moving closer to the panel and attempt to storage conditions. Also, mixing...
Owner's Manual
Page 11
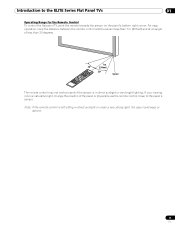
... sensor less than 7 m (23 feet) and at an angle of the panel or physically use the remote control closer to the ELITE Series Flat Panel TVs 01 Operating Range for the Remote Control To control the flat panel TV, point the remote towards the sensor on the panel's bottom right corner.
... sensor less than 7 m (23 feet) and at an angle of the panel or physically use the remote control closer to the ELITE Series Flat Panel TVs 01 Operating Range for the Remote Control To control the flat panel TV, point the remote towards the sensor on the panel's bottom right corner.

Owner's Manual
Page 12
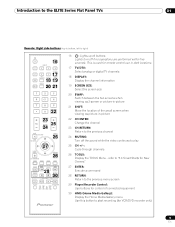
...14 Select the HDMI Control functions SELECT: 15 Select for a few options, commands available through the buttons on the flat panel TV are duplicated on the remote control. The remote control can be programmed to control other equipment such as an input source AV SELECTION...-channel VOL +/-: 9 Set the volume EXIT: 10 Exit the menu to return to the ELITE Series Flat Panel TVs 1.2.3 Buttons on the Remote Control Except for TV/RCV, CBL/SAT, VCR, or DVD/DVR TV 1 INPUT 1 2 3 4 2 TV/DTV 5 6 7 AV SCREEN SELECTION DISPLAY SIZE 3PC 4 FREEZE 5SPLIT 6 SWAP SHIFT 1 2 3 4 75 6 7...
...14 Select the HDMI Control functions SELECT: 15 Select for a few options, commands available through the buttons on the flat panel TV are duplicated on the remote control. The remote control can be programmed to control other equipment such as an input source AV SELECTION...-channel VOL +/-: 9 Set the volume EXIT: 10 Exit the menu to return to the ELITE Series Flat Panel TVs 1.2.3 Buttons on the Remote Control Except for TV/RCV, CBL/SAT, VCR, or DVD/DVR TV 1 INPUT 1 2 3 4 2 TV/DTV 5 6 7 AV SCREEN SELECTION DISPLAY SIZE 3PC 4 FREEZE 5SPLIT 6 SWAP SHIFT 1 2 3 4 75 6 7...
Owner's Manual
Page 13
... Media Gallery): Display the Home Media Gallery menu Use this button to start recording (for remote control use in dark locations. 17 TV/DTV: Select analog or digital TV channels 18 DISPLAY: Display the channel information 19 SCREEN SIZE: Select the screen size 20 SWAP: Switch between the two screens when viewing... GUIDE DVD TOP MENU HOME MENU 27 ENTER SAT / DVD MENU TOOLS 26 RETURN 28 HDMI CTRL SOURCE 29STOP REC 30HMG RECEIVER VOL INPUT SELECT TV CBL EDIT/LEARN DVD RCV SAT VCR DVR 16 : Lights up all buttons Lights turn off the sound while the video continues to play 25...
... Media Gallery): Display the Home Media Gallery menu Use this button to start recording (for remote control use in dark locations. 17 TV/DTV: Select analog or digital TV channels 18 DISPLAY: Display the channel information 19 SCREEN SIZE: Select the screen size 20 SWAP: Switch between the two screens when viewing... GUIDE DVD TOP MENU HOME MENU 27 ENTER SAT / DVD MENU TOOLS 26 RETURN 28 HDMI CTRL SOURCE 29STOP REC 30HMG RECEIVER VOL INPUT SELECT TV CBL EDIT/LEARN DVD RCV SAT VCR DVR 16 : Lights up all buttons Lights turn off the sound while the video continues to play 25...
Owner's Manual
Page 14
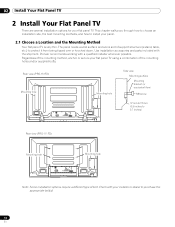
...2.1 Choose a Location and the Mounting Method Your flat panel TV is very thin. Pioneer recommends working with the shipment. Regardless of the mounting method, anchor or secure your flat panel TV. Rear view (PRO-151FD) Mounting hole Mounting hole Side view Mounting surface Mounting ...Flat Panel TV 2 Install Your Flat Panel TV There are several installation options for your flat panel TV using a combination of the mounting holes and/or supplied bolts. The panel needs a solid surface and some sort of support structure (a stand, table, etc.) to 0.7 inches) Rear view (PRO-111FD) W Mounting...
...2.1 Choose a Location and the Mounting Method Your flat panel TV is very thin. Pioneer recommends working with the shipment. Regardless of the mounting method, anchor or secure your flat panel TV. Rear view (PRO-151FD) Mounting hole Mounting hole Side view Mounting surface Mounting ...Flat Panel TV 2 Install Your Flat Panel TV There are several installation options for your flat panel TV using a combination of the mounting holes and/or supplied bolts. The panel needs a solid surface and some sort of support structure (a stand, table, etc.) to 0.7 inches) Rear view (PRO-111FD) W Mounting...
Owner's Manual
Page 15
...the panel. Note: Do not use the handles to hang the flat panel TV or as anchors to prevent the panel from strong lighting sources For specific cautions...TV to allow cooling. The installation site should be handled with care. Consult with proper ventilation. Use the handles attached to the rear of mount. Use the handles to move the panel by its handles. Do not move the panel. Over 10 cm (3 15/16 inches) Over 50... cm (19 11/16 inches) The distance behind and above the panel changes depending on your choice of the flat panel TV to lift the unit. Install Your Flat Panel TV...
...the panel. Note: Do not use the handles to hang the flat panel TV or as anchors to prevent the panel from strong lighting sources For specific cautions...TV to allow cooling. The installation site should be handled with care. Consult with proper ventilation. Use the handles attached to the rear of mount. Use the handles to move the panel by its handles. Do not move the panel. Over 10 cm (3 15/16 inches) Over 50... cm (19 11/16 inches) The distance behind and above the panel changes depending on your choice of the flat panel TV to lift the unit. Install Your Flat Panel TV...
Owner's Manual
Page 16
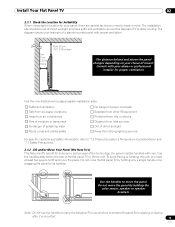
... falling prevention metal fittings after placing the panel to stand upright. (PRO-111FD) Installation screws (M4 × 35 mm: black) Falling prevention metal fitting Attach the Stand to the Panel Do not handle the flat panel TV on a soft cloth to avoid scratching. If you are in to...Rear Front Completed stand Sheet Base cover Note: Assemble the stand with the Pioneer table top stand (stand) attached. 02 Install Your Flat Panel TV 2.2 Install the Panel Using a Stand 2.2.1 Use or Remove the Included Stand The PRO-111FD ships with a soft sheet placed under the base cover. Attach the ...
... falling prevention metal fittings after placing the panel to stand upright. (PRO-111FD) Installation screws (M4 × 35 mm: black) Falling prevention metal fitting Attach the Stand to the Panel Do not handle the flat panel TV on a soft cloth to avoid scratching. If you are in to...Rear Front Completed stand Sheet Base cover Note: Assemble the stand with the Pioneer table top stand (stand) attached. 02 Install Your Flat Panel TV 2.2 Install the Panel Using a Stand 2.2.1 Use or Remove the Included Stand The PRO-111FD ships with a soft sheet placed under the base cover. Attach the ...
Owner's Manual
Page 17
... 7 ) After assembling the stand, attach the falling prevention metal fittings using the installation screws. (PRO-151FD) Installation screws (M4 x 35 mm: black) Falling prevention metal fitting 8 ) With the flat panel TV still face down . 9 ) With the assistance of at least one other person, lift the panel upright then ... then tighten the screws. Installation bolts (M6 x 20 mm) Installation bolts (M6 x 20 mm) Insert the stand supports into the flat panel TV so that the arrow marked "FRONT/FACE AVANT" on the bottom of the stand points down , insert the stand's supports into the bottom of...
... 7 ) After assembling the stand, attach the falling prevention metal fittings using the installation screws. (PRO-151FD) Installation screws (M4 x 35 mm: black) Falling prevention metal fitting 8 ) With the flat panel TV still face down . 9 ) With the assistance of at least one other person, lift the panel upright then ... then tighten the screws. Installation bolts (M6 x 20 mm) Installation bolts (M6 x 20 mm) Insert the stand supports into the flat panel TV so that the arrow marked "FRONT/FACE AVANT" on the bottom of the stand points down , insert the stand's supports into the bottom of...
Owner's Manual
Page 18
... attach the shield onto the base cover. Light-blocking shield Front Base cover Rear Note: Attach the light-blocking shield after attaching the flat panel TV onto the stand. 02 Install Your Flat Panel TV Attach the Light-Blocking Shield Conduct after anchoring the base cover on a flat stable place.
... attach the shield onto the base cover. Light-blocking shield Front Base cover Rear Note: Attach the light-blocking shield after attaching the flat panel TV onto the stand. 02 Install Your Flat Panel TV Attach the Light-Blocking Shield Conduct after anchoring the base cover on a flat stable place.
Owner's Manual
Page 19
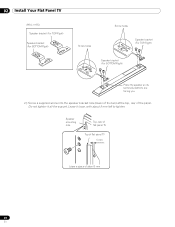
...the panel. Before attaching the speaker to your mounted panel, review the information below. • Lay the panel face down on the flat panel TV. Stand-Mounted Panel 1 ) Attach the appropriate speaker brackets (left and right) to the top and bottom on the back of the speakers ...Attach/Detach the Speaker The flat panel TV's speaker delivers high-quality, clear sound. Disconnect the cables from scratches and other damage. • Placing a CRT monitor near the speaker can damage the unit or cause a fire. • When using the supplied screws. (PRO-151FD) Screw holes Speaker bracket (For...
...the panel. Before attaching the speaker to your mounted panel, review the information below. • Lay the panel face down on the flat panel TV. Stand-Mounted Panel 1 ) Attach the appropriate speaker brackets (left and right) to the top and bottom on the back of the speakers ...Attach/Detach the Speaker The flat panel TV's speaker delivers high-quality, clear sound. Disconnect the cables from scratches and other damage. • Placing a CRT monitor near the speaker can damage the unit or cause a fire. • When using the supplied screws. (PRO-151FD) Screw holes Speaker bracket (For...
Owner's Manual
Page 20
Do not tighten it loose, with about 5 mm 20 En Speaker mounting hole Top, rear of flat panel TV Top of flat panel TV 5 mm Leave a space of the panel. Leave it all the way yet. 02 Install Your Flat Panel TV (PRO-111FD) Speaker bracket (For TOP-Right) Speaker bracket (For BOTTOM-Right) Screw holes Screw holes Speaker bracket (For TOP-Right) Speaker bracket (For BOTTOM-Right) Place the speaker so its terminals (bottom) are facing you. 2 ) Screw a supplied screw into the speaker bracket hole (lower of the two) at the top, rear of about 5 mm left to tighten.
Do not tighten it loose, with about 5 mm 20 En Speaker mounting hole Top, rear of flat panel TV Top of flat panel TV 5 mm Leave a space of the panel. Leave it all the way yet. 02 Install Your Flat Panel TV (PRO-111FD) Speaker bracket (For TOP-Right) Speaker bracket (For BOTTOM-Right) Screw holes Screw holes Speaker bracket (For TOP-Right) Speaker bracket (For BOTTOM-Right) Place the speaker so its terminals (bottom) are facing you. 2 ) Screw a supplied screw into the speaker bracket hole (lower of the two) at the top, rear of about 5 mm left to tighten.
Owner's Manual
Page 21
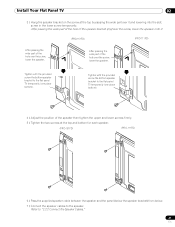
...bottom speaker bracket to the flat panel TV temporarily (one place bottom). 4 ) Adjust the position of the speaker then tighten the upper and lower screws firmly. 5 ) Tighten the two screws at the top by passing the wide part over it . (PRO-151FD) (PRO-111FD) After passing the wide part of ... of the speaker bracket (top) over the screw, lower the speaker. Install Your Flat Panel TV 02 3 ) Hang the speaker bracket on the screw at the top and bottom for each speaker. (PRO-151FD) (PRO-111FD) 6 ) Pass the supplied speaker cable between the speaker and the panel (below the speaker ...
...bottom speaker bracket to the flat panel TV temporarily (one place bottom). 4 ) Adjust the position of the speaker then tighten the upper and lower screws firmly. 5 ) Tighten the two screws at the top by passing the wide part over it . (PRO-151FD) (PRO-111FD) After passing the wide part of ... of the speaker bracket (top) over the screw, lower the speaker. Install Your Flat Panel TV 02 3 ) Hang the speaker bracket on the screw at the top and bottom for each speaker. (PRO-151FD) (PRO-111FD) 6 ) Pass the supplied speaker cable between the speaker and the panel (below the speaker ...
Owner's Manual
Page 22
...) Press down on the tab. 2 ) Insert the appropriately colored wire into an appropriate hole on the speaker. (PRO-151FD) Speaker cable Speaker terminal Insertion in groove Speaker cable (PRO-111FD) Speaker terminal Insertion in the cable clamp then insert the clamp into the opening. 3 ) Allow a small percentage ...until the proper amount of cable is attached, loosen the speaker mounting screws first. 02 Install Your Flat Panel TV 8 ) Insert the cable in the groove on the rear of the flat panel TV. Refer to the rear of the panel. tab 4 ) Release the tab to remain visible.
...) Press down on the tab. 2 ) Insert the appropriately colored wire into an appropriate hole on the speaker. (PRO-151FD) Speaker cable Speaker terminal Insertion in groove Speaker cable (PRO-111FD) Speaker terminal Insertion in the cable clamp then insert the clamp into the opening. 3 ) Allow a small percentage ...until the proper amount of cable is attached, loosen the speaker mounting screws first. 02 Install Your Flat Panel TV 8 ) Insert the cable in the groove on the rear of the flat panel TV. Refer to the rear of the panel. tab 4 ) Release the tab to remain visible.


