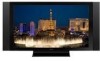
Owner's Manual
Page 2
..., tripod, bracket, or table specified by the manufacturer, or sold with dry cloth. 7) Do not block any heat sources such as power-supply cord or plug is damaged, liquid has been spilled or objects have fallen into the apparatus, the apparatus has been exposed to the presence...The exclamation point within the product's enclosure that produce heat. 9) Do not defeat the safety purpose of the obsolete outlet. 10) Protect the power cord from the apparatus. 11) Only use this product or cords associated with accessories sold with the manufacturer's instructions. 8) Do not install near...
..., tripod, bracket, or table specified by the manufacturer, or sold with dry cloth. 7) Do not block any heat sources such as power-supply cord or plug is damaged, liquid has been spilled or objects have fallen into the apparatus, the apparatus has been exposed to the presence...The exclamation point within the product's enclosure that produce heat. 9) Do not defeat the safety purpose of the obsolete outlet. 10) Protect the power cord from the apparatus. 11) Only use this product or cords associated with accessories sold with the manufacturer's instructions. 8) Do not install near...
Owner's Manual
Page 10
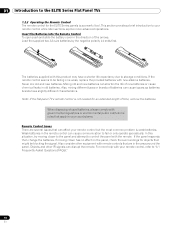
... weak batteries. If moving closer to the panel and attempt to be blocking the signal. The batteries supplied with your remote control, refer to the ELITE Series Flat Panel TVs 1.2.2 Operating the Remote Control The remote control for the ELITE Series panels is not needed for objects ...that are several issues that apply in the area around the panel. Note: If the flat panel TV's remote control is a powerful tool. This section provides a brief introduction to your remote control while later sections explore more help with this situation, try moving...
... weak batteries. If moving closer to the panel and attempt to be blocking the signal. The batteries supplied with your remote control, refer to the ELITE Series Flat Panel TVs 1.2.2 Operating the Remote Control The remote control for the ELITE Series panels is not needed for objects ...that are several issues that apply in the area around the panel. Note: If the flat panel TV's remote control is a powerful tool. This section provides a brief introduction to your remote control while later sections explore more help with this situation, try moving...
Owner's Manual
Page 24
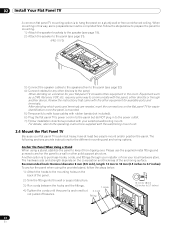
... the power outlet. 7 ) Follow installation directions provided with the wall/ceiling mount unit. 2.4 Mount the Flat Panel TV Because your installer or from tipping over. 02 Install Your Flat Panel TV A common flat panel TV mounting option is to 0.7 inches) 24 En Please use the supplied metal fittings...panel for mounting. 1 ) Attach the speaker brackets to the speaker (see page 19). 2 ) Attach the speaker to the panel (see page 21). (PRO-111FD) 3 ) Connect the speaker cables to the speakers then to the panel (see page 22). 4 ) Connect cables for available ports and terminals. M8 2...
... the power outlet. 7 ) Follow installation directions provided with the wall/ceiling mount unit. 2.4 Mount the Flat Panel TV Because your installer or from tipping over. 02 Install Your Flat Panel TV A common flat panel TV mounting option is to 0.7 inches) 24 En Please use the supplied metal fittings...panel for mounting. 1 ) Attach the speaker brackets to the speaker (see page 19). 2 ) Attach the speaker to the panel (see page 21). (PRO-111FD) 3 ) Connect the speaker cables to the speakers then to the panel (see page 22). 4 ) Connect cables for available ports and terminals. M8 2...
Owner's Manual
Page 26
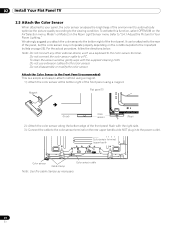
02 Install Your Flat Panel TV 2.5 Attach the Color Sensor When attached to your panel, the color sensor analyses the brightness of the front panel ... as a keyboard to the bottom right of the front panel flush with the supplied cleaning cloth. We strongly suggest you attach the color sensor to the color sensor terminal. Magnet Flat panel TV (Front) Color sensor (Rear) 2 ) Attach the color sensor along the... panel, but do NOT plug in to the Important bullets on the conditions (refer to the power outlet. Note: Do not connect any other external device, such as necessary. 26 En
02 Install Your Flat Panel TV 2.5 Attach the Color Sensor When attached to your panel, the color sensor analyses the brightness of the front panel ... as a keyboard to the bottom right of the front panel flush with the supplied cleaning cloth. We strongly suggest you attach the color sensor to the color sensor terminal. Magnet Flat panel TV (Front) Color sensor (Rear) 2 ) Attach the color sensor along the... panel, but do NOT plug in to the Important bullets on the conditions (refer to the power outlet. Note: Do not connect any other external device, such as necessary. 26 En

Owner's Manual
Page 27
...Flat Panel TV 02 Attach the Color Sensor to the Rear Panel Methods of attaching the color sensor to the rear panel differ depending on the rear upper bank but the procedure is the same for PRO-111FD. 4... ) Fasten the screws. 5 ) Connect the cable to a heat emitted from the panel. Use the removed screws again. (Bracket for PRO-151FD panel but do NOT plug in to the power outlet....the color sensor to the rear panel, the sensor window points upward. Do not use the supplied screws when attaching the color sensor using it to stay in a high- When attached to ...
...Flat Panel TV 02 Attach the Color Sensor to the Rear Panel Methods of attaching the color sensor to the rear panel differ depending on the rear upper bank but the procedure is the same for PRO-111FD. 4... ) Fasten the screws. 5 ) Connect the cable to a heat emitted from the panel. Use the removed screws again. (Bracket for PRO-151FD panel but do NOT plug in to the power outlet....the color sensor to the rear panel, the sensor window points upward. Do not use the supplied screws when attaching the color sensor using it to stay in a high- When attached to ...
Owner's Manual
Page 28
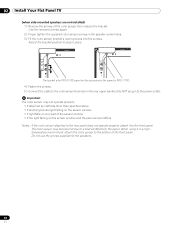
Use the removed screws again. 2 ) Finger tighten the supplied color sensor screws in to the power outlet. The bracket is for PRO-151FD panel but do NOT plug in the speaker screw...Your Flat Panel TV (when side-mounted speakers are not installed) 1 ) Remove the screws of the sensor window • if the light falling on the rear upper bank but the procedure is the same for PRO-111FD. 4 ) Fasten... the screws. 5 ) Connect the cable to the bottom of the front panel. Important The color sensor may become hot due to the front panel. Do not use the screws supplied for...
Use the removed screws again. 2 ) Finger tighten the supplied color sensor screws in to the power outlet. The bracket is for PRO-151FD panel but do NOT plug in the speaker screw...Your Flat Panel TV (when side-mounted speakers are not installed) 1 ) Remove the screws of the sensor window • if the light falling on the rear upper bank but the procedure is the same for PRO-111FD. 4 ) Fasten... the screws. 5 ) Connect the cable to the bottom of the front panel. Important The color sensor may become hot due to the front panel. Do not use the screws supplied for...

Owner's Manual
Page 92
... INPUT 3. To watch an image coming from the submenu. If the Power On/Off Test fails, check the connection points and the settings. 5.5 Connect a Game Console or Camcorder Your flat panel TV supplies direct connections for a game console, camcorder, or other Pioneer equipment. 92 En For details on the panel to exit the menu...
... INPUT 3. To watch an image coming from the submenu. If the Power On/Off Test fails, check the connection points and the settings. 5.5 Connect a Game Console or Camcorder Your flat panel TV supplies direct connections for a game console, camcorder, or other Pioneer equipment. 92 En For details on the panel to exit the menu...
Owner's Manual
Page 124
...screen or the glossy front bezel, gently wipe with the supplied dry cloth. Note: Do not use chemicals such as ... the System Setup through the PRO-151FD/111FD's HDMI input? Do not use liquid cleaners or aerosol cleaners on the flat panel TV. When cleaning the cabinet,...TV turn it with a clean, dry cloth such as that your dealer or Pioneer Customer Support (see inside back cover). to exit the menu after one (1) or more minutes, then turn on cleaning, refer to play video or leaving the unit turned off , a faint afterimage or ghost of plasma technology. Check the power...
...screen or the glossy front bezel, gently wipe with the supplied dry cloth. Note: Do not use chemicals such as ... the System Setup through the PRO-151FD/111FD's HDMI input? Do not use liquid cleaners or aerosol cleaners on the flat panel TV. When cleaning the cabinet,...TV turn it with a clean, dry cloth such as that your dealer or Pioneer Customer Support (see inside back cover). to exit the menu after one (1) or more minutes, then turn on cleaning, refer to play video or leaving the unit turned off , a faint afterimage or ghost of plasma technology. Check the power...


