
Owner's Manual
Page 2
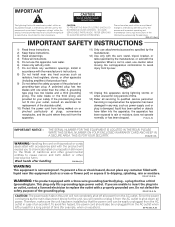
... instructions. 2) Keep these instructions. 3) Heed all warnings. 4) Follow all instructions. 5) Do not use attachments/accessories specified by the manufacturer. 12) Use only with the cart, stand, tripod, bracket, or table specified by the manufacturer, or sold with the product will expose you are provided for your outlet, consult an electrician for...
... instructions. 2) Keep these instructions. 3) Heed all warnings. 4) Follow all instructions. 5) Do not use attachments/accessories specified by the manufacturer. 12) Use only with the cart, stand, tripod, bracket, or table specified by the manufacturer, or sold with the product will expose you are provided for your outlet, consult an electrician for...
Owner's Manual
Page 3
...1.2.1 Control Buttons and More on the Flat Panel Display 7 1.2.2 Operating the Remote Control ...8 1.2.3 Buttons on purchasing a Pioneer Elite KURO monitor. This exclusive series of seeing and hearing like never before. Please spend some time reading through this owner's guide and manual to learn about ...and meticulous engineering to enter a new world of Elite KURO monitors does just that. TABLE OF CONTENTS Congratulations on the Remote Control ...10 2 Install Your Flat Panel Display ...12 2.1 Use the Optional Table Top Stand (Stand) or Equivalent Items 12 2.2 Use the Optional ...
...1.2.1 Control Buttons and More on the Flat Panel Display 7 1.2.2 Operating the Remote Control ...8 1.2.3 Buttons on purchasing a Pioneer Elite KURO monitor. This exclusive series of seeing and hearing like never before. Please spend some time reading through this owner's guide and manual to learn about ...and meticulous engineering to enter a new world of Elite KURO monitors does just that. TABLE OF CONTENTS Congratulations on the Remote Control ...10 2 Install Your Flat Panel Display ...12 2.1 Use the Optional Table Top Stand (Stand) or Equivalent Items 12 2.2 Use the Optional ...

Owner's Manual
Page 6
... contents before discarding or allowing your installer to the Flat Panel Displays The Pioneer Flat Panel Display models include the 60-inch PRO-141FD and the 50-inch PRO-101FD (screen sizes measured diagonally). Below is listed on the back of this ...manual. 1.1 Flat Panel Display Shipment Checklist In addition to the flat panel display, there are several accessories included to make installation quick and easy. You will need a Philips screwdriver if removing or attaching the stand...
... contents before discarding or allowing your installer to the Flat Panel Displays The Pioneer Flat Panel Display models include the 60-inch PRO-141FD and the 50-inch PRO-101FD (screen sizes measured diagonally). Below is listed on the back of this ...manual. 1.1 Flat Panel Display Shipment Checklist In addition to the flat panel display, there are several accessories included to make installation quick and easy. You will need a Philips screwdriver if removing or attaching the stand...
Owner's Manual
Page 12
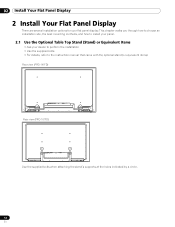
... an installation site, the best mounting methods, and how to the instruction manual that came with the optional stand (or equivalent items) Rear view (PRO-141FD) Rear view (PRO-101FD) Use the supplied bolts when attaching the stand's supports at the holes indicated by a circle. 12 En 02 Install Your Flat Panel Display 2 Install Your... for your dealer to perform the installation • Use the supplied bolts • For details, refer to install your panel. 2.1 Use the Optional Table Top Stand (Stand) or Equivalent Items • Ask your flat panel display.
... an installation site, the best mounting methods, and how to the instruction manual that came with the optional stand (or equivalent items) Rear view (PRO-141FD) Rear view (PRO-101FD) Use the supplied bolts when attaching the stand's supports at the holes indicated by a circle. 12 En 02 Install Your Flat Panel Display 2 Install Your... for your dealer to perform the installation • Use the supplied bolts • For details, refer to install your panel. 2.1 Use the Optional Table Top Stand (Stand) or Equivalent Items • Ask your flat panel display.
Owner's Manual
Page 14
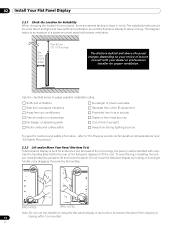
... display by holding only a single handle or by dragging the panel by its handles. (PRO-141FD) (PRO-101FD) Note: Do not use the handles to hang the flat panel display or as anchors ... installation site should be handled with proper ventilation. Over 10 cm (3 15/16 inches) Over 50 cm (19 11/16 inches) The distance behind and above the panel changes depending on your ...dealer or professional installer for proper ventilation. Use the handles attached to the rear of a stand-mounted panel with care. 02 Install Your Flat Panel Display 2.2.1 Check the Location for Suitability When...
... display by holding only a single handle or by dragging the panel by its handles. (PRO-141FD) (PRO-101FD) Note: Do not use the handles to hang the flat panel display or as anchors ... installation site should be handled with proper ventilation. Over 10 cm (3 15/16 inches) Over 50 cm (19 11/16 inches) The distance behind and above the panel changes depending on your ...dealer or professional installer for proper ventilation. Use the handles attached to the rear of a stand-mounted panel with care. 02 Install Your Flat Panel Display 2.2.1 Check the Location for Suitability When...
Owner's Manual
Page 15
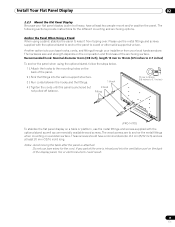
... panel, fire or electrical shock could result. 15 En Do not use the metal fittings and screws supplied with the optional stand to anchor the panel to 0.7 inches) M8 (PRO-141FD) To stabilize the flat panel display on the back of 4 mm (5/32 inch) and are to purchase hooks, cords..., and fittings through your installer or from tipping over. Please use the metal fittings and screws supplied with the optional stand as well as commercially available...
... panel, fire or electrical shock could result. 15 En Do not use the metal fittings and screws supplied with the optional stand to anchor the panel to 0.7 inches) M8 (PRO-141FD) To stabilize the flat panel display on the back of 4 mm (5/32 inch) and are to purchase hooks, cords..., and fittings through your installer or from tipping over. Please use the metal fittings and screws supplied with the optional stand as well as commercially available...
Owner's Manual
Page 16
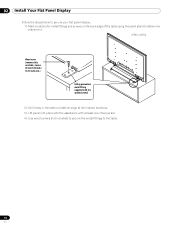
...to secure your flat panel display. 1 ) Mark locations for metal fittings and screws on the back edge of the table using the panel stand to determine placement. (PRO-141FD) Wood screw (commercially available, 4 mm x 20 mm (5/32 inch x 13/16 inch) min.) Falling prevention metal fitting (...supplied with the optional stand) 2 ) Drill holes in the table or platform edge at the marked locations. 3 ) Lift panel into place with the assistance with at ...
...to secure your flat panel display. 1 ) Mark locations for metal fittings and screws on the back edge of the table using the panel stand to determine placement. (PRO-141FD) Wood screw (commercially available, 4 mm x 20 mm (5/32 inch x 13/16 inch) min.) Falling prevention metal fitting (...supplied with the optional stand) 2 ) Drill holes in the table or platform edge at the marked locations. 3 ) Lift panel into place with the assistance with at ...

Owner's Manual
Page 80
...to maintain functionality. 8.1 Installation Details It is switched on the flat panel display until all phosphor-based screens including standard tubetype TVs, the luminosity of the screen diminishes very slowly. When the surrounding environmental or internal temperature exceeds a certain degree, the ...accessories manufactured by a single issue such as this could block the panel vents. • Use a proper mount or stand rather than the Pioneer stand or installation brackets may result in instability and cause injury. For more installation information, refer to rise, resulting in any...
...to maintain functionality. 8.1 Installation Details It is switched on the flat panel display until all phosphor-based screens including standard tubetype TVs, the luminosity of the screen diminishes very slowly. When the surrounding environmental or internal temperature exceeds a certain degree, the ...accessories manufactured by a single issue such as this could block the panel vents. • Use a proper mount or stand rather than the Pioneer stand or installation brackets may result in instability and cause injury. For more installation information, refer to rise, resulting in any...

Owner's Manual
Page 83
... locations include a bathroom, a kitchen or laundry sink, in a location with KRP-TS02 (Pioneer Corporation.) or KRP-SW01 (Pioneer Corporation.) stand. Use with other excessively hot place, such as inside a car or near a heater. It can cause batteries to water or other equipment. This PRO-101FD for use or store batteries in direct sunlight or other...
... locations include a bathroom, a kitchen or laundry sink, in a location with KRP-TS02 (Pioneer Corporation.) or KRP-SW01 (Pioneer Corporation.) stand. Use with other excessively hot place, such as inside a car or near a heater. It can cause batteries to water or other equipment. This PRO-101FD for use or store batteries in direct sunlight or other...


