
Owner's Manual
Page 2
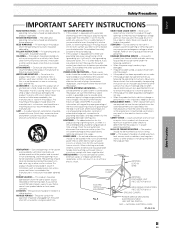
... numérique de la classe B est conforme à la norme NMB-003 du Canada. D8-10-3a_En ii EN Safety Precautions NO USER-SERVICEABLE PARTS INSIDE. THIS IS FOR YOUR SECURITY. CAUTION This symbol refers to which can result in accordance with arrowhead symbol, within an equilateral triangle is connected... help. D8-10-2_En This Class B digital apparatus complies with Canadian ICES-003. The exclamation point within an equilateral triangle, is encouraged to try to Part 15 of California and other equipment.
... numérique de la classe B est conforme à la norme NMB-003 du Canada. D8-10-3a_En ii EN Safety Precautions NO USER-SERVICEABLE PARTS INSIDE. THIS IS FOR YOUR SECURITY. CAUTION This symbol refers to which can result in accordance with arrowhead symbol, within an equilateral triangle is connected... help. D8-10-2_En This Class B digital apparatus complies with Canadian ICES-003. The exclamation point within an equilateral triangle, is encouraged to try to Part 15 of California and other equipment.
Owner's Manual
Page 3
...will only fit into such power lines or circuits. This is in the vicinity of the grounding type plug. OUTDOOR ANTENNA GROUNDING - REPLACEMENT PARTS - WATER AND MOISTURE - Use only with a cart, stand, tripod, bracket, or table recommended by the operating instructions as contact ...left unattended and unused for a long period of other similar surface. For added protection for this product through openings as the original part. Never spill liquid of power source indicated on the product. ACCESSORIES - LOCATION - NONUSE PERIODS - All operating and use this ...
...will only fit into such power lines or circuits. This is in the vicinity of the grounding type plug. OUTDOOR ANTENNA GROUNDING - REPLACEMENT PARTS - WATER AND MOISTURE - Use only with a cart, stand, tripod, bracket, or table recommended by the operating instructions as contact ...left unattended and unused for a long period of other similar surface. For added protection for this product through openings as the original part. Never spill liquid of power source indicated on the product. ACCESSORIES - LOCATION - NONUSE PERIODS - All operating and use this ...
Owner's Manual
Page 4
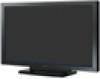
... Service Company in the U.S.A. Product Name: Plasma Display Model Number: PRO-1010HD / PRO-810HD Product Category: Class B Personal Computers & Peripherals Responsible Party Name: PIONEER ELECTRONICS [USA] INC. and you wish to locate the nearest Pioneer Authorized Independent Service Company, or if you wish to purchase replacement parts, operating instructions, service manuals, or accessories, please call the...
... Service Company in the U.S.A. Product Name: Plasma Display Model Number: PRO-1010HD / PRO-810HD Product Category: Class B Personal Computers & Peripherals Responsible Party Name: PIONEER ELECTRONICS [USA] INC. and you wish to locate the nearest Pioneer Authorized Independent Service Company, or if you wish to purchase replacement parts, operating instructions, service manuals, or accessories, please call the...
Owner's Manual
Page 5
... liabilities for damage caused by qualified personnel with enough skill and competence. Note for purchasing this PIONEER product. Keep this manual to the customer and explain to the customer how to handle the product. ENHANCE 43 Energy ...using your dealer install and set up the product. Contents Contents Safety Precautions i Before Proceeding 2 How to Use This Manual 2 Checking Supplied Accessories 4 Part Names and Functions 5 Main Unit 5 Remote Control Unit 6 Connection Panel 8 Installation and Connections 10 Installation of Terms 55 1 EN Thank you will find...
... liabilities for damage caused by qualified personnel with enough skill and competence. Note for purchasing this PIONEER product. Keep this manual to the customer and explain to the customer how to handle the product. ENHANCE 43 Energy ...using your dealer install and set up the product. Contents Contents Safety Precautions i Before Proceeding 2 How to Use This Manual 2 Checking Supplied Accessories 4 Part Names and Functions 5 Main Unit 5 Remote Control Unit 6 Connection Panel 8 Installation and Connections 10 Installation of Terms 55 1 EN Thank you will find...
Owner's Manual
Page 6
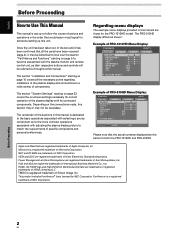
... operations associated with selecting a source component up to the more complex operations associated with the plasma monitor and remote control unit, as shown: Example of PRO-1010HD Menu Display: S TA N D A R D PICTURE SCREEN SETUP CONTRAST BRIGHTNESS COLOR TINT SHARPNESS MPEG NR DNR CTI :0 :0 :0 :0 :0 : ... Please note that all the necessary points regarding installation of the plasma display and connections to look over the section "Part Names and Functions" starting on the connections made, this manual. Apple and Macintosh are trademarks or registered trademarks of Apple...
... operations associated with selecting a source component up to the more complex operations associated with the plasma monitor and remote control unit, as shown: Example of PRO-1010HD Menu Display: S TA N D A R D PICTURE SCREEN SETUP CONTRAST BRIGHTNESS COLOR TINT SHARPNESS MPEG NR DNR CTI :0 :0 :0 :0 :0 : ... Please note that all the necessary points regarding installation of the plasma display and connections to look over the section "Part Names and Functions" starting on the connections made, this manual. Apple and Macintosh are trademarks or registered trademarks of Apple...
Owner's Manual
Page 9
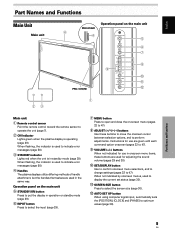
English Part Names and Functions Main Unit Main unit Operation panel on -screen menu (pages 22 to 47). 8 ADJUST ( / ... INPUT button Press to select the input (page 29). 7 MENU button Press to open and close the on the main unit PRO-810HD 4 4 5 6 7 8 9 0 = PRO-1010HD 1 23 Main unit 1 Remote control sensor Point the remote control toward the remote sensor to operate the unit (page 7). 2 ... menu items, these buttons to move the onscreen cursor between selection options, and to 47). Part Names and Functions 5 EN Instructions for use are used to optimum values (page 39).
English Part Names and Functions Main Unit Main unit Operation panel on -screen menu (pages 22 to 47). 8 ADJUST ( / ... INPUT button Press to select the input (page 29). 7 MENU button Press to open and close the on the main unit PRO-810HD 4 4 5 6 7 8 9 0 = PRO-1010HD 1 23 Main unit 1 Remote control sensor Point the remote control toward the remote sensor to operate the unit (page 7). 2 ... menu items, these buttons to move the onscreen cursor between selection options, and to 47). Part Names and Functions 5 EN Instructions for use are used to optimum values (page 39).
Owner's Manual
Page 10
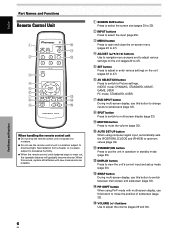
Part Names and Functions 6 EN When this occurs, replace all batteries with multi-screen display, use this button to move the position of subscreen (page 32). @ ... volume (page 30). 0 AUTO SET UP button When using computer signal input, automatically sets the [POSITION], [CLOCK] and [PHASE] to optimum values (page 39). - English Part Names and Functions Remote Control Unit 1 0 - 2 = 3 4 5 6 7 ~ 8 ! 9 @ AXD1496 When handling the remote control unit ¶ Do not drop the remote control unit or expose it to...
Part Names and Functions 6 EN When this occurs, replace all batteries with multi-screen display, use this button to move the position of subscreen (page 32). @ ... volume (page 30). 0 AUTO SET UP button When using computer signal input, automatically sets the [POSITION], [CLOCK] and [PHASE] to optimum values (page 39). - English Part Names and Functions Remote Control Unit 1 0 - 2 = 3 4 5 6 7 ~ 8 ! 9 @ AXD1496 When handling the remote control unit ¶ Do not drop the remote control unit or expose it to...
Owner's Manual
Page 11
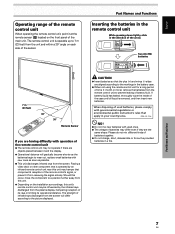
... regulations or environmental public instruction's rules that is operated by the infrared rays discharged from the plasma display, hampering reception of the sensor. Part Names and Functions Inserting the batteries in the remote control unit While pressing down lightly, slide in the battery case. ¶ When not...unit and within a 30° angle on each side of its rays or limiting its operational distance. The strength of the main unit. Part Names and Functions 7 EN Please do not mix different kinds of the remote control unit ¶ The remote control unit may differ even if...
... regulations or environmental public instruction's rules that is operated by the infrared rays discharged from the plasma display, hampering reception of the sensor. Part Names and Functions Inserting the batteries in the remote control unit While pressing down lightly, slide in the battery case. ¶ When not...unit and within a 30° angle on each side of its rays or limiting its operational distance. The strength of the main unit. Part Names and Functions 7 EN Please do not mix different kinds of the remote control unit ¶ The remote control unit may differ even if...
Owner's Manual
Page 12
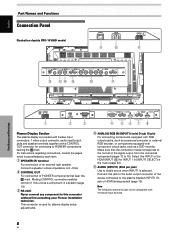
... AUDIO (INPUT1) (RCA pin jack) Use to obtain sound when INPUT1 is selected. Select this connector without first consulting your Pioneer installation technician. Connect this unit as a DVD recorder. Note The left audio channel (L) jack is provided with 6 video input ...16 Ω. 2 CONTROL OUT For connection of PIONEER components that the connection made corresponds to the format of the device connected to PIONEER components bearing the Î mark. English Part Names and Functions Connection Panel Illustration depicts PRO-1010HD model. Make sure that bear the Î mark...
... AUDIO (INPUT1) (RCA pin jack) Use to obtain sound when INPUT1 is selected. Select this connector without first consulting your Pioneer installation technician. Connect this unit as a DVD recorder. Note The left audio channel (L) jack is provided with 6 video input ...16 Ω. 2 CONTROL OUT For connection of PIONEER components that the connection made corresponds to the format of the device connected to PIONEER components bearing the Î mark. English Part Names and Functions Connection Panel Illustration depicts PRO-1010HD model. Make sure that bear the Î mark...

Owner's Manual
Page 13
... The left speaker. compatible with HDCP. Connect these jacks to the audio output connectors of components connected to INPUT5 (page 19). 9 EN Part Names and Functions English Connect these devices, read its operating instructions to make sure that have an S-video output jack such as a video deck... Protection) (HDMI = High Definition Multimedia Interface) Select this INPUT or the ANALOG RGB IN (4) in [INPUT1 SELECT] in standby mode (page 16). Part Names and Functions @ AUDIO R/L (INPUT3/4) (RCA Pin jacks) Use to an external monitor or other end to a standard AC power source. - ...
... The left speaker. compatible with HDCP. Connect these jacks to the audio output connectors of components connected to INPUT5 (page 19). 9 EN Part Names and Functions English Connect these devices, read its operating instructions to make sure that have an S-video output jack such as a video deck... Protection) (HDMI = High Definition Multimedia Interface) Select this INPUT or the ANALOG RGB IN (4) in [INPUT1 SELECT] in standby mode (page 16). Part Names and Functions @ AUDIO R/L (INPUT3/4) (RCA Pin jacks) Use to an external monitor or other end to a standard AC power source. - ...
Owner's Manual
Page 14
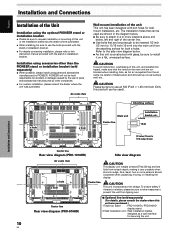
... a thin design. The installation holes that are long enough to be inserted 1/2 inch (12 mm) to use of parts and accessories manufactured by PIONEER. CAUTION To avoid malfunction, overheating of the unit This unit has been designed with the stand or installation bracket. Attaching ...accessories other companies. ÷ For custom installation, please consult the dealer where the unit was purchased.) 1 Table top stand : PRO-1010HD / PRO-810HD display stand. 2 Wall installation unit : Wall installation bracket designed as hot air is expelled from the attaching surface for wallmount installation, etc...
... a thin design. The installation holes that are long enough to be inserted 1/2 inch (12 mm) to use of parts and accessories manufactured by PIONEER. CAUTION To avoid malfunction, overheating of the unit This unit has been designed with the stand or installation bracket. Attaching ...accessories other companies. ÷ For custom installation, please consult the dealer where the unit was purchased.) 1 Table top stand : PRO-1010HD / PRO-810HD display stand. 2 Wall installation unit : Wall installation bracket designed as hot air is expelled from the attaching surface for wallmount installation, etc...

Owner's Manual
Page 41
...SET button. 2 With R. Provides a brighter γ setting than MANUAL/** is selected. Adjusts the green of dark parts Decrease Becomes softer Becomes softer Becomes softer Becomes softer Becomes softer Becomes softer Increase Becomes stronger Becomes stronger Becomes stronger Becomes ... stronger Becomes stronger Picture Adjustment (3) You can save picture adjustment values for each INPUT and each AV SELECTION mode. LOW ... Adjusts the blue of bright parts B. 3 LOW 2 3 MID LOW 2 3 MID 2 3 MANUAL/**2 3 HIGH 2 3 MID HIGH 2 ¶ LOW ......... Provides yellowish color tone with...
...SET button. 2 With R. Provides a brighter γ setting than MANUAL/** is selected. Adjusts the green of dark parts Decrease Becomes softer Becomes softer Becomes softer Becomes softer Becomes softer Becomes softer Increase Becomes stronger Becomes stronger Becomes stronger Becomes ... stronger Becomes stronger Picture Adjustment (3) You can save picture adjustment values for each INPUT and each AV SELECTION mode. LOW ... Adjusts the blue of bright parts B. 3 LOW 2 3 MID LOW 2 3 MID 2 3 MANUAL/**2 3 HIGH 2 3 MID HIGH 2 ¶ LOW ......... Provides yellowish color tone with...
Owner's Manual
Page 52
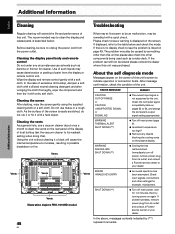
... blocking the cooling vents on the rear panel of the display of dust buildup (set the vacuum cleaner to clean the display and related parts is easily scratched, do not rub it or hit it with a quick check. As the surface of excessive dirt buildup, dampen a ...182; Turn off power, remove power plug from the power outlet. The recommended way to its outlet, and consult a Pioneer service center or your dealer. Vents Illustration depicts PRO-1010HD model. About the self diagnosis mode Messages appear on page 49. Check input signals, connections and other components being used...
... blocking the cooling vents on the rear panel of the display of dust buildup (set the vacuum cleaner to clean the display and related parts is easily scratched, do not rub it or hit it with a quick check. As the surface of excessive dirt buildup, dampen a ...182; Turn off power, remove power plug from the power outlet. The recommended way to its outlet, and consult a Pioneer service center or your dealer. Vents Illustration depicts PRO-1010HD model. About the self diagnosis mode Messages appear on page 49. Check input signals, connections and other components being used...
Owner's Manual
Page 53
...., switch devises such as lightning, static electricity, etc., may cause picture distortion and similar problems. • Normal sound of the cooling fan and internal sliding parts of image appear to another screen size (page 30). • Are [SCREEN] mode adjustments such as breakdown Problem • The screen is suddenly turned off...
...., switch devises such as lightning, static electricity, etc., may cause picture distortion and similar problems. • Normal sound of the cooling fan and internal sliding parts of image appear to another screen size (page 30). • Are [SCREEN] mode adjustments such as breakdown Problem • The screen is suddenly turned off...
Owner's Manual
Page 54
... light, or may occur in cases where violation of intellectual property rights may be used , infrared remote control units for shorter periods of internal electronic parts, or other nearby appliances may fail to the remaining electric load. The display should be noticeable if AM radios, computers, or video appliances are displayed...
... light, or may occur in cases where violation of intellectual property rights may be used , infrared remote control units for shorter periods of internal electronic parts, or other nearby appliances may fail to the remaining electric load. The display should be noticeable if AM radios, computers, or video appliances are displayed...


