Owner's Manual
Page 4
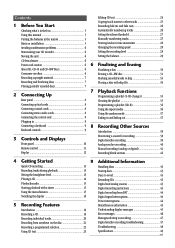
... the box 5 Automatically numbering tracks 26 Using this manual 5 Setting the silence threshold 27 Putting the batteries in the remote 5 Manually numbering tracks 27 Hints on installation 5 Starting tracks in time increments 28 Avoiding condensation problems 6 Changing the recording...38 3 Controls and Displays Monitoring a source for recording 38 Digital synchro recording 39 Front panel 10 Analog synchro recording 40 Remote control 11 Manual recording (analog or digital 41 Display 12 Recording blank sections 42 4 Getting Started 9 Additional Information Quick ...
... the box 5 Automatically numbering tracks 26 Using this manual 5 Setting the silence threshold 27 Putting the batteries in the remote 5 Manually numbering tracks 27 Hints on installation 5 Starting tracks in time increments 28 Avoiding condensation problems 6 Changing the recording...38 3 Controls and Displays Monitoring a source for recording 38 Digital synchro recording 39 Front panel 10 Analog synchro recording 40 Remote control 11 Manual recording (analog or digital 41 Display 12 Recording blank sections 42 4 Getting Started 9 Additional Information Quick ...
Owner's Manual
Page 5
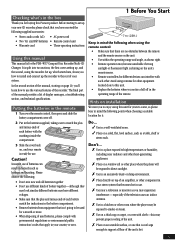
...rug or carpet, or cover with each other equipment located close to this unit. • Replace the batteries when you for buying this Pioneer product. It is ready for use . # Use near radiators and other heat-generating appliances. # Place on a window sill or other... R6P batteries • Remote control unit • Warranty card • These operating instructions Using this unit for different devices can result in hazards such as a table, shelf or stereo rack. Please observe the following points when choosing a suitable location for the PDR-W37 Compact Disc Recorder/Multi-...
...rug or carpet, or cover with each other equipment located close to this unit. • Replace the batteries when you for buying this Pioneer product. It is ready for use . # Use near radiators and other heat-generating appliances. # Place on a window sill or other... R6P batteries • Remote control unit • Warranty card • These operating instructions Using this unit for different devices can result in hazards such as a table, shelf or stereo rack. Please observe the following points when choosing a suitable location for the PDR-W37 Compact Disc Recorder/Multi-...
Owner's Manual
Page 8
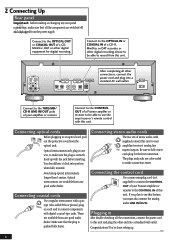
...CONTROL standard AC wall outlet. Connecting coaxial cords Use a regular interconnect with digital coaxial-type jacks. Connecting stereo audio cords The two sets of a Pioneer amplifer or receiver to be able to the TAPE/MD/ CD-R LINE IN/OUT jacks of a CD, MiniDisc, DAT or other connections, connect...from this unit. Plugging in an optical cord, pull out the protective cover from the optical jack. Connect to use the amp/receiver's remote control with the jack before inserting. Make sure that all the components are switched off and unplugged from any good audio dealer. Connecting ...
...CONTROL standard AC wall outlet. Connecting coaxial cords Use a regular interconnect with digital coaxial-type jacks. Connecting stereo audio cords The two sets of a Pioneer amplifer or receiver to be able to the TAPE/MD/ CD-R LINE IN/OUT jacks of a CD, MiniDisc, DAT or other connections, connect...from this unit. Plugging in an optical cord, pull out the protective cover from the optical jack. Connect to use the amp/receiver's remote control with the jack before inserting. Make sure that all the components are switched off and unplugged from any good audio dealer. Connecting ...
Owner's Manual
Page 9
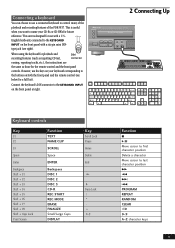
This unit is useful when you want to control many of the playback and recording features of the PDR-W37. When using the keyboard for playback and recording features (such as inputting CD text, DIN connector erasing, repeating tracks, etc.), the ...; Num Lock / * + 0-9 Function 7 6 Move cursor to first character position Delete a character Move cursor to the buttons on both the front panel and the remote control (see right). Connecting a keyboard You can choose to use a connected keyboard to name your keyboard corresponding to last character position ¡ 1 ¢ 4 PROGRAM...
This unit is useful when you want to control many of the playback and recording features of the PDR-W37. When using the keyboard for playback and recording features (such as inputting CD text, DIN connector erasing, repeating tracks, etc.), the ...; Num Lock / * + 0-9 Function 7 6 Move cursor to first character position Delete a character Move cursor to the buttons on both the front panel and the remote control (see right). Connecting a keyboard You can choose to use a connected keyboard to name your keyboard corresponding to last character position ¡ 1 ¢ 4 PROGRAM...
Owner's Manual
Page 11
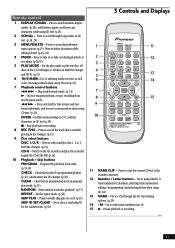
...all discs in both the changer and CD-R. (p.15) 6 10/0 MARK-Use in CD text. (p.16, 23) 3 MENU/DELETE - Pause playback or recording. 11 Remote control 1 DISPLAY/CHARA - Press to cycle through long names in selecting tracks over 10. 15 8 - Stop playback or recording. 8 REC THIS - Clear the last... THIS 7 8 DISC 1 DISC 2 DISC 3 CD-R PROGRAM CHECK CLEAR RANDOM SKIP PLAY SKIP ID REPEAT SET CLEAR COMPACT DISC RECORDER/ Î MULTI-CD CHANGER REMOTE CONTROL UNIT 11 12 13 14 15 11 NAME CLIP - Use to jump directly to move cursor position when using CD text. 13 NAME - Use...
...all discs in both the changer and CD-R. (p.15) 6 10/0 MARK-Use in CD text. (p.16, 23) 3 MENU/DELETE - Pause playback or recording. 11 Remote control 1 DISPLAY/CHARA - Press to cycle through long names in selecting tracks over 10. 15 8 - Stop playback or recording. 8 REC THIS - Clear the last... THIS 7 8 DISC 1 DISC 2 DISC 3 CD-R PROGRAM CHECK CLEAR RANDOM SKIP PLAY SKIP ID REPEAT SET CLEAR COMPACT DISC RECORDER/ Î MULTI-CD CHANGER REMOTE CONTROL UNIT 11 12 13 14 15 11 NAME CLIP - Use to jump directly to move cursor position when using CD text. 13 NAME - Use...

Owner's Manual
Page 13
...change the level. Make sure there is a CD-R or CDRW in the changer. Setting the headphone level 3 Press OPEN/CLOSE 10 to close the the remote)to a power outlet. The display shows the current level: H (high), or L (low). After a the new level. COMPACT DISC MULTI CHANGER ... THIS COMPACT DISC DIGITAL RECORDER OPEN/CLOSE 0 MENU /DELETE ¶ REC VOL PUSH ENTER CD TEXT Hi-bitLegatoLinkConversion Quick CD recording Although the PDR-W37 has many advanced recording features, duplicating a CD is playing, and the CD changer will sound a little strange! Before starting, make it playable...
...change the level. Make sure there is a CD-R or CDRW in the changer. Setting the headphone level 3 Press OPEN/CLOSE 10 to close the the remote)to a power outlet. The display shows the current level: H (high), or L (low). After a the new level. COMPACT DISC MULTI CHANGER ... THIS COMPACT DISC DIGITAL RECORDER OPEN/CLOSE 0 MENU /DELETE ¶ REC VOL PUSH ENTER CD TEXT Hi-bitLegatoLinkConversion Quick CD recording Although the PDR-W37 has many advanced recording features, duplicating a CD is playing, and the CD changer will sound a little strange! Before starting, make it playable...
Owner's Manual
Page 14
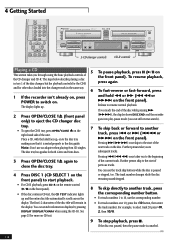
... next track on . You can still reverse-search). 7 To skip back or forward to the start playback. • For CD-R playback, press CD-R on the remote control (6 on the front panel). The disc tray has guides for more on CD text. 5 To pause playback, press 8 (6 on the front panel). See page...
... next track on . You can still reverse-search). 7 To skip back or forward to the start playback. • For CD-R playback, press CD-R on the remote control (6 on the front panel). The disc tray has guides for more on CD text. 5 To pause playback, press 8 (6 on the front panel). See page...
Owner's Manual
Page 20
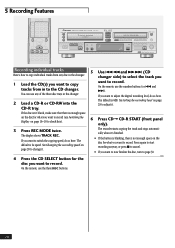
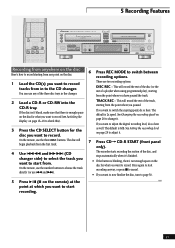
..., make sure that there is blinking, there's not enough space on page 28 to change it . 6 Press CD= CD-R START (front panel only). On the remote, use any disc in to check this). 3 Press REC MODE twice. See Setting the recording level on page 16-18 to the CD changer. Press... want to record (see Switching the Display on page 28 to switch the copying speed, do so here. The display shows TRACK REC. On the remote, use the three DISC buttons. 5 Use 41 and ¡ ¢ (CD changer side) to select the track you want to adjust the digital recording level...
..., make sure that there is blinking, there's not enough space on page 28 to change it . 6 Press CD= CD-R START (front panel only). On the remote, use any disc in to check this). 3 Press REC MODE twice. See Setting the recording level on page 16-18 to the CD changer. Press... want to record (see Switching the Display on page 28 to switch the copying speed, do so here. The display shows TRACK REC. On the remote, use the three DISC buttons. 5 Use 41 and ¡ ¢ (CD changer side) to select the track you want to adjust the digital recording level...
Owner's Manual
Page 21
... 2 DISC 3 5 Recording Features OPEN/CLOSE 10 20 30 COMPACT DISC RECORDER / MULTI-CD CHANGER ◊ÛB¿ˆ≤≥ 3 - On the remote, use any point on the remote) at the point at which you want to page 30. 21 There are two recording options: DISC REC - The default is 0dB. On... the remote, use the number buttons to choose the track directly (or use 4 and ¢). 5 Press 6 (8 on the disc: 1 Load the CD(s) you want to record tracks ...
... 2 DISC 3 5 Recording Features OPEN/CLOSE 10 20 30 COMPACT DISC RECORDER / MULTI-CD CHANGER ◊ÛB¿ˆ≤≥ 3 - On the remote, use any point on the remote) at the point at which you want to page 30. 21 There are two recording options: DISC REC - The default is 0dB. On... the remote, use the number buttons to choose the track directly (or use 4 and ¢). 5 Press 6 (8 on the disc: 1 Load the CD(s) you want to record tracks ...

Owner's Manual
Page 23
... text (up to 2000 characters) for up to name by turning the jog dial. Press 7 at one time. If you're using the front panel, remote control, or a connected IBM-compatible PC keyboard (see page 9). 1 Make sure the disc you can be displayed completely), with a blinking cursor on that when you... COMPACT DISC DIGITAL RECORDER NAME ¶ DISPLAY CHARACTER REC VOL 7 PUSH ENTER CD TEXT Hi-bitLegatoLinkConversion Using CD text You can input characters using the remote control, use numbers keys 1-9 for the complete list of letters, numbers, and symbols available.
... text (up to 2000 characters) for up to name by turning the jog dial. Press 7 at one time. If you're using the front panel, remote control, or a connected IBM-compatible PC keyboard (see page 9). 1 Make sure the disc you can be displayed completely), with a blinking cursor on that when you... COMPACT DISC DIGITAL RECORDER NAME ¶ DISPLAY CHARACTER REC VOL 7 PUSH ENTER CD TEXT Hi-bitLegatoLinkConversion Using CD text You can input characters using the remote control, use numbers keys 1-9 for the complete list of letters, numbers, and symbols available.

Owner's Manual
Page 24
... VOL 7 PUSH ENTER CD TEXT Hi-bitLegatoLinkConversion 6 Confirm the character and move the cursor to the previous menu (step 2). The characters on the remote control. For the remote, move the cursor to the next character position by moving the cursor to the character position you back to the next character position by...
... VOL 7 PUSH ENTER CD TEXT Hi-bitLegatoLinkConversion 6 Confirm the character and move the cursor to the previous menu (step 2). The characters on the remote control. For the remote, move the cursor to the next character position by moving the cursor to the character position you back to the next character position by...

Owner's Manual
Page 25
On the remote, use the 4 and ¢ buttons to move the cursor around the character display. 6 Press NAME CLIP again. This can name the first one of playback ...
On the remote, use the 4 and ¢ buttons to move the cursor around the character display. 6 Press NAME CLIP again. This can name the first one of playback ...

Owner's Manual
Page 26
...recorder number the tracks automatically. The display shows either normal or synchro record mode. • You can record from something, it detects more on the remote) to confirm 2 the new fade length. 5 Recording Features TIME MENU/ DELETE FADER 4 ¢ ENTER 7 COMPACT DISC RECORDER / MULTI-CD CHANGER ...Sometimes, for recording on the source. Setting the fade length 1 Press MENU/DELETE. 2 Turn the jog dial (4 and ¢ on the remote)to ENTER. This happens in synchro recording mode (although you record a fade out during all-track sync mode, the synchro mode is canceled ...
...recorder number the tracks automatically. The display shows either normal or synchro record mode. • You can record from something, it detects more on the remote) to confirm 2 the new fade length. 5 Recording Features TIME MENU/ DELETE FADER 4 ¢ ENTER 7 COMPACT DISC RECORDER / MULTI-CD CHANGER ...Sometimes, for recording on the source. Setting the fade length 1 Press MENU/DELETE. 2 Turn the jog dial (4 and ¢ on the remote)to ENTER. This happens in synchro recording mode (although you record a fade out during all-track sync mode, the synchro mode is canceled ...

Owner's Manual
Page 27
...seconds into the current track. -60dB to ENTER. Use these levels if you want the remote)to edit track numbers after the recorder detects 2 seconds of silence before the next sound on the remote) until A.LVL. If the recorder is not putting in new track numbers because the original...: The maximum analog threshold level is -54dB. 3 Turn the jog dial (4 and ¢ on the source. See Automatically numbering tracks on the remote) at least four seconds long-the recorder won't let you can number tracks manually as recording from digital satellite or Laserdisc, or from CD, MD...
...seconds into the current track. -60dB to ENTER. Use these levels if you want the remote)to edit track numbers after the recorder detects 2 seconds of silence before the next sound on the remote) until A.LVL. If the recorder is not putting in new track numbers because the original...: The maximum analog threshold level is -54dB. 3 Turn the jog dial (4 and ¢ on the source. See Automatically numbering tracks on the remote) at least four seconds long-the recorder won't let you can number tracks manually as recording from digital satellite or Laserdisc, or from CD, MD...

Owner's Manual
Page 28
...CD changer. power is better. The default is only available when recording from the digital outputs. 3 Turn the jog dial (4 and ¢ on the remote) until T. The Hi indicator shows the selected speed (x1 or x2). Boosting the level will default to the CD as it . This feature is ...turned off . 1 Press MENU/DELETE. 2 Turn the jog dial (4 and ¢ on the remote) to change it 's recorded, single (x1) speed is switched off ; COMPACT DISC MULTI CHANGER REC MODE COMPACT DISC DIGITAL RECORDER MENU/ DELETE 4 1 ¡ ¢...
...CD changer. power is better. The default is only available when recording from the digital outputs. 3 Turn the jog dial (4 and ¢ on the remote) until T. The Hi indicator shows the selected speed (x1 or x2). Boosting the level will default to the CD as it . This feature is ...turned off . 1 Press MENU/DELETE. 2 Turn the jog dial (4 and ¢ on the remote) to change it 's recorded, single (x1) speed is switched off ; COMPACT DISC MULTI CHANGER REC MODE COMPACT DISC DIGITAL RECORDER MENU/ DELETE 4 1 ¡ ¢...

Owner's Manual
Page 30
... the display. If a CD-RW is free from dust, dirt and scratches-if necessary, clean the disc following the guidelines on the player or the remote have any effect during finalization. If you start finalization. 6 Finalizing and Erasing COMPACT DISC RECORDER / MULTI-CD CHANGER ◊ÛB¿ˆ≤≥ 3 - Caution...
... the display. If a CD-RW is free from dust, dirt and scratches-if necessary, clean the disc following the guidelines on the player or the remote have any effect during finalization. If you start finalization. 6 Finalizing and Erasing COMPACT DISC RECORDER / MULTI-CD CHANGER ◊ÛB¿ˆ≤≥ 3 - Caution...

Owner's Manual
Page 34
... TIME 4 ¢ 3 7 SKIP PLAY SKIP ID SET CLEAR COMPACT DISC RECORDER / MULTI-CD CHANGER ◊ÛB¿ˆ≤≥ 3 - Press SKIP PLAY on the remote to stop the disc and press 0 (CD-R side). On pressing 0, the recorder writes the skip ID information onto the disc. This means the player won...
... TIME 4 ¢ 3 7 SKIP PLAY SKIP ID SET CLEAR COMPACT DISC RECORDER / MULTI-CD CHANGER ◊ÛB¿ˆ≤≥ 3 - Press SKIP PLAY on the remote to stop the disc and press 0 (CD-R side). On pressing 0, the recorder writes the skip ID information onto the disc. This means the player won...

Owner's Manual
Page 37
... the display blinks and the volume starts to start random playback. The FADER indicator in or fade out (See Setting the fade length on the remote first, then RANDOM. Each track will play just once, but the order will cancel random play. (see page 15 for more on play modes). •...
... the display blinks and the volume starts to start random playback. The FADER indicator in or fade out (See Setting the fade length on the remote first, then RANDOM. Each track will play just once, but the order will cancel random play. (see page 15 for more on play modes). •...

Owner's Manual
Page 48
... Check that the disc is distorted • Check that all connections to the amplifier are correct and that all interconnects are shining onto the remote control sensor on the main unit. • Check that you 've selected the correct input. Can't record • Check that all ... sound when playing a disc • Check that all connections to the amplifier and any other components are correct and that you 're operating the remote within its operating range - page 31-32. • Check that all interconnects are skipped without being played • The disc loaded contains skip ...
... Check that the disc is distorted • Check that all connections to the amplifier are correct and that all interconnects are shining onto the remote control sensor on the main unit. • Check that you 've selected the correct input. Can't record • Check that all ... sound when playing a disc • Check that all connections to the amplifier and any other components are correct and that you 're operating the remote within its operating range - page 31-32. • Check that all interconnects are skipped without being played • The disc loaded contains skip ...
Owner's Manual
Page 49
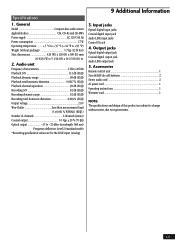
... the LINE input (analog) 9 Additional Information 3. Input jacks Optical digital input jacks Coaxial digital input jack Audio LINE input jacks Control IN jack 4. Specifications 1. Accessories Remote control unit 1 Size AA/R6P dry cell batteries 2 Stereo audio cord 2 AC power cord 1 Operating instructions 1 Warranty card 1 NOTE: The specifications and design of channels...
... the LINE input (analog) 9 Additional Information 3. Input jacks Optical digital input jacks Coaxial digital input jack Audio LINE input jacks Control IN jack 4. Specifications 1. Accessories Remote control unit 1 Size AA/R6P dry cell batteries 2 Stereo audio cord 2 AC power cord 1 Operating instructions 1 Warranty card 1 NOTE: The specifications and design of channels...


