Owner's Manual
Page 2
... are used in a residential installation. Connect the equipment into an outlet on , the user is encouraged to try to which can radiate radio frequency energy and, if not installed and used to connect the unit to the presence of the FCC Rules. model] CAUTION: This product satisfies FCC regulations when shielded cables and connectors are designed to Part 15 of important operating and maintenance (servicing) instructions...
... are used in a residential installation. Connect the equipment into an outlet on , the user is encouraged to try to which can radiate radio frequency energy and, if not installed and used to connect the unit to the presence of the FCC Rules. model] CAUTION: This product satisfies FCC regulations when shielded cables and connectors are designed to Part 15 of important operating and maintenance (servicing) instructions...
Owner's Manual
Page 3
... Electrical Code, ANSI/NFPA 70, provides information with a three-wire grounding type plug, a plug having one way. Article 810 of power source indicated on the product. See Figure A. OBJECT AND LIQUID ENTRY - REPLACEMENT PARTS - HEAT - GROUNDING OR POLARIZATION • If this product through openings as an improper adjustment of any service or repairs to qualified service personnel under the following the operating instructions. AVOID DIRECT EXPOSURE...
... Electrical Code, ANSI/NFPA 70, provides information with a three-wire grounding type plug, a plug having one way. Article 810 of power source indicated on the product. See Figure A. OBJECT AND LIQUID ENTRY - REPLACEMENT PARTS - HEAT - GROUNDING OR POLARIZATION • If this product through openings as an improper adjustment of any service or repairs to qualified service personnel under the following the operating instructions. AVOID DIRECT EXPOSURE...
Owner's Manual
Page 4
... IDs 34 Playing partially recorded discs 7 2 Connecting Up 7 Playback Functions Programming a playlist (3-CD changer 35 Rear panel 8 Clearing the playlist 35 Connecting optical cords 8 Programming a playlist (CD-R 36 Connecting coaxial cords 8 Using the repeat modes 36 Connecting stereo audio cords 8 Using the random mode 37 Connecting the control cord 8 Fading in and fading out 37 Plugging in 8 Connecting a keyboard 9 8 Recording Other Sources Keyboard controls 9 Introduction 38 3 Controls and Displays Monitoring a source for recording 38 Digital synchro...
... IDs 34 Playing partially recorded discs 7 2 Connecting Up 7 Playback Functions Programming a playlist (3-CD changer 35 Rear panel 8 Clearing the playlist 35 Connecting optical cords 8 Programming a playlist (CD-R 36 Connecting coaxial cords 8 Using the repeat modes 36 Connecting stereo audio cords 8 Using the random mode 37 Connecting the control cord 8 Fading in and fading out 37 Plugging in 8 Connecting a keyboard 9 8 Recording Other Sources Keyboard controls 9 Introduction 38 3 Controls and Displays Monitoring a source for recording 38 Digital synchro...
Owner's Manual
Page 5
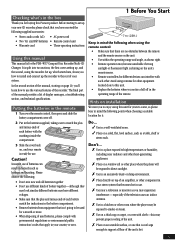
... please bear in mind the following supplied accessories: • Stereo audio cords (x2) • AC power cord • Two 'AA' size R6P batteries • Remote control unit • Warranty card • These operating instructions Using this manual This manual is split into two sections; In the second section of an amplifier, or other component in your new CD recorder, please check that becomes hot...
... please bear in mind the following supplied accessories: • Stereo audio cords (x2) • AC power cord • Two 'AA' size R6P batteries • Remote control unit • Warranty card • These operating instructions Using this manual This manual is split into two sections; In the second section of an amplifier, or other component in your new CD recorder, please check that becomes hot...

Owner's Manual
Page 6
... Compact Disc Digital Audio mark shown right. Use a dry cloth to the warmer temperature for about an hour before switching on the power cord or pinch the cord in normal use, but if for compatibility with a mild detergent solution made by the plug part. Never lift or move the unit during playback or recording - Although lens cleaners for a replacement. Power cord caution Handle the power cord by...
... Compact Disc Digital Audio mark shown right. Use a dry cloth to the warmer temperature for about an hour before switching on the power cord or pinch the cord in normal use, but if for compatibility with a mild detergent solution made by the plug part. Never lift or move the unit during playback or recording - Although lens cleaners for a replacement. Power cord caution Handle the power cord by...
Owner's Manual
Page 7
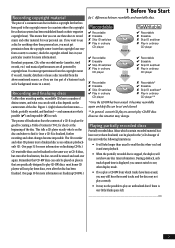
... records, etc.) and musical performances are specifically designed to play CD-RW discs: most home CD players will take longer than personal use, you must get permission from which contain recorded material but even after the disc has been finalized. (...disc may not play correctly. • It may not be played in the 3-CD changer of this situation may change. You must get permission from the copyright owner if you sell, transfer, distribute or lease a disc recorded from the above mentioned sources, or if you use it as part of a consumer-use a disc for anything other display mode...
... records, etc.) and musical performances are specifically designed to play CD-RW discs: most home CD players will take longer than personal use, you must get permission from which contain recorded material but even after the disc has been finalized. (...disc may not play correctly. • It may not be played in the 3-CD changer of this situation may change. You must get permission from the copyright owner if you sell, transfer, distribute or lease a disc recorded from the above mentioned sources, or if you use it as part of a consumer-use a disc for anything other display mode...
Owner's Manual
Page 8
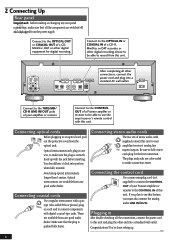
.... Optical interconnects are switched off and unplugged from the power supply. Connect to use the amp/receiver's remote control with the jack before inserting. Optical interconnects only plug in After double-checking all other digital equipment for the best connection. Connecting coaxial cords Use a regular interconnect with digital coaxial-type jacks. These are color-coded to record from the optical jack. Connecting stereo audio cords The two sets of a Pioneer amplifer or receiver to be able to make connection easier. Connecting the control cord Use a mono...
.... Optical interconnects are switched off and unplugged from the power supply. Connect to use the amp/receiver's remote control with the jack before inserting. Optical interconnects only plug in After double-checking all other digital equipment for the best connection. Connecting coaxial cords Use a regular interconnect with digital coaxial-type jacks. These are color-coded to record from the optical jack. Connecting stereo audio cords The two sets of a Pioneer amplifer or receiver to be able to make connection easier. Connecting the control cord Use a mono...
Owner's Manual
Page 10
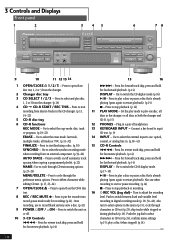
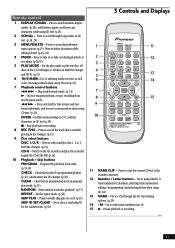
...) 6 CD-R functions 12 PHONES - Connect a key board to select the synchro recording mode 4 1 - Press to switch between fixed and variable level record-pause mode ready for forward track skip; press and hold (p.15); Push to start or pause recording. (p.14) 7 OPEN/CLOSE 0 - Also recording, use : optical, multiple tracks, all discs in . (p.38-41) FINALIZE - Press to play a disc or pause a disc that 's already preference menu options...
...) 6 CD-R functions 12 PHONES - Connect a key board to select the synchro recording mode 4 1 - Press to switch between fixed and variable level record-pause mode ready for forward track skip; press and hold (p.15); Push to start or pause recording. (p.14) 7 OPEN/CLOSE 0 - Also recording, use : optical, multiple tracks, all discs in . (p.38-41) FINALIZE - Press to play a disc or pause a disc that 's already preference menu options...
Owner's Manual
Page 11
...) 9 Disc select buttons DISC 1/2/3 - Remote control 1 DISPLAY/CHARA - Press to cycle through long names in program play disc 1, 2 or 3 from record-pause mode. 1 ¡ - Use to jump directly to select and play mode. (p.35) RANDOM - Press to track numbers for playback, selecting track numbers for editing / programming, and selecting letters when using CD text (p.23). 2 SCROLL - Press to copy the current CD text to access the preference menu options (p.15). Press to switch between display modes...
...) 9 Disc select buttons DISC 1/2/3 - Remote control 1 DISPLAY/CHARA - Press to cycle through long names in program play disc 1, 2 or 3 from record-pause mode. 1 ¡ - Use to jump directly to select and play mode. (p.35) RANDOM - Press to track numbers for playback, selecting track numbers for editing / programming, and selecting letters when using CD text (p.23). 2 SCROLL - Press to copy the current CD text to access the preference menu options (p.15). Press to switch between display modes...

Owner's Manual
Page 13
... REC THIS COMPACT DISC DIGITAL RECORDER OPEN/CLOSE 0 MENU /DELETE ¶ REC VOL PUSH ENTER CD TEXT Hi-bitLegatoLinkConversion Quick CD recording Although the PDR-W37 has many advanced recording features, duplicating a CD is playing, and the CD changer will sound a little strange! After a the new level. TIME MENU/ DELETE 4 ¢ ENTER 4 Getting Started OPEN/CLOSE 10 COMPACT DISC RECORDER / MULTI-CD CHANGER ◊...
... REC THIS COMPACT DISC DIGITAL RECORDER OPEN/CLOSE 0 MENU /DELETE ¶ REC VOL PUSH ENTER CD TEXT Hi-bitLegatoLinkConversion Quick CD recording Although the PDR-W37 has many advanced recording features, duplicating a CD is playing, and the CD changer will sound a little strange! After a the new level. TIME MENU/ DELETE 4 ¢ ENTER 4 Getting Started OPEN/CLOSE 10 COMPACT DISC RECORDER / MULTI-CD CHANGER ◊...

Owner's Manual
Page 23
...), with each key. If you're using the front panel, remote control, or a connected IBM-compatible PC keyboard (see page 9). 1 Make sure the disc you load the disc into the recorder and is stopped. Each title can appear in the recorder at the current cursor position changes between uppercase, lowercase, and numbers/symbols with a blinking cursor under the first character. This 4 is...
...), with each key. If you're using the front panel, remote control, or a connected IBM-compatible PC keyboard (see page 9). 1 Make sure the disc you load the disc into the recorder and is stopped. Each title can appear in the recorder at the current cursor position changes between uppercase, lowercase, and numbers/symbols with a blinking cursor under the first character. This 4 is...

Owner's Manual
Page 27
...;ÛB¿ˆ≤≥ 3 - Each input (analog, coaxial, and optical) has its own threshold level, which can number tracks manually as "silence". You can adjust the level of the recorder, you 're recording from an analog source-auto track numbering may not always recognize the gap between tracks. COMPACT DISC MULTI CHANGER 5 Recording Features COMPACT DISC DIGITAL RECORDER MENU/ DELETE 4 1 ¡ ¢ ¶ REC...
...;ÛB¿ˆ≤≥ 3 - Each input (analog, coaxial, and optical) has its own threshold level, which can number tracks manually as "silence". You can adjust the level of the recorder, you 're recording from an analog source-auto track numbering may not always recognize the gap between tracks. COMPACT DISC MULTI CHANGER 5 Recording Features COMPACT DISC DIGITAL RECORDER MENU/ DELETE 4 1 ¡ ¢ ¶ REC...

Owner's Manual
Page 34
... 0 (CD-R side). This means the player won't play on the front panel). When you 'll lose this sessions skip ID changes! Until you want to clear a skip ID, the display will light automatically if one or more are any skip IDs on the disc in its memory. COMPACT DISC MULTI CHANGER COMPACT DISC DIGITAL RECORDER OPEN/CLOSE 0 CD-R CONTROL ¶ REC VOL 6 7 PUSH...
... 0 (CD-R side). This means the player won't play on the front panel). When you 'll lose this sessions skip ID changes! Until you want to clear a skip ID, the display will light automatically if one or more are any skip IDs on the disc in its memory. COMPACT DISC MULTI CHANGER COMPACT DISC DIGITAL RECORDER OPEN/CLOSE 0 CD-R CONTROL ¶ REC VOL 6 7 PUSH...

Owner's Manual
Page 38
... digital, the display indicates the type of any discs playing in jacks. OPTICAL 2 - These points are starting in the proper places during automatic track numbering. 1 Stop playback of source if it recognizes it , there's also a manual recording mode. The display shows MONITOR. The level meter shows the recording level. COAXIAL The recorder's display indicates the current input. 4 The display shows monitoring information. OPTICAL 1 - If the source is especially useful...
... digital, the display indicates the type of any discs playing in jacks. OPTICAL 2 - These points are starting in the proper places during automatic track numbering. 1 Stop playback of source if it recognizes it , there's also a manual recording mode. The display shows MONITOR. The level meter shows the recording level. COAXIAL The recorder's display indicates the current input. 4 The display shows monitoring information. OPTICAL 1 - If the source is especially useful...

Owner's Manual
Page 39
... adjust the recording level (clockwise to increase or anticlockwise to choose optical or coaxial input. OPTICAL 1 - as the source. 5 Make sure that any discs loaded in the source should not light at all -track synchro mode, if the recorder detects another signal, recording starts again. • If you want to adjust the recording level: Start playing a sample of silence. • Press 7 to either of the digital inputs...
... adjust the recording level (clockwise to increase or anticlockwise to choose optical or coaxial input. OPTICAL 1 - as the source. 5 Make sure that any discs loaded in the source should not light at all -track synchro mode, if the recorder detects another signal, recording starts again. • If you want to adjust the recording level: Start playing a sample of silence. • Press 7 to either of the digital inputs...

Owner's Manual
Page 41
... the source is compatible. OPTICAL 2 - 8 Recording Other Sources COMPACT DISC RECORDER / MULTI-CD CHANGER ◊ÛB¿ˆ≤≥ 3 - COMPACT DISC MULTI CHANGER INPUT 7 COMPACT DISC DIGITAL RECORDER OPEN/CLOSE 0 REC/ REC MUTE ¶ ¶ ¡ ¢ DISPLAY CHARACTER REC VOL 6 7 PUSH ENTER CD TEXT Hi-bitLegatoLinkConversion Manual recording (analog or digital) The main use the DISPLAY button to check that • To adjust the recording level, see either a format...
... the source is compatible. OPTICAL 2 - 8 Recording Other Sources COMPACT DISC RECORDER / MULTI-CD CHANGER ◊ÛB¿ˆ≤≥ 3 - COMPACT DISC MULTI CHANGER INPUT 7 COMPACT DISC DIGITAL RECORDER OPEN/CLOSE 0 REC/ REC MUTE ¶ ¶ ¡ ¢ DISPLAY CHARACTER REC VOL 6 7 PUSH ENTER CD TEXT Hi-bitLegatoLinkConversion Manual recording (analog or digital) The main use the DISPLAY button to check that • To adjust the recording level, see either a format...
Owner's Manual
Page 44
..., if the signal resumes within about five seconds, the result will be set to program play mode, use the 1-track synchro recording mode - After recording, always remove the disc from that includes both digital audio and video or text, you losing some of audio discs - In other digital-copy restrictions, you can make further digital recordings from the recorder before switching the power off this could result in program play . If...
..., if the signal resumes within about five seconds, the result will be set to program play mode, use the 1-track synchro recording mode - After recording, always remove the disc from that includes both digital audio and video or text, you losing some of audio discs - In other digital-copy restrictions, you can make further digital recordings from the recorder before switching the power off this could result in program play . If...

Owner's Manual
Page 45
... state. Switch using the INPUT button. p. 13 NO DISC An attempt is made to the disc' s PMA (Program Memory Area). Wait for the message to set a skip ID by pressing 6. p. 39-40 p. 39-40 p. 38 CD (MD, DAT, DVD, DCC) PMA REC SKIP SET ? INITIALIZE ? Confirm that you want to disappear. The recorder shows the current input mode -digital or analog. Understanding display messages...
... state. Switch using the INPUT button. p. 13 NO DISC An attempt is made to the disc' s PMA (Program Memory Area). Wait for the message to set a skip ID by pressing 6. p. 39-40 p. 39-40 p. 38 CD (MD, DAT, DVD, DCC) PMA REC SKIP SET ? INITIALIZE ? Confirm that you want to disappear. The recorder shows the current input mode -digital or analog. Understanding display messages...

Owner's Manual
Page 47
... disc for consumer use without ejecting the disc. Some CD/ MD/DAT/DVD players are not compatible with SCMS. The digital source was pressed. The source player was already playing when the SYNCHRO button was interrupted. If you see the SYNCHRO indicator start to blink. 3 If none of the above solves the problem, use manual digital recording to recording 9 Additional Information Message Can't REC D.IN UNLOCK Can't SYNC CHECK INPUT...
... disc for consumer use without ejecting the disc. Some CD/ MD/DAT/DVD players are not compatible with SCMS. The digital source was pressed. The source player was already playing when the SYNCHRO button was interrupted. If you see the SYNCHRO indicator start to blink. 3 If none of the above solves the problem, use manual digital recording to recording 9 Additional Information Message Can't REC D.IN UNLOCK Can't SYNC CHECK INPUT...

Owner's Manual
Page 48
... level is not set too low - pages 40-41. • Check that you 've selected the correct input. If it has, use another component's power output, check that all connections to the amplifier are correct and that the recording level is not set too high.- pages 28, 39-41. • Some analog sources output a very high level signal that may be interference from a nearby TV. Can't operate using the remote control...
... level is not set too low - pages 40-41. • Check that you 've selected the correct input. If it has, use another component's power output, check that all connections to the amplifier are correct and that the recording level is not set too high.- pages 28, 39-41. • Some analog sources output a very high level signal that may be interference from a nearby TV. Can't operate using the remote control...


