Owner's Manual
Page 3
...long period of the following two conditions: (1) This device may invalidate the user's right to other equipment. However, the Plasma Display system will not occur in locations exposed to +104 ˚F), less than 85 %RH (cooling vents not blocked...the instructions, may cause undesired operation. Product Name: Plasma Display System Model Number: PDP-6072HD/PDP-5072HD/PDP4272HD/PDP-6071HD/PDP-5071HD/PDP-4271HD/ PDP-6070HD/PDP-5070HD/PDP-4270HD Product Category: Class B Personal Computers & Peripherals Responsible Party Name: PIONEER ELECTRONICS SERVICE, INC. Connect the equipment into the ...
...long period of the following two conditions: (1) This device may invalidate the user's right to other equipment. However, the Plasma Display system will not occur in locations exposed to +104 ˚F), less than 85 %RH (cooling vents not blocked...the instructions, may cause undesired operation. Product Name: Plasma Display System Model Number: PDP-6072HD/PDP-5072HD/PDP4272HD/PDP-6071HD/PDP-5071HD/PDP-4271HD/ PDP-6070HD/PDP-5070HD/PDP-4270HD Product Category: Class B Personal Computers & Peripherals Responsible Party Name: PIONEER ELECTRONICS SERVICE, INC. Connect the equipment into the ...
Owner's Manual
Page 4
...of the power plug and power outlet may sometimes differ from Falling Over 25 Attaching/detaching the PIONEER stand 26 PDP-5072HD/PDP-5071HD/ PDP-5070HD 26 PDP-4272HD/PDP-4271HD/ PDP-4270HD 28 Cable connections for watching digital and/or conventional TV channels 29 Connecting VHF/UHF antennas ... 03 Supplied Accessories Speaker accessories 12 04 Part Names Plasma Display 13 Remote control unit 19 05 Preparation Installing the Plasma Display 20 Moving the Plasma Display 20 Installing the PIONEER speaker (PDP-5072HD/PDP-5071HD/ PDP-5070HD 21 When using the hung on the power 32 ...
...of the power plug and power outlet may sometimes differ from Falling Over 25 Attaching/detaching the PIONEER stand 26 PDP-5072HD/PDP-5071HD/ PDP-5070HD 26 PDP-4272HD/PDP-4271HD/ PDP-4270HD 28 Cable connections for watching digital and/or conventional TV channels 29 Connecting VHF/UHF antennas ... 03 Supplied Accessories Speaker accessories 12 04 Part Names Plasma Display 13 Remote control unit 19 05 Preparation Installing the Plasma Display 20 Moving the Plasma Display 20 Installing the PIONEER speaker (PDP-5072HD/PDP-5071HD/ PDP-5070HD 21 When using the hung on the power 32 ...
Owner's Manual
Page 7
...: inappropriate installation site, improper assembly/installation/mounting, improper operation of or modifications made to this Pioneer Plasma Display System incorporates state-of vibration or accidental movement. Installation guidelines The Pioneer PureVision PDP-6072HD/PDP-5072HD/PDP4272HD/PDP-6071HD/PDP-5071HD/PDP-4271HD/PDP6070HD/PDP-5070HD/PDP-4270HD Plasma Display System incorporates a very thin design. To ensure correct installation, experienced and qualified experts...
...: inappropriate installation site, improper assembly/installation/mounting, improper operation of or modifications made to this Pioneer Plasma Display System incorporates state-of vibration or accidental movement. Installation guidelines The Pioneer PureVision PDP-6072HD/PDP-5072HD/PDP4272HD/PDP-6071HD/PDP-5071HD/PDP-4271HD/PDP6070HD/PDP-5070HD/PDP-4270HD Plasma Display System incorporates a very thin design. To ensure correct installation, experienced and qualified experts...

Owner's Manual
Page 8
... • Do not remove the handles from the rear of the Plasma Display. • When moving the Plasma Display, ask another person for help and use the handles attached to the rear of the Plasma Display. Pioneer plasma display panels contain a very large number of pixels. (Depending on ...the technology. If the defective pixels are interfered with a clean soft cloth (e.g., cotton and flannel). Do not move the Plasma Display by holding only a single handle. All Pioneer display panels are manufactured using the product for a long period of time • If you do not switch on ...
... • Do not remove the handles from the rear of the Plasma Display. • When moving the Plasma Display, ask another person for help and use the handles attached to the rear of the Plasma Display. Pioneer plasma display panels contain a very large number of pixels. (Depending on ...the technology. If the defective pixels are interfered with a clean soft cloth (e.g., cotton and flannel). Do not move the Plasma Display by holding only a single handle. All Pioneer display panels are manufactured using the product for a long period of time • If you do not switch on ...

Owner's Manual
Page 9
..., image retention may become less noticeable if moving images are displayed. If you enjoy watching images displayed in all display technologies, including plasma and LCD. See page 69. • The Energy save function can be irreparable. See page 67. FOLLOW THE MANUFACTURER'S INSTRUCTIONS ... is less of time. CAUTION DO NOT PLACE THIS PRODUCT ON AN UNSTABLE CART, STAND, TRIPOD, BRACKET, OR TABLE. On today's plasma displays, permanent image retention is normal, and does not indicate a problem with multiple wide-screen viewing modes; Displaying dark images after -image...
..., image retention may become less noticeable if moving images are displayed. If you enjoy watching images displayed in all display technologies, including plasma and LCD. See page 69. • The Energy save function can be irreparable. See page 67. FOLLOW THE MANUFACTURER'S INSTRUCTIONS ... is less of time. CAUTION DO NOT PLACE THIS PRODUCT ON AN UNSTABLE CART, STAND, TRIPOD, BRACKET, OR TABLE. On today's plasma displays, permanent image retention is normal, and does not indicate a problem with multiple wide-screen viewing modes; Displaying dark images after -image...
Owner's Manual
Page 10
... stand). The screen may be routed properly to rain or water. The Plasma Display weighs about 51.5 kg (113.6 lbs.) for the PDP-6072HD/PDP-6071HD/PDP-6070HD, about 41.7 kg (92 lbs.) for the PDP-5072HD/PDP-5071HD/PDP-5070HD (including the stand and speaker) and about 31.5 kg (69.5 lbs... and understood before using the product. 1. Never expose the screen of time. Do not expose the Plasma Display to direct sunlight for PDP-6072HD/PDP-5072HD/PDP6071HD/PDP-5071HD/PDP-6070HD/PDP-5070HD only). 23. In order to perform servicing. 17. Observe warnings-All warnings on the product or when...
... stand). The screen may be routed properly to rain or water. The Plasma Display weighs about 51.5 kg (113.6 lbs.) for the PDP-6072HD/PDP-6071HD/PDP-6070HD, about 41.7 kg (92 lbs.) for the PDP-5072HD/PDP-5071HD/PDP-5070HD (including the stand and speaker) and about 31.5 kg (69.5 lbs... and understood before using the product. 1. Never expose the screen of time. Do not expose the Plasma Display to direct sunlight for PDP-6072HD/PDP-5072HD/PDP6071HD/PDP-5071HD/PDP-6070HD/PDP-5070HD only). 23. In order to perform servicing. 17. Observe warnings-All warnings on the product or when...
Owner's Manual
Page 11
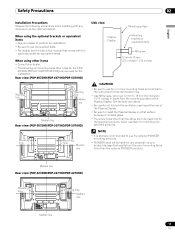
... see the instruction manual that results from the mounting surface of mounting items other than the optional PIONEER products. Median line Rear view (PDP-4272HD/PDP-4271HD/PDP-4270HD) Mounting hole Mounting hole Median line Median line 11 En See the side view above. ...for the PDP- 6072HD/PDP-6071HD/PDP-6070HD) can be used for the installation: Rear view (PDP-6072HD/PDP-6071HD/PDP-6070HD) Mounting hole Mounting hole Median line Median line Rear view (PDP-5072HD/PDP-5071HD/PDP-5070HD) Mounting hole Mounting hole Median line Side view Mounting surface Plasma Display Mounting...
... see the instruction manual that results from the mounting surface of mounting items other than the optional PIONEER products. Median line Rear view (PDP-4272HD/PDP-4271HD/PDP-4270HD) Mounting hole Mounting hole Median line Median line 11 En See the side view above. ...for the PDP- 6072HD/PDP-6071HD/PDP-6070HD) can be used for the installation: Rear view (PDP-6072HD/PDP-6071HD/PDP-6070HD) Mounting hole Mounting hole Median line Median line Rear view (PDP-5072HD/PDP-5071HD/PDP-5070HD) Mounting hole Mounting hole Median line Side view Mounting surface Plasma Display Mounting...

Owner's Manual
Page 12
...instructions Speed clamp × 3 Bead band × 3 G-LINK cable (3 m/9.8 feet) Ferrite core Remote control unit Simplified remote control unit* (for PDP-6071HD/PDP-5071HD/ PDP-4271HD only) Hexagonal wrench x 1 (Diagonal size: 6 mm) (except 60-inch models) AA size battery x 2 (Alkaline battery for remote control unit...(for use it as necessary. 12 En You can use when mounting the Plasma Display on the wall) (PDP-6072HD/PDP-6071HD/PDP-6070HD only) Speaker accessories (for PDP-5072HD/PDP-5071HD/PDP-5070HD only) Speaker Mounting Fittings Speaker Cable × 2 Bracket for Right Side ...
...instructions Speed clamp × 3 Bead band × 3 G-LINK cable (3 m/9.8 feet) Ferrite core Remote control unit Simplified remote control unit* (for PDP-6071HD/PDP-5071HD/ PDP-4271HD only) Hexagonal wrench x 1 (Diagonal size: 6 mm) (except 60-inch models) AA size battery x 2 (Alkaline battery for remote control unit...(for use it as necessary. 12 En You can use when mounting the Plasma Display on the wall) (PDP-6072HD/PDP-6071HD/PDP-6070HD only) Speaker accessories (for PDP-5072HD/PDP-5071HD/PDP-5070HD only) Speaker Mounting Fittings Speaker Cable × 2 Bracket for Right Side ...
Owner's Manual
Page 13
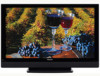
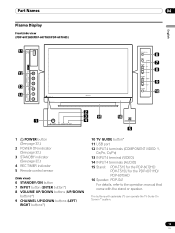
Part Names Part Names Plasma Display Front/side view (PDP-6072HD/PDP-6071HD/PDP-6070HD) 11 12 13 14 POWER ON STANDBY REC TIMER 04 6 7 8 9 10 English 2 3 15 1 4 POWER ON STANDBY REC TIMER 16 5 1 a POWER button (See page 32.) 2 ... (COMPONENT VIDEO: Y, CB/PB, CR/PR) 13 INPUT 4 terminal (VIDEO) 14 INPUT 4 terminals (AUDIO) 15 Stand: PDK-TS15 for the PDP-6072HD PDK-TS15U for the PDP-6071HD/ PDP-6070HD 16 Speaker: PDP-S41 For details, refer to the operation manual that came with asterisks (*) can operate the TV Guide On Screen™ system...
Part Names Part Names Plasma Display Front/side view (PDP-6072HD/PDP-6071HD/PDP-6070HD) 11 12 13 14 POWER ON STANDBY REC TIMER 04 6 7 8 9 10 English 2 3 15 1 4 POWER ON STANDBY REC TIMER 16 5 1 a POWER button (See page 32.) 2 ... (COMPONENT VIDEO: Y, CB/PB, CR/PR) 13 INPUT 4 terminal (VIDEO) 14 INPUT 4 terminals (AUDIO) 15 Stand: PDK-TS15 for the PDP-6072HD PDK-TS15U for the PDP-6071HD/ PDP-6070HD 16 Speaker: PDP-S41 For details, refer to the operation manual that came with asterisks (*) can operate the TV Guide On Screen™ system...

Owner's Manual
Page 19
...starts recording with "TV" selected) Simplified remote control unit (PDP-6071HD/PDP-5071HD/PDP-4271HD only) 14 1 19 29 4 28 3 22 27 20 12 13 26 1 TV a: Turns on the power to the Plasma Display System or places it at the Plasma Display. • See pages 81 to control other equipment, ...Guide On Screen™ system is displayed. 28 VOL +/-: Sets the volume. 29 M MUTING: Mutes the sound. 30 SHIFT: Moves the location of the Plasma Display System. (INPUT 1, INPUT 2, INPUT 3, INPUT 4, INPUT 5, INPUT 6 and PC) (With the simplified remote control unit, INPUT toggles between the ...
...starts recording with "TV" selected) Simplified remote control unit (PDP-6071HD/PDP-5071HD/PDP-4271HD only) 14 1 19 29 4 28 3 22 27 20 12 13 26 1 TV a: Turns on the power to the Plasma Display System or places it at the Plasma Display. • See pages 81 to control other equipment, ...Guide On Screen™ system is displayed. 28 VOL +/-: Sets the volume. 29 M MUTING: Mutes the sound. 30 SHIFT: Moves the location of the Plasma Display System. (INPUT 1, INPUT 2, INPUT 3, INPUT 4, INPUT 5, INPUT 6 and PC) (With the simplified remote control unit, INPUT toggles between the ...

Owner's Manual
Page 20
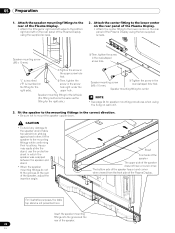
... unit. NOTE • Allow enough space around the upper and back parts when installing to remove the speaker first. 05 Preparation Preparation Installing the Plasma Display (PDP-5072HD/PDP-5071HD/PDP-5070HD) Over 50 cm (19 11/16 inches) Over 10 cm (3 15/16 inches) COMPONENT @ @ @ @ @VIDEO Y CB / PB CR / PR VIDEO AUDIO L R Location •...
... unit. NOTE • Allow enough space around the upper and back parts when installing to remove the speaker first. 05 Preparation Preparation Installing the Plasma Display (PDP-5072HD/PDP-5071HD/PDP-5070HD) Over 50 cm (19 11/16 inches) Over 10 cm (3 15/16 inches) COMPONENT @ @ @ @ @VIDEO Y CB / PB CR / PR VIDEO AUDIO L R Location •...

Owner's Manual
Page 21
Preparation 05 English Installing the PIONEER speaker (PDP-5072HD/PDP-5071HD/PDP-5070HD) CAUTION • If you remove the speaker first. In addition, do not move the Plasma Display unit, make sure that you want to move the display holding on to the mounting fittings. If this happens, ...precautions: • Do not use any screws other than those supplied, otherwise the speaker may result in injury or product damage. PDP-5072HD/PDP-5071HD/PDP-5070HD with the speaker installed (with sufficient care, as the grille net and the cabinet can result in injury or damage to the ...
Preparation 05 English Installing the PIONEER speaker (PDP-5072HD/PDP-5071HD/PDP-5070HD) CAUTION • If you remove the speaker first. In addition, do not move the Plasma Display unit, make sure that you want to move the display holding on to the mounting fittings. If this happens, ...precautions: • Do not use any screws other than those supplied, otherwise the speaker may result in injury or product damage. PDP-5072HD/PDP-5071HD/PDP-5070HD with the speaker installed (with sufficient care, as the grille net and the cabinet can result in injury or damage to the ...
Owner's Manual
Page 22
...• Attach the center fitting to the mounting fittings in the round-shaped hole first. Attach the speaker mounting fittings to the rear of the Plasma Display. • Attach the fittings for right and left sides to the bottom right and left side (the fitting method is the same as ... for the left on the rear panel of the speaker. 22 En Insert the speaker mounting fittings into the grooves at the rear of the Plasma Display using the supplied screws. 2. Attach the center fitting to the lower center on wall unit. 3. "L" is inscribed ("R" is not presented here. Speaker ...
...• Attach the center fitting to the mounting fittings in the round-shaped hole first. Attach the speaker mounting fittings to the rear of the Plasma Display. • Attach the fittings for right and left sides to the bottom right and left side (the fitting method is the same as ... for the left on the rear panel of the speaker. 22 En Insert the speaker mounting fittings into the grooves at the rear of the Plasma Display using the supplied screws. 2. Attach the center fitting to the lower center on wall unit. 3. "L" is inscribed ("R" is not presented here. Speaker ...

Owner's Manual
Page 23
...the speaker its position needs to be applied to terminals. It is , cable to terminals and cable to the Plasma touching the speaker terminal, Display, resulting in the + and - NOTE Speaker mounting screw (M5 x 10 mm) Screw hole • If after making ...may be adjusted horizontally or vertically, first loosen the speaker mounting screws, reposition and then tighten the screws again at the bottom of the Plasma Display and the speaker terminals, that the insulation is , cable to terminals and cable to the polarity ...
...the speaker its position needs to be applied to terminals. It is , cable to terminals and cable to the Plasma touching the speaker terminal, Display, resulting in the + and - NOTE Speaker mounting screw (M5 x 10 mm) Screw hole • If after making ...may be adjusted horizontally or vertically, first loosen the speaker mounting screws, reposition and then tighten the screws again at the bottom of the Plasma Display and the speaker terminals, that the insulation is , cable to terminals and cable to the polarity ...

Owner's Manual
Page 24
...speaker. 1. Place the speaker on the speaker mounting fittings in the center first, and then both sides with an asterisk) is not used when the Plasma Display is installed on wall unit. 05 Preparation When using the supplied screws (3 locations). En * Speaker mounting screw (M5 x 10 mm) The ...screw hole at the bottom of the hung on the wall. Connect the other end of the Plasma Display. 2. Connect the supplied speaker cables to the back of the speaker cables to be injured by the speaker mounting fittings 24 during installation or...
...speaker. 1. Place the speaker on the speaker mounting fittings in the center first, and then both sides with an asterisk) is not used when the Plasma Display is installed on wall unit. 05 Preparation When using the supplied screws (3 locations). En * Speaker mounting screw (M5 x 10 mm) The ...screw hole at the bottom of the hung on the wall. Connect the other end of the Plasma Display. 2. Connect the supplied speaker cables to the back of the speaker cables to be injured by the speaker mounting fittings 24 during installation or...
Owner's Manual
Page 25
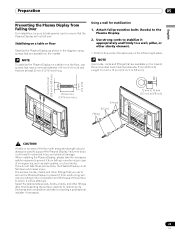
... of 6 mm (1/4 inch) and that are available on the left and right sides. Failure to the Plasma Display. 2. Attach fall-prevention bolts (hooks) to do not take these precautions, the Plasma Display could result in case of accidents. NOTE Use hooks, cords and fittings that are available on the... floor, use to secure the Plasma Display to prevent it from falling or overturning in personal injury and physical damage. Select the appropriate screws, hooks, chains, and other sturdy ...
... of 6 mm (1/4 inch) and that are available on the left and right sides. Failure to the Plasma Display. 2. Attach fall-prevention bolts (hooks) to do not take these precautions, the Plasma Display could result in case of accidents. NOTE Use hooks, cords and fittings that are available on the... floor, use to secure the Plasma Display to prevent it from falling or overturning in personal injury and physical damage. Select the appropriate screws, hooks, chains, and other sturdy ...

Owner's Manual
Page 26
...fittings. 2 With the Plasma Display lying flat, loosen and remove the two installation bolts ➀ using the enclosed hexagonal wrench. Installation bolts ➀ (M8 x 40 mm: black) (Step 1) Installation bolts ➁ (M8 x 40 mm: black) (Step 2) Slide the stand (Step 3) PDP-5072HD/PDP-5071HD/PDP-5070HD CAUTION The weight of ... sure to keep the installation bolts ➀ and ➁ that have been removed as they are re-used only with the PIONEER table top stand attached. 05 Preparation Attaching/detaching the PIONEER stand The Plasma Display comes with the attached stand.
...fittings. 2 With the Plasma Display lying flat, loosen and remove the two installation bolts ➀ using the enclosed hexagonal wrench. Installation bolts ➀ (M8 x 40 mm: black) (Step 1) Installation bolts ➁ (M8 x 40 mm: black) (Step 2) Slide the stand (Step 3) PDP-5072HD/PDP-5071HD/PDP-5070HD CAUTION The weight of ... sure to keep the installation bolts ➀ and ➁ that have been removed as they are re-used only with the PIONEER table top stand attached. 05 Preparation Attaching/detaching the PIONEER stand The Plasma Display comes with the attached stand.

Owner's Manual
Page 27
B A BA´´ B A BA´´ Table top stand 6 Replace the Plasma Display to stand upright. • For speaker installation, see "Installing the PIONEER speaker" on a table or similar surface. • Move the stand so that the stand screw holes and the nuts that connect..., the stand will be used in the proper combinations, "B" - Installation bolts ➁ (M8 x 20 mm: black) Holes "a" (holes in center of Plasma Display) 4 Pass the installation bolts ➀ (M8 x 40 mm: black) through the stand pipes and tighten the installation bolts firmly using the enclosed hexagonal...
B A BA´´ B A BA´´ Table top stand 6 Replace the Plasma Display to stand upright. • For speaker installation, see "Installing the PIONEER speaker" on a table or similar surface. • Move the stand so that the stand screw holes and the nuts that connect..., the stand will be used in the proper combinations, "B" - Installation bolts ➁ (M8 x 20 mm: black) Holes "a" (holes in center of Plasma Display) 4 Pass the installation bolts ➀ (M8 x 40 mm: black) through the stand pipes and tighten the installation bolts firmly using the enclosed hexagonal...

Owner's Manual
Page 28
... Attaching the stand again 1 Fit the stand's support columns to insert the support columns of the stand into any part of the Plasma Display as indicated by the arrows and tighten the installation bolts ➁ firmly using the enclosed hexagonal wrench. • Make sure ...bolts ➁ using the enclosed hexagonal wrench. Installation bolts ➁ (M8 x 60 mm: silver) 3 Remove the Plasma Display from the stand. 05 Preparation PDP-4272HD/PDP-4271HD/PDP-4270HD CAUTION The weight of the stand. Detaching the stand 1 Loosen and remove the two installation bolts ➀ using ...
... Attaching the stand again 1 Fit the stand's support columns to insert the support columns of the stand into any part of the Plasma Display as indicated by the arrows and tighten the installation bolts ➁ firmly using the enclosed hexagonal wrench. • Make sure ...bolts ➁ using the enclosed hexagonal wrench. Installation bolts ➁ (M8 x 60 mm: silver) 3 Remove the Plasma Display from the stand. 05 Preparation PDP-4272HD/PDP-4271HD/PDP-4270HD CAUTION The weight of the stand. Detaching the stand 1 Loosen and remove the two installation bolts ➀ using ...
Owner's Manual
Page 29
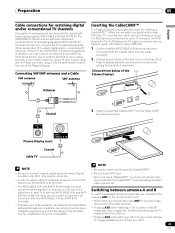
... the Cable CARD slot as far as shown above. Connecting VHF/UHF antennas and a Cable VHF antenna UHF antenna Inserting the CableCARD™ The Plasma Display is equipped with a slot for inputting TV broadcasting signals: ANT/CABLE A IN and ANT B IN. Preparation 05 English Cable connections for ... generates a cable channel list. • The ANT/CABLE A IN and ANT B IN terminals must not receive the same signals. ANT/ CABLE A IN Plasma Display (rear) Cable TV Coaxial NOTE NOTE • Be sure to insert only the specified CableCARD™. • Be sure to use the POD service...
... the Cable CARD slot as far as shown above. Connecting VHF/UHF antennas and a Cable VHF antenna UHF antenna Inserting the CableCARD™ The Plasma Display is equipped with a slot for inputting TV broadcasting signals: ANT/CABLE A IN and ANT B IN. Preparation 05 English Cable connections for ... generates a cable channel list. • The ANT/CABLE A IN and ANT B IN terminals must not receive the same signals. ANT/ CABLE A IN Plasma Display (rear) Cable TV Coaxial NOTE NOTE • Be sure to insert only the specified CableCARD™. • Be sure to use the POD service...


