Owner's Manual
Page 3
... - Product Name: Plasma Display System Model Number: PDP-6072HD/PDP-5072HD/PDP4272HD/PDP-6071HD/PDP-5071HD/PDP-4271HD/ PDP-6070HD/PDP-5070HD/PDP-4270HD Product Category: Class B Personal Computers & Peripherals Responsible Party Name: PIONEER ELECTRONICS SERVICE, INC. PLEASE WRITE THIS SERIAL NUMBER ON YOUR ENCLOSED WARRANTY CARD AND KEEP IN A SECURE AREA. STANDBY/ON Indicator: The indicator is lit red when the unit is in the standby mode and lit blue when it...
... - Product Name: Plasma Display System Model Number: PDP-6072HD/PDP-5072HD/PDP4272HD/PDP-6071HD/PDP-5071HD/PDP-4271HD/ PDP-6070HD/PDP-5070HD/PDP-4270HD Product Category: Class B Personal Computers & Peripherals Responsible Party Name: PIONEER ELECTRONICS SERVICE, INC. PLEASE WRITE THIS SERIAL NUMBER ON YOUR ENCLOSED WARRANTY CARD AND KEEP IN A SECURE AREA. STANDBY/ON Indicator: The indicator is lit red when the unit is in the standby mode and lit blue when it...
Owner's Manual
Page 4
... 03 Supplied Accessories Speaker accessories 12 04 Part Names Plasma Display 13 Remote control unit 19 05 Preparation Installing the Plasma Display 20 Moving the Plasma Display 20 Installing the PIONEER speaker (PDP-5072HD/PDP-5071HD/ PDP-5070HD 21 When using the hung on the power 32 Turning off the power 32 Watching TV channels 33 Selecting the antenna 33 Changing channels 33 Changing the volume and sound ........ 34 Changing the language 34 Setting MTS/SAP mode 35 Viewing a channel banner 36 Using the POD service 36 Using...
... 03 Supplied Accessories Speaker accessories 12 04 Part Names Plasma Display 13 Remote control unit 19 05 Preparation Installing the Plasma Display 20 Moving the Plasma Display 20 Installing the PIONEER speaker (PDP-5072HD/PDP-5071HD/ PDP-5070HD 21 When using the hung on the power 32 Turning off the power 32 Watching TV channels 33 Selecting the antenna 33 Changing channels 33 Changing the volume and sound ........ 34 Changing the language 34 Setting MTS/SAP mode 35 Viewing a channel banner 36 Using the POD service 36 Using...
Owner's Manual
Page 5
... Using the TV Guide On Screen™ system 52 Screen components 52 TV Guide On Screen™ icons 52 Selecting a screen size for received 4:3 aspect ratio signals 70 Changing the brightness at both sides of the screen (Side Mask 70 Language setting 70 TV Guide On Screen™ navigation ....... 53 12 Enjoying through External Equipment The Listings screen 53 About External Equipment 71 Recording programs 54 Watching a DVD image 71 Setting program reminders 55 Connecting a DVD player...
... Using the TV Guide On Screen™ system 52 Screen components 52 TV Guide On Screen™ icons 52 Selecting a screen size for received 4:3 aspect ratio signals 70 Changing the brightness at both sides of the screen (Side Mask 70 Language setting 70 TV Guide On Screen™ navigation ....... 53 12 Enjoying through External Equipment The Listings screen 53 About External Equipment 71 Recording programs 54 Watching a DVD image 71 Setting program reminders 55 Connecting a DVD player...
Owner's Manual
Page 6
... Setup screen 80 Starting the Slide Show screen 80 13 Useful Remote Control Features Presetting manufacturer codes to control other devices 81 Presetting manufacturer codes ...........81 Library Search 81 Manufacturing Reset 81 Programming codes 82 CABLE 82 SATELLITE 82 VCR 83 PVR 85 DVD 85 DVD-R 86 LD 86 Using the remote control unit to control other devices 87 Receiver control buttons 87 CBL/SAT control buttons 88 VCR control buttons 89 DVD/DVR control buttons 90 14 Appendix Troubleshooting...
... Setup screen 80 Starting the Slide Show screen 80 13 Useful Remote Control Features Presetting manufacturer codes to control other devices 81 Presetting manufacturer codes ...........81 Library Search 81 Manufacturing Reset 81 Programming codes 82 CABLE 82 SATELLITE 82 VCR 83 PVR 85 DVD 85 DVD-R 86 LD 86 Using the remote control unit to control other devices 87 Receiver control buttons 87 CBL/SAT control buttons 88 VCR control buttons 89 DVD/DVR control buttons 90 14 Appendix Troubleshooting...
Owner's Manual
Page 7
... ventilation is strongly recommended. closed-captioned images or video game images which have static portions). • Avoid viewing the On Screen Display for extended periods, from a DVD player, VCR, and all phosphor-based screens (for over a long period of time, when using the Plasma Display System, always switch the display to "STANDBY" mode. • Extensive viewing of accessories other than the PIONEER stand or installation bracket may result in possible malfunction. Using the unit without proper ventilation...
... ventilation is strongly recommended. closed-captioned images or video game images which have static portions). • Avoid viewing the On Screen Display for extended periods, from a DVD player, VCR, and all phosphor-based screens (for over a long period of time, when using the Plasma Display System, always switch the display to "STANDBY" mode. • Extensive viewing of accessories other than the PIONEER stand or installation bracket may result in possible malfunction. Using the unit without proper ventilation...

Owner's Manual
Page 9
... plasma and LCD. CAUTION Panel sticking and after -images to burning Avoid displaying the same image on all phosphor-based display systems (including CRT television systems-both direct view and projection-as well as still images, fixed images from screen burning. See page 67. This Plasma Display is less of these screen modes to the remaining electric load. In most cases, the image retention can remain. USE ONLY WITH A CART, STAND, TRIPOD, BRACKET, OR TABLE...
... plasma and LCD. CAUTION Panel sticking and after -images to burning Avoid displaying the same image on all phosphor-based display systems (including CRT television systems-both direct view and projection-as well as still images, fixed images from screen burning. See page 67. This Plasma Display is less of these screen modes to the remaining electric load. In most cases, the image retention can remain. USE ONLY WITH A CART, STAND, TRIPOD, BRACKET, OR TABLE...
Owner's Manual
Page 10
... to perform servicing. 17. Request a qualified service person to service the product yourself. When the power cord or plug is provided or the manufacturer's instructions are designed for built-in installation; b. d. Use of time. The Plasma Display weighs about 51.5 kg (113.6 lbs.) for the PDP-6072HD/PDP-6071HD/PDP-6070HD, about 41.7 kg (92 lbs.) for the PDP-5072HD/PDP-5071HD/PDP-5070HD (including the stand and speaker) and about...
... to perform servicing. 17. Request a qualified service person to service the product yourself. When the power cord or plug is provided or the manufacturer's instructions are designed for built-in installation; b. d. Use of time. The Plasma Display weighs about 51.5 kg (113.6 lbs.) for the PDP-6072HD/PDP-6071HD/PDP-6070HD, about 41.7 kg (92 lbs.) for the PDP-5072HD/PDP-5071HD/PDP-5070HD (including the stand and speaker) and about...

Owner's Manual
Page 19
... menu screen. 25 MENU: Displays a panel menu in dark places. Part Names 04 English Remote control unit This section describes the functions of the Plasma Display System. (INPUT 1, INPUT 2, INPUT 3, INPUT 4, INPUT 5, INPUT 6 and PC) (With the simplified remote control unit, INPUT toggles between the two screens when in the 2screen or picture-in-picture mode. See page 49 for details. 19 AV SELECTION: Selects audio and video settings. (AV mode: STANDARD, DYNAMIC, MOVIE, GAME, USER. PC mode: STANDARD, USER.) 20 DISPLAY: Displays the channel...
... menu screen. 25 MENU: Displays a panel menu in dark places. Part Names 04 English Remote control unit This section describes the functions of the Plasma Display System. (INPUT 1, INPUT 2, INPUT 3, INPUT 4, INPUT 5, INPUT 6 and PC) (With the simplified remote control unit, INPUT toggles between the two screens when in the 2screen or picture-in-picture mode. See page 49 for details. 19 AV SELECTION: Selects audio and video settings. (AV mode: STANDARD, DYNAMIC, MOVIE, GAME, USER. PC mode: STANDARD, USER.) 20 DISPLAY: Displays the channel...

Owner's Manual
Page 21
... supplied, otherwise the speaker may result in injury or damage to the Plasma Display. This may become damaged or broken when they are subjected to strong external impacts. • Placing a CRT computer screen or CRT monitor near to the speaker may come off and remove the power cord from the power outlet beforehand when changing the connection or installation method. Preparation 05 English Installing the PIONEER speaker (PDP-5072HD/PDP-5071HD/PDP-5070HD...
... supplied, otherwise the speaker may result in injury or damage to the Plasma Display. This may become damaged or broken when they are subjected to strong external impacts. • Placing a CRT computer screen or CRT monitor near to the speaker may come off and remove the power cord from the power outlet beforehand when changing the connection or installation method. Preparation 05 English Installing the PIONEER speaker (PDP-5072HD/PDP-5071HD/PDP-5070HD...

Owner's Manual
Page 26
... to remove the speaker mounting fittings. 2 With the Plasma Display lying flat, loosen and remove the two installation bolts ➀ using the enclosed hexagonal wrench. 05 Preparation Attaching/detaching the PIONEER stand The Plasma Display comes with step 2. 1 Detach the supplied speaker if it has already been installed. • To detach the speaker, remove the cable wiring for the speaker at the rear and screws at least two people must assemble and install it. Installation bolts ➀...
... to remove the speaker mounting fittings. 2 With the Plasma Display lying flat, loosen and remove the two installation bolts ➀ using the enclosed hexagonal wrench. 05 Preparation Attaching/detaching the PIONEER stand The Plasma Display comes with step 2. 1 Detach the supplied speaker if it has already been installed. • To detach the speaker, remove the cable wiring for the speaker at the rear and screws at least two people must assemble and install it. Installation bolts ➀...
Owner's Manual
Page 29
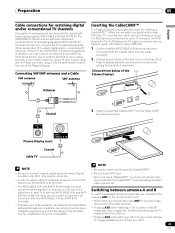
... receive the same signals. For example, do not connect a cable from below of the Tab Plasma Display) U/Vmixer 1 2 Coaxial 3 Insert the specified CableCARD™ into the Cable CARD slot as far as it into the antenna terminal at the rear of useful information, using cable TV to digital programming and broadcasting, TV Guide Data may not be available in the 2-screen mode with an F-type connector, plug it goes. Switching...
... receive the same signals. For example, do not connect a cable from below of the Tab Plasma Display) U/Vmixer 1 2 Coaxial 3 Insert the specified CableCARD™ into the Cable CARD slot as far as it into the antenna terminal at the rear of useful information, using cable TV to digital programming and broadcasting, TV Guide Data may not be available in the 2-screen mode with an F-type connector, plug it goes. Switching...
Owner's Manual
Page 31
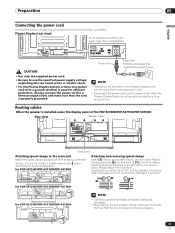
Plasma Display (rear view) AC IN terminal is installed under the display panel of the PDP-5072HD/PDP-5071HD/PDP-5070HD: Rear view Speaker cable Bead band Attaching speed clamps to the main unit Attach the speed clamps using any pressure. 31 En Routing cables When the speaker is located on the upper edge of the Plasma Display when connecting or disconnecting power cords. • Disconnect the power cord from the power outlet when the Plasma Display System is properly...
Plasma Display (rear view) AC IN terminal is installed under the display panel of the PDP-5072HD/PDP-5071HD/PDP-5070HD: Rear view Speaker cable Bead band Attaching speed clamps to the main unit Attach the speed clamps using any pressure. 31 En Routing cables When the speaker is located on the upper edge of the Plasma Display when connecting or disconnecting power cords. • Disconnect the power cord from the power outlet when the Plasma Display System is properly...
Owner's Manual
Page 32
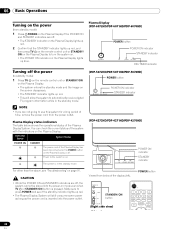
... the power (to automatically receive digital TV program information while in the standby mode. (PDP-5072HD/PDP-5071HD/PDP-5070HD) POWER button POWER ON STANDBY POWER ON indicator STANDBY indicator (PDP-4272HD/PDP-4271HD/PDP-4270HD) ON STANDBY REC TIMER POWER ON indicator STANDBY indicator For other than the above, see if the standby indicator lights up red. • The Plasma Display System will allow the system to standby mode) 1 Press TV a on the remote control unit or STANDBY/ON on the Plasma Display. •...
... the power (to automatically receive digital TV program information while in the standby mode. (PDP-5072HD/PDP-5071HD/PDP-5070HD) POWER button POWER ON STANDBY POWER ON indicator STANDBY indicator (PDP-4272HD/PDP-4271HD/PDP-4270HD) ON STANDBY REC TIMER POWER ON indicator STANDBY indicator For other than the above, see if the standby indicator lights up red. • The Plasma Display System will allow the system to standby mode) 1 Press TV a on the remote control unit or STANDBY/ON on the Plasma Display. •...

Owner's Manual
Page 44
... a rating of the Plasma Display. The following procedure to change the password. 1 Press HOME MENU. 2 Select "Tuner Setup". ( / then ENTER) 3 Select "Parental Control". ( / then ENTER) 4 Select "Password". ( / then ENTER) 5 Select "Change Password". ( / then ENTER) Parental Control Password Password Change Password Clear Password xxxxxxxxxxxxxxxxxxxxx xxxxxxxxxxxxxxxxxxxxx xxxxxxxxxxxxxxxxxxxxx Home Menu Exit 6 Enter the current 4-digit password, using buttons 0 - 9. 8 Enter the same password that is used for original movies not edited for television. TV Parental Guideline...
... a rating of the Plasma Display. The following procedure to change the password. 1 Press HOME MENU. 2 Select "Tuner Setup". ( / then ENTER) 3 Select "Parental Control". ( / then ENTER) 4 Select "Password". ( / then ENTER) 5 Select "Change Password". ( / then ENTER) Parental Control Password Password Change Password Clear Password xxxxxxxxxxxxxxxxxxxxx xxxxxxxxxxxxxxxxxxxxx xxxxxxxxxxxxxxxxxxxxx Home Menu Exit 6 Enter the current 4-digit password, using buttons 0 - 9. 8 Enter the same password that is used for original movies not edited for television. TV Parental Guideline...
Owner's Manual
Page 52
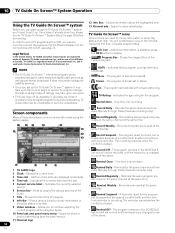
... frequency is changed to receive TV program listings. In order to record TV programs with another recording or auto tune reminder. For the connections with closed captioning. • TV Rating - As content providers move to the various services of Transcontinental, Inc. press the INFO button to "TV Guide On Screen™ System Setup"on the Info Bar, inside the Info Box, or beside program titles. •...
... frequency is changed to receive TV program listings. In order to record TV programs with another recording or auto tune reminder. For the connections with closed captioning. • TV Rating - As content providers move to the various services of Transcontinental, Inc. press the INFO button to "TV Guide On Screen™ System Setup"on the Info Bar, inside the Info Box, or beside program titles. •...
Owner's Manual
Page 72
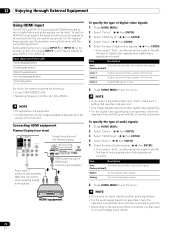
...; If no image appears, specify another audio signal type. • For the audio signal types to be specified, check the operation manual that came with the connected equipment. To use the HDMI terminal, specify the types of audio signals when audio signals are received. Item Description Auto Automatically identifies input digital video signals. (factory default) Color-1 Digital Component Video signals (4:2:2) locked Color-2 Digital Component Video signals (4:4:4) locked Color-3 Digital RGB signals locked 6 Press HOME MENU to exit the menu. Item Description...
...; If no image appears, specify another audio signal type. • For the audio signal types to be specified, check the operation manual that came with the connected equipment. To use the HDMI terminal, specify the types of audio signals when audio signals are received. Item Description Auto Automatically identifies input digital video signals. (factory default) Color-1 Digital Component Video signals (4:2:2) locked Color-2 Digital Component Video signals (4:4:4) locked Color-3 Digital RGB signals locked 6 Press HOME MENU to exit the menu. Item Description...
Owner's Manual
Page 74
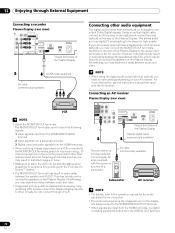
... external input sources. Using an optical digital cable, connect an AV receiver to the MONITOR OUT terminals, select an input source (e.g., TV channel reception) on the Plasma Display. However, this system can output Dolby Digital signals. Connecting an AV receiver Plasma Display (rear view) VCR NOTE • About the MONITOR OUT terminals The MONITOR OUT terminals cannot output the following signals: 1 Video signals input from the COMPONENT VIDEO terminal 2 Video signals from a personal computer 3 Digital video and audio signals from the HDMI terminals • When watching images...
... external input sources. Using an optical digital cable, connect an AV receiver to the MONITOR OUT terminals, select an input source (e.g., TV channel reception) on the Plasma Display. However, this system can output Dolby Digital signals. Connecting an AV receiver Plasma Display (rear view) VCR NOTE • About the MONITOR OUT terminals The MONITOR OUT terminals cannot output the following signals: 1 Video signals input from the COMPONENT VIDEO terminal 2 Video signals from a personal computer 3 Digital video and audio signals from the HDMI terminals • When watching images...
Owner's Manual
Page 78
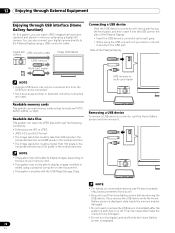
... and stored in the vertical direction. NOTE • For details on or off while the Home Gallery screen is switched on connectable devices, see Pioneer's website: http://www.pioneerelectronics.com • Be sure to quit the Home Gallery screen before removing the USB device. If you can also connect your digital camera directly to the Plasma Display using a digital still camera. 12 Enjoying through External Equipment...
... and stored in the vertical direction. NOTE • For details on or off while the Home Gallery screen is switched on connectable devices, see Pioneer's website: http://www.pioneerelectronics.com • Be sure to quit the Home Gallery screen before removing the USB device. If you can also connect your digital camera directly to the Plasma Display using a digital still camera. 12 Enjoying through External Equipment...

Owner's Manual
Page 91
... 76.) • Is a non-compatible PC signal being input? (See page 75.) • Is picture adjustment correct? (See page 64.) • Audio is output but no image is output. Slide it under strong or fluorescent lighting? • Is a fluorescent light illuminating the remote control sensor? • POWER ON indicator or STANDBY indicator is deactivated; Appendix 14 Appendix English Troubleshooting Problem GENERAL • No power. With this option selected...
... 76.) • Is a non-compatible PC signal being input? (See page 75.) • Is picture adjustment correct? (See page 64.) • Audio is output but no image is output. Slide it under strong or fluorescent lighting? • Is a fluorescent light illuminating the remote control sensor? • POWER ON indicator or STANDBY indicator is deactivated; Appendix 14 Appendix English Troubleshooting Problem GENERAL • No power. With this option selected...

Owner's Manual
Page 92
... Plasma Display is minimized. Some signals may require to find the best setting for cable service on Screen 5. - change the AV mode setting. (See page 69.) If the following procedure (see page 39): - Check the speaker cable connections between the Plasma Display and the speakers. SD11 Check temperature around PDP. Possible Solution • If TV-Guide data cannot be obtained. Contact the nearest Pioneer Authorized Independent Service Company, or the Customer Support...
... Plasma Display is minimized. Some signals may require to find the best setting for cable service on Screen 5. - change the AV mode setting. (See page 69.) If the following procedure (see page 39): - Check the speaker cable connections between the Plasma Display and the speakers. SD11 Check temperature around PDP. Possible Solution • If TV-Guide data cannot be obtained. Contact the nearest Pioneer Authorized Independent Service Company, or the Customer Support...


