User Manual
Page 7
... current status 19 Changing screen size 20 Enlarging one part of the screen (POINT ZOOM 21 Multiscreen display 22 Automatic power-off (POWER MANAGEMENT 23 PICTURE/SCREEN Adjustment 24 PICTURE adjustment 24 Adjusting screen POSITION, CLOCK, and PHASE
... current status 19 Changing screen size 20 Enlarging one part of the screen (POINT ZOOM 21 Multiscreen display 22 Automatic power-off (POWER MANAGEMENT 23 PICTURE/SCREEN Adjustment 24 PICTURE adjustment 24 Adjusting screen POSITION, CLOCK, and PHASE
User Manual
Page 9
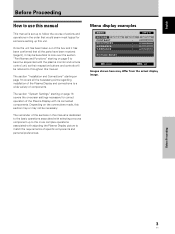
... the plasma monitor and remote control unit, as their respective buttons and controls will be necessary. Before Proceeding 3 En Menu display examples MENU PICTURE SCREEN CONTRAST BRIGHTNESS H.ENHANCE V. E N H A N C E PICTURE RESET SETUP : : : : INPUT1 OPTION 0 0 0 0 SET ENTER MENU EXIT Images shown here may not be referred to throughout this manual. ... to the basic operations associated with selecting a source component up to the more complex operations associated with adjusting the Plasma Display picture to match the requirements of specific components and personal preferences.
... the plasma monitor and remote control unit, as their respective buttons and controls will be necessary. Before Proceeding 3 En Menu display examples MENU PICTURE SCREEN CONTRAST BRIGHTNESS H.ENHANCE V. E N H A N C E PICTURE RESET SETUP : : : : INPUT1 OPTION 0 0 0 0 SET ENTER MENU EXIT Images shown here may not be referred to throughout this manual. ... to the basic operations associated with selecting a source component up to the more complex operations associated with adjusting the Plasma Display picture to match the requirements of specific components and personal preferences.
User Manual
Page 10
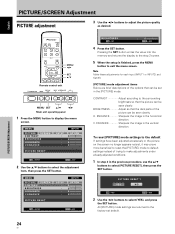
...YES NO SET SET MENU EXIT 2 Use the 2/3 buttons to the factory set in these adjustments for the section "PICTURE adjustment". All [PICTURE] mode settings are provided to allow you to exit the menu screen. The following illustrations are brief descriptions of trying ...be performed on the screen item displayed and its proper operating order. Note The screen images depicted in the [PICTURE] mode. English PICTURE/SCREEN Adjustment PICTURE adjustment 3 Use the 2/3 buttons to display the menu screen. Note Make these Operating Instructions should be seen clearly...
...YES NO SET SET MENU EXIT 2 Use the 2/3 buttons to the factory set in these adjustments for the section "PICTURE adjustment". All [PICTURE] mode settings are provided to allow you to exit the menu screen. The following illustrations are brief descriptions of trying ...be performed on the screen item displayed and its proper operating order. Note The screen images depicted in the [PICTURE] mode. English PICTURE/SCREEN Adjustment PICTURE adjustment 3 Use the 2/3 buttons to display the menu screen. Note Make these Operating Instructions should be seen clearly...
User Manual
Page 13
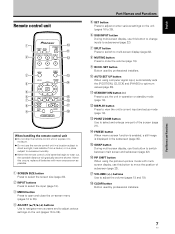
SET button Button used by professional installers. 0 AUTO SET UP button When using the picture-in the subscreen (page 35). @ SWAP button During multi-screen display, use this button to switch between main screen and subscreen (page 22). # PIP SHIFT ..., use this button to move the position of the screen (page 21). ! FREEZE button When memo screen function is enabled, a still image is displayed in -picture mode with new ones as soon as possible. 1 SCREEN SIZE button Press to select the screen size (page 20). 2 INPUT buttons Press to select the...
SET button Button used by professional installers. 0 AUTO SET UP button When using the picture-in the subscreen (page 35). @ SWAP button During multi-screen display, use this button to switch between main screen and subscreen (page 22). # PIP SHIFT ..., use this button to move the position of the screen (page 21). ! FREEZE button When memo screen function is enabled, a still image is displayed in -picture mode with new ones as soon as possible. 1 SCREEN SIZE button Press to select the screen size (page 20). 2 INPUT buttons Press to select the...
User Manual
Page 14
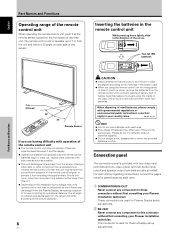
...When not using the remote control unit for Plasma Display setup adjustments. Audio input/ output and speaker output terminals are aligned according to the picture displayed. 8 En CAUTION ¶ Insert batteries so that is used ones. ¶ The voltage of batteries may not operate if there... are objects placed between it and the display. ¶ Operational distance will differ according to the markings in your Pioneer installation technician. English Part Names and Functions Operating range of the remote control unit When operating the remote control unit, point it...
...When not using the remote control unit for Plasma Display setup adjustments. Audio input/ output and speaker output terminals are aligned according to the picture displayed. 8 En CAUTION ¶ Insert batteries so that is used ones. ¶ The voltage of batteries may not operate if there... are objects placed between it and the display. ¶ Operational distance will differ according to the markings in your Pioneer installation technician. English Part Names and Functions Operating range of the remote control unit When operating the remote control unit, point it...
User Manual
Page 22
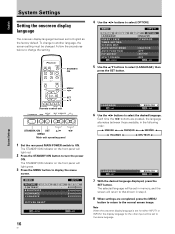
... DEUTSCH 2 LANGUAGE SET SET : ENGLISH MENU EXIT 7 With the desired language displayed, press the SET button. E N H A N C E SETUP : : : : INPUT1 OPTION 0 0 0 0 PICTURE RESET SET ENTER MENU EXIT 16 En LANGUAGE SET SET : ENGLISH MENU EXIT 6 Use the 2/3 buttons to select [LANGUAGE], then press the SET button. System... the procedures below to change to another language, the screen setting must be set to ON. To change the setting. MENU PICTURE SCREEN CONTRAST BRIGHTNESS H.ENHANCE V. VOL + STANDBY/ON SET 5/∞ 2/3 MENU Main unit operating panel 1 Set the rear ...
... DEUTSCH 2 LANGUAGE SET SET : ENGLISH MENU EXIT 7 With the desired language displayed, press the SET button. E N H A N C E SETUP : : : : INPUT1 OPTION 0 0 0 0 PICTURE RESET SET ENTER MENU EXIT 16 En LANGUAGE SET SET : ENGLISH MENU EXIT 6 Use the 2/3 buttons to select [LANGUAGE], then press the SET button. System... the procedures below to change to another language, the screen setting must be set to ON. To change the setting. MENU PICTURE SCREEN CONTRAST BRIGHTNESS H.ENHANCE V. VOL + STANDBY/ON SET 5/∞ 2/3 MENU Main unit operating panel 1 Set the rear ...
User Manual
Page 23
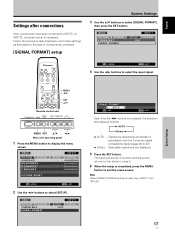
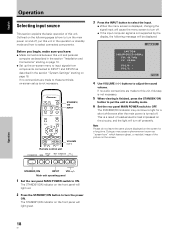
...to exit the menu screen. Selectable resolutions are detected automatically in step 3. 6 When the setup is necessary. MENU PICTURE SCREEN P O W E R M G T. MENU PICTURE SCREEN CONTRAST BRIGHTNESS H.ENHANCE V. VOL + MENU SET 5/∞ 2/3 Main unit operating panel 1 Press the MENU ... after connections After components have been connected to display the menu screen. MENU PICTURE SCREEN P O W E R M G T. Signals are displayed. 5 Press the SET button. E N H A N C E SETUP : : : : INPUT1 OPTION 0 0 0 0 PICTURE RESET SET ENTER MENU EXIT 2 Use the 2/3 buttons to 42) ÷...
...to exit the menu screen. Selectable resolutions are detected automatically in step 3. 6 When the setup is necessary. MENU PICTURE SCREEN P O W E R M G T. MENU PICTURE SCREEN CONTRAST BRIGHTNESS H.ENHANCE V. VOL + MENU SET 5/∞ 2/3 Main unit operating panel 1 Press the MENU ... after connections After components have been connected to display the menu screen. MENU PICTURE SCREEN P O W E R M G T. Signals are displayed. 5 Press the SET button. E N H A N C E SETUP : : : : INPUT1 OPTION 0 0 0 0 PICTURE RESET SET ENTER MENU EXIT 2 Use the 2/3 buttons to 42) ÷...
User Manual
Page 24
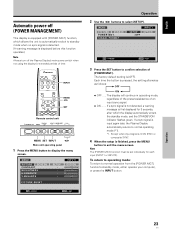
...will light red. 2 Press the STANDBY/ON button to INPUT1 and INPUT2 as "screen burn" which leaves a ghost, or residual, image of the picture on page 16. Operation 18 En STANDBY/ON INPUT VOL +/- POL.V: - Main unit operating panel 1 Set the rear panel MAIN POWER switch to light... [+/-] Remote control unit STANDBY/ON DISPLAY MENU / SET INPUT SCREEN SIZE - This is turned off presently. Note Please do not leave the same picture displayed on and off . ÷ If the input computer signal is not supported by the display, the following pages is displayed, changing the signal...
...will light red. 2 Press the STANDBY/ON button to INPUT1 and INPUT2 as "screen burn" which leaves a ghost, or residual, image of the picture on page 16. Operation 18 En STANDBY/ON INPUT VOL +/- POL.V: - Main unit operating panel 1 Set the rear panel MAIN POWER switch to light... [+/-] Remote control unit STANDBY/ON DISPLAY MENU / SET INPUT SCREEN SIZE - This is turned off presently. Note Please do not leave the same picture displayed on and off . ÷ If the input computer signal is not supported by the display, the following pages is displayed, changing the signal...
User Manual
Page 26
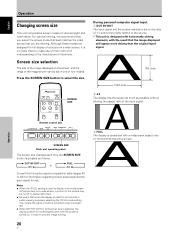
...is pressed as possible without altering the aspect ratio of four modes. A Notes ÷ When the [FULL] setting is used to line ratio of the picture may violate the rights of authors protected under copyright law. ÷ When [DOT BY DOT] or [4:3] screen size is selected, the display position is designed... faithful to select the size. Screen size selection The size of the image displayed on a wide screen, it is presented with a full understanding of a picture on the screen, and the range of the image shown can be cut off or appear deformed. ÷ Be aware that you make use of...
...is pressed as possible without altering the aspect ratio of four modes. A Notes ÷ When the [FULL] setting is used to line ratio of the picture may violate the rights of authors protected under copyright law. ÷ When [DOT BY DOT] or [4:3] screen size is selected, the display position is designed... faithful to select the size. Screen size selection The size of the image displayed on a wide screen, it is presented with a full understanding of a picture on the screen, and the range of the image shown can be cut off or appear deformed. ÷ Be aware that you make use of...
User Manual
Page 28
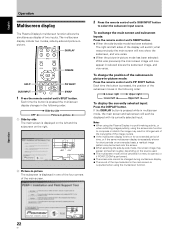
...Plasma Display's multiscreen function allows the simultaneous display of the subscreen moves in the following order: 3 Side-by-side OFF 2 Picture-in-picture 2 1 Side-by -side and picture-inpicture. Each time the button is pressed, the position of two inputs. To exchange the main screen and subscreen inputs: ... the side-by-side mode, the screen image may appear somewhat rougher, depending on the right. 66.0 24 R12 10 22.1 2 Picture-in-picture The subscreen is performed. ¶ The screen size cannot be changed during multiscreen display. ¶ The sound of the subscreen in...
...Plasma Display's multiscreen function allows the simultaneous display of the subscreen moves in the following order: 3 Side-by-side OFF 2 Picture-in-picture 2 1 Side-by -side and picture-inpicture. Each time the button is pressed, the position of two inputs. To exchange the main screen and subscreen inputs: ... the side-by-side mode, the screen image may appear somewhat rougher, depending on the right. 66.0 24 R12 10 22.1 2 Picture-in-picture The subscreen is performed. ¶ The screen size cannot be changed during multiscreen display. ¶ The sound of the subscreen in...
User Manual
Page 29
E N H A N C E SETUP : : : : INPUT1 OPTION 0 0 0 0 PICTURE RESET SET ENTER MENU EXIT Operation 2 Use the 2/3 buttons to display the menu screen. VOL + MENU SET INPUT 2/3 Main unit operating panel 1 Press the MENU ... a sync signal is not detected, a warning message is first displayed for 8 seconds, after which allows the unit to automatically switch to normal operating mode (*1). *1. MENU PICTURE SCREEN CONTRAST BRIGHTNESS H.ENHANCE V. The factory default setting is pressed, the setting alternates as follows: 3 OFF ON 2 ÷ OFF ..... Except when input signal is G ON...
E N H A N C E SETUP : : : : INPUT1 OPTION 0 0 0 0 PICTURE RESET SET ENTER MENU EXIT Operation 2 Use the 2/3 buttons to display the menu screen. VOL + MENU SET INPUT 2/3 Main unit operating panel 1 Press the MENU ... a sync signal is not detected, a warning message is first displayed for 8 seconds, after which allows the unit to automatically switch to normal operating mode (*1). *1. MENU PICTURE SCREEN CONTRAST BRIGHTNESS H.ENHANCE V. The factory default setting is pressed, the setting alternates as follows: 3 OFF ON 2 ÷ OFF ..... Except when input signal is G ON...
User Manual
Page 30
...8734; 2/3 Main unit operating panel 1 Press the MENU button to select the adjustment item, then press the SET button. E N H A N C E PICTURE RESET SETUP : : : : INPUT1 OPTION 0 0 0 0 SET ENTER MENU EXIT 2 Use the 5/∞ buttons to display the menu screen. V. ... is finished, press the MENU button to adjust the picture quality as desired. MENU PICTURE SCREEN CONTRAST BRIGHTNESS H.ENHANCE V. PICTURE/SCREEN Adjustment PICTURE adjustment 3 Use the 2/3 buttons to exit the menu screen. English PICTURE/SCREEN Adjustment MENU 2/3 SET 5/∞ Remote control unit...
...8734; 2/3 Main unit operating panel 1 Press the MENU button to select the adjustment item, then press the SET button. E N H A N C E PICTURE RESET SETUP : : : : INPUT1 OPTION 0 0 0 0 SET ENTER MENU EXIT 2 Use the 5/∞ buttons to display the menu screen. V. ... is finished, press the MENU button to adjust the picture quality as desired. MENU PICTURE SCREEN CONTRAST BRIGHTNESS H.ENHANCE V. PICTURE/SCREEN Adjustment PICTURE adjustment 3 Use the 2/3 buttons to exit the menu screen. English PICTURE/SCREEN Adjustment MENU 2/3 SET 5/∞ Remote control unit...
User Manual
Page 31
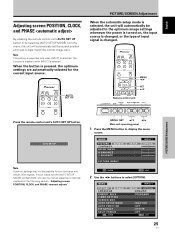
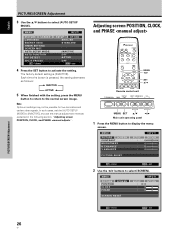
... is supported only when INPUT1 is selected. In such cases, set the screen position and clock to best match the current image input. MENU PICTURE SCREEN CONTRAST BRIGHTNESS H.ENHANCE V. AUTO SETUP MODE AUTO FUNCTION PIP DETECT SPLIT FREEZE SET ENTER INPUT1 SETUP OPTION :ENGLISH : S TA N D... button is changed , or the type of input signal is pressed, the optimum settings are automatically selected for low-luminance and certain other signals. MENU PICTURE SCREEN LANGUAGE ENERGY SAVE TIMER SETTING S C R E E N M G T. MENU SET 5/∞ 2/3 Main unit operating panel 1 Press the ...
... is supported only when INPUT1 is selected. In such cases, set the screen position and clock to best match the current image input. MENU PICTURE SCREEN CONTRAST BRIGHTNESS H.ENHANCE V. AUTO SETUP MODE AUTO FUNCTION PIP DETECT SPLIT FREEZE SET ENTER INPUT1 SETUP OPTION :ENGLISH : S TA N D... button is changed , or the type of input signal is pressed, the optimum settings are automatically selected for low-luminance and certain other signals. MENU PICTURE SCREEN LANGUAGE ENERGY SAVE TIMER SETTING S C R E E N M G T. MENU SET 5/∞ 2/3 Main unit operating panel 1 Press the ...
User Manual
Page 32
...possible for low-luminance and certain other signals. Each time the button is [INACTIVE]. E N H A N C E SETUP : : : : INPUT1 OPTION 0 0 0 0 PICTURE RESET SET ENTER MENU EXIT 2 Use the 2/3 buttons to [INACTIVE], and use the manual adjustment methods explained in the following section, "Adjusting screen POSITION, CLOCK..., and PHASE ". In such cases, set the [AUTO SETUP MODE] to select [SCREEN]. MENU PICTURE SCREEN CONTRAST BRIGHTNESS H.ENHANCE V. Adjusting screen POSITION, CLOCK, and PHASE MENU 2/3 SET 5/∞ Remote control unit STANDBY/...
...possible for low-luminance and certain other signals. Each time the button is [INACTIVE]. E N H A N C E SETUP : : : : INPUT1 OPTION 0 0 0 0 PICTURE RESET SET ENTER MENU EXIT 2 Use the 2/3 buttons to [INACTIVE], and use the manual adjustment methods explained in the following section, "Adjusting screen POSITION, CLOCK..., and PHASE ". In such cases, set the [AUTO SETUP MODE] to select [SCREEN]. MENU PICTURE SCREEN CONTRAST BRIGHTNESS H.ENHANCE V. Adjusting screen POSITION, CLOCK, and PHASE MENU 2/3 SET 5/∞ Remote control unit STANDBY/...
User Manual
Page 33
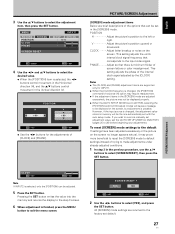
...press the MENU button to make adjustments under already adjusted conditions. 1 In step 3 in the Vertical direction (V). V Adjust the picture's position upward or downward. Pressing the SET button writes the value into the memory and returns the display to select [SCREEN RESET... and the 5/∞ buttons control movement in the previous procedure, use the 5/∞ buttons to the step 3 screen. 6 When adjustment is possible. MENU PICTURE POSITION CLOCK PHASE SCREEN SCREEN RESET INPUT1 SETUP OPTION : 0/ 0 : 0 : 0 SET ENTER MENU EXIT 4 Use the 2/3 and 5/∞ buttons to...
...press the MENU button to make adjustments under already adjusted conditions. 1 In step 3 in the Vertical direction (V). V Adjust the picture's position upward or downward. Pressing the SET button writes the value into the memory and returns the display to select [SCREEN RESET... and the 5/∞ buttons control movement in the previous procedure, use the 5/∞ buttons to the step 3 screen. 6 When adjustment is possible. MENU PICTURE POSITION CLOCK PHASE SCREEN SCREEN RESET INPUT1 SETUP OPTION : 0/ 0 : 0 : 0 SET ENTER MENU EXIT 4 Use the 2/3 and 5/∞ buttons to...
User Manual
Page 34
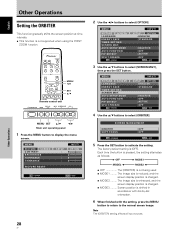
... SET 5/∞ Remote control unit STANDBY/ON DISPLAY MENU / SET INPUT SCREEN SIZE - E N H A N C E SETUP : : : : INPUT1 OPTION 0 0 0 0 PICTURE RESET SET ENTER MENU EXIT 28 En 2 Use the 2/3 buttons to activate the setting. MENU PICTURE SCREEN LANGUAGE ENERGY SAVE TIMER SETTING S C R E E N M G T. AUTO SETUP MODE AUTO FUNCTION PIP DETECT SPLIT FREEZE SET ENTER INPUT1... the ORBITER This function gradually shifts the screen position at time intervals. ÷ This function is not being used. ÷ MODE1 ......... MENU PICTURE SCREEN CONTRAST BRIGHTNESS H.ENHANCE V.
... SET 5/∞ Remote control unit STANDBY/ON DISPLAY MENU / SET INPUT SCREEN SIZE - E N H A N C E SETUP : : : : INPUT1 OPTION 0 0 0 0 PICTURE RESET SET ENTER MENU EXIT 28 En 2 Use the 2/3 buttons to activate the setting. MENU PICTURE SCREEN LANGUAGE ENERGY SAVE TIMER SETTING S C R E E N M G T. AUTO SETUP MODE AUTO FUNCTION PIP DETECT SPLIT FREEZE SET ENTER INPUT1... the ORBITER This function gradually shifts the screen position at time intervals. ÷ This function is not being used. ÷ MODE1 ......... MENU PICTURE SCREEN CONTRAST BRIGHTNESS H.ENHANCE V.

User Manual
Page 35
...SETTING S C R E E N M G T. Note The [SOFT FOCUS] setting affects all input sources. 29 En Other Operations English MENU PICTURE SCREEN CONTRAST BRIGHTNESS H.ENHANCE V. Softened increases in the order 1, 2, 3, 4. 6 When finished with the setting, press the MENU button to return.... Each time the button is pressed, the setting alternates as follows: 3 OFF 3 1 4 2 32 22 ÷ OFF The [SOFT FOCUS] setting is [OFF]. MENU PICTURE SCREEN LANGUAGE ENERGY SAVE TIMER SETTING S C R E E N M G T. The factory default setting is canceled. ÷ 1 ~ 4 Settings for [SOFT FOCUS]. MENU...
...SETTING S C R E E N M G T. Note The [SOFT FOCUS] setting affects all input sources. 29 En Other Operations English MENU PICTURE SCREEN CONTRAST BRIGHTNESS H.ENHANCE V. Softened increases in the order 1, 2, 3, 4. 6 When finished with the setting, press the MENU button to return.... Each time the button is pressed, the setting alternates as follows: 3 OFF 3 1 4 2 32 22 ÷ OFF The [SOFT FOCUS] setting is [OFF]. MENU PICTURE SCREEN LANGUAGE ENERGY SAVE TIMER SETTING S C R E E N M G T. The factory default setting is canceled. ÷ 1 ~ 4 Settings for [SOFT FOCUS]. MENU...

User Manual
Page 36
...E E N M G T. Brightness is less than that used in [STANDARD] mode. ÷ MODE2 ......... Note The [ENERGY SAVE] setting affects all input sources. MENU PICTURE SCREEN LANGUAGE ENERGY SAVE TIMER SETTING S C R E E N M G T. AUTO SETUP MODE AUTO FUNCTION PIP DETECT SPLIT FREEZE SET ENTER INPUT1 SETUP OPTION :ENGLISH : ... Other Operations Energy saving settings (ENERGY SAVE) The power control function allows screen brightness to select [OPTION]. E N H A N C E PICTURE RESET SETUP : : : : INPUT1 OPTION 0 0 0 0 SET ENTER MENU EXIT 30 En 2 Use the 2/3 buttons to be suppressed ...
...E E N M G T. Brightness is less than that used in [STANDARD] mode. ÷ MODE2 ......... Note The [ENERGY SAVE] setting affects all input sources. MENU PICTURE SCREEN LANGUAGE ENERGY SAVE TIMER SETTING S C R E E N M G T. AUTO SETUP MODE AUTO FUNCTION PIP DETECT SPLIT FREEZE SET ENTER INPUT1 SETUP OPTION :ENGLISH : ... Other Operations Energy saving settings (ENERGY SAVE) The power control function allows screen brightness to select [OPTION]. E N H A N C E PICTURE RESET SETUP : : : : INPUT1 OPTION 0 0 0 0 SET ENTER MENU EXIT 30 En 2 Use the 2/3 buttons to be suppressed ...
User Manual
Page 37
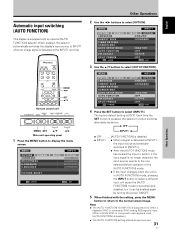
... S TA N D A R D :INACTIVE :OFF :ACTIVE :OFF MENU EXIT 4 Press the SET button to display the menu screen. MENU PICTURE SCREEN CONTRAST BRIGHTNESS H.ENHANCE V. MENU PICTURE SCREEN LANGUAGE ENERGY SAVE TIMER SETTING S C R E E N M G T. VOL + MENU SET 5/∞ 2/3 Main unit operating panel ........ ÷ When a signal is detected at the INPUT1 terminal. Automatic input switching (AUTO FUNCTION) This display is [OFF]. E N H A N C E PICTURE RESET SETUP : : : : INPUT1 OPTION 0 0 0 0 SET ENTER MENU EXIT Other Operations 2 Use the 2/3 buttons to INPUT1 when an image signal is...
... S TA N D A R D :INACTIVE :OFF :ACTIVE :OFF MENU EXIT 4 Press the SET button to display the menu screen. MENU PICTURE SCREEN CONTRAST BRIGHTNESS H.ENHANCE V. MENU PICTURE SCREEN LANGUAGE ENERGY SAVE TIMER SETTING S C R E E N M G T. VOL + MENU SET 5/∞ 2/3 Main unit operating panel ........ ÷ When a signal is detected at the INPUT1 terminal. Automatic input switching (AUTO FUNCTION) This display is [OFF]. E N H A N C E PICTURE RESET SETUP : : : : INPUT1 OPTION 0 0 0 0 SET ENTER MENU EXIT Other Operations 2 Use the 2/3 buttons to INPUT1 when an image signal is...

User Manual
Page 38
... D AY L I G H T SAVING TIME M O N D AY 12:00:00 SET RETURN :OFF SET CHANGE MENU EXIT ÷ DAYLIGHT SAVING TIME Use to set each menu item. MENU PICTURE SCREEN LANGUAGE ENERGY SAVE TIMER SETTING S C R E E N M G T. Other Operations 32 En MENU 2/3 SET 5/∞ Remote control unit STANDBY/ON DISPLAY MENU / SET INPUT SCREEN SIZE - MENU...
... D AY L I G H T SAVING TIME M O N D AY 12:00:00 SET RETURN :OFF SET CHANGE MENU EXIT ÷ DAYLIGHT SAVING TIME Use to set each menu item. MENU PICTURE SCREEN LANGUAGE ENERGY SAVE TIMER SETTING S C R E E N M G T. Other Operations 32 En MENU 2/3 SET 5/∞ Remote control unit STANDBY/ON DISPLAY MENU / SET INPUT SCREEN SIZE - MENU...


