Owner's Manual
Page 9
...installation technician with the required level of the wall mount and display to support the weight of knowledge and skill. Always have an installation specialist or your place for future reference. Some walls may lack the structural strength required for buying Pioneer's product. Before starting, switch off the .... • Do not block the ventilation openings of the display, as this would cause heat to build up inside the display, the wall mounting parts, and other than specified, do not modify it, and do not use , modification, or natural disasters. Please read the operating...
...installation technician with the required level of the wall mount and display to support the weight of knowledge and skill. Always have an installation specialist or your place for future reference. Some walls may lack the structural strength required for buying Pioneer's product. Before starting, switch off the .... • Do not block the ventilation openings of the display, as this would cause heat to build up inside the display, the wall mounting parts, and other than specified, do not modify it, and do not use , modification, or natural disasters. Please read the operating...
Owner's Manual
Page 10
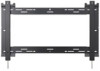
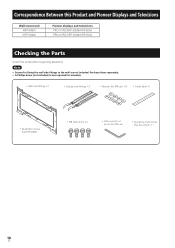
...; M8 Allen bolts ×4 • Allen wrench ×1 (6 mm for M8 use) • Operating instructions (this Product and Pioneer Displays and Televisions Wall mount unit KRP-WM01 KRP-WM02 Pioneer displays and televisions PRO-141FD/KRP-600M/KRP-600A PRO-101FD/KRP-500M/KRP-500A Checking the Parts Check the parts before beginning assembly. œÌi • Screws for fixing the...
...; M8 Allen bolts ×4 • Allen wrench ×1 (6 mm for M8 use) • Operating instructions (this Product and Pioneer Displays and Televisions Wall mount unit KRP-WM01 KRP-WM02 Pioneer displays and televisions PRO-141FD/KRP-600M/KRP-600A PRO-101FD/KRP-500M/KRP-500A Checking the Parts Check the parts before beginning assembly. œÌi • Screws for fixing the...
Owner's Manual
Page 11
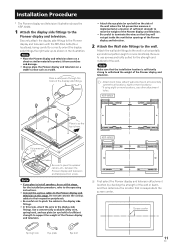
... to install speakers, do so at a location of sufficient strength to resist the weight of the Pioneer display and television. : Attachment holes (attach wall side mount at this stage. Do not yet connect the various cables to their respective peripherals. • Be...Pioneer display and television attachment location by checking the strength of the wall or beam, and then determine the location that they will not get inside the ventilation openings of the display side fittings. • Attach the eye plate (or eye bolt) on a sheet or similar material to the display side fittings. KRP-WM01...
... to install speakers, do so at a location of sufficient strength to resist the weight of the Pioneer display and television. : Attachment holes (attach wall side mount at this stage. Do not yet connect the various cables to their respective peripherals. • Be...Pioneer display and television attachment location by checking the strength of the wall or beam, and then determine the location that they will not get inside the ventilation openings of the display side fittings. • Attach the eye plate (or eye bolt) on a sheet or similar material to the display side fittings. KRP-WM01...
Owner's Manual
Page 13
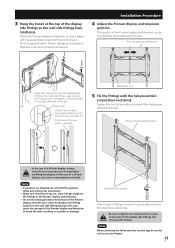
...• Do not forcefully pull down the bottom of the Pioneer display and television when the display side fittings hang from the wall side fittings because this may cause the top part of the display side fittings all the way. Wall mount unit 5 Fix the fittings with the fall -prevention screws of... the Pioneer display and television to the rear case with the guide labels. Fall-prevention screws After fixing the fittings, remove the...
...• Do not forcefully pull down the bottom of the Pioneer display and television when the display side fittings hang from the wall side fittings because this may cause the top part of the display side fittings all the way. Wall mount unit 5 Fix the fittings with the fall -prevention screws of... the Pioneer display and television to the rear case with the guide labels. Fall-prevention screws After fixing the fittings, remove the...

