
Owner's Manual
Page 8
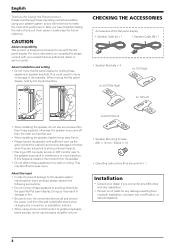
...cord from the main unit and fall over. • When installing the speaker, tighten the screws firmly. • Please handle the speaker with this installation. • Pioneer is designed exclusively for BOTTOM-Left • Speaker Mounting Screws (M5 × 10 mm : Black) × 16... • Operating Instructions (this Pioneer product. English Thank you have finished reading the ...
...cord from the main unit and fall over. • When installing the speaker, tighten the screws firmly. • Please handle the speaker with this installation. • Pioneer is designed exclusively for BOTTOM-Left • Speaker Mounting Screws (M5 × 10 mm : Black) × 16... • Operating Instructions (this Pioneer product. English Thank you have finished reading the ...
Owner's Manual
Page 9
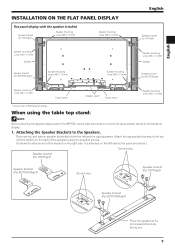
...Cable clamp* Speaker cable* Cable clamp* Speaker mounting screw (M5 × 10 mm) *: Accessories of the flat panel display When using the supplied screws. (It shows the attachment of the speakers using the table top stand: NOTE: Before attaching the speaker, please attach the KRP-TS01 series table... top stand (or another flat panel display stand) to the Speakers. There are facing you. 9
...Cable clamp* Speaker cable* Cable clamp* Speaker mounting screw (M5 × 10 mm) *: Accessories of the flat panel display When using the supplied screws. (It shows the attachment of the speakers using the table top stand: NOTE: Before attaching the speaker, please attach the KRP-TS01 series table... top stand (or another flat panel display stand) to the Speakers. There are facing you. 9
Owner's Manual
Page 10
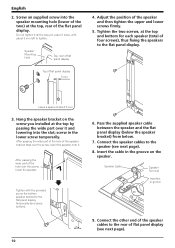
...panel display 5 mm 4. Pass the supplied speaker cable between the speaker and the flat panel display (below the speaker bracket) from below. 7. Hang the speaker bracket on the speaker. After passing the wide part of the hole of four screws), thus fixing the speakers to the speaker (see next page). screw in groove 9.... screws, at the top, rear of the hole over the screw, lower the speaker onto it loose, with the provided screw the bottom speaker bracket to tighten. Connect the other end of the speaker cables to the rear of about 5 mm left to the flat panel display temporarily...
...panel display 5 mm 4. Pass the supplied speaker cable between the speaker and the flat panel display (below the speaker bracket) from below. 7. Hang the speaker bracket on the speaker. After passing the wide part of the hole of four screws), thus fixing the speakers to the speaker (see next page). screw in groove 9.... screws, at the top, rear of the hole over the screw, lower the speaker onto it loose, with the provided screw the bottom speaker bracket to tighten. Connect the other end of the speaker cables to the rear of about 5 mm left to the flat panel display temporarily...
Owner's Manual
Page 11
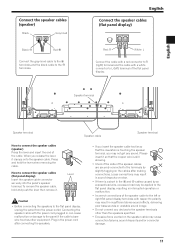
... result in sound dropouts or noise. • If there is a short in interrupted operation or malfunction. • Incorrect connections of the speaker cable to the speaker terminals other equipment. When you may cause connection failures, sound dropouts and/or connector damage. 11 Lever Caution • Before connecting the...and hold and push the lever then remove it so that the insulation is still showing. • Check if the ends of the speaker cables are securely connected to the terminals by an exposed lead wire, excessive load may be applied to the flat panel display, resulting ...
... result in sound dropouts or noise. • If there is a short in interrupted operation or malfunction. • Incorrect connections of the speaker cable to the speaker terminals other equipment. When you may cause connection failures, sound dropouts and/or connector damage. 11 Lever Caution • Before connecting the...and hold and push the lever then remove it so that the insulation is still showing. • Check if the ends of the speaker cables are securely connected to the terminals by an exposed lead wire, excessive load may be applied to the flat panel display, resulting ...

Owner's Manual
Page 12
...the flat panel display, hold the latch to attach the cable clamp, an accessory of the hung on or near the cabinets, since these speakers or speaker brackets. Follow the steps below to release. Latch Lever Lever NOTE: The longer a clamp is very dirty, wipe with a soft cloth ... it out from the hole. Connect the other chemicals on wall unit. CABINET MAINTENANCE • Use a polishing cloth or dry cloth to the brackets. Speaker cable Cable clamp Cable clamp 12 Do not use thinner, benzine, insecticide sprays and other cables and power cord to lock. 1 2 4 ) Confirm...
...the flat panel display, hold the latch to attach the cable clamp, an accessory of the hung on or near the cabinets, since these speakers or speaker brackets. Follow the steps below to release. Latch Lever Lever NOTE: The longer a clamp is very dirty, wipe with a soft cloth ... it out from the hole. Connect the other chemicals on wall unit. CABINET MAINTENANCE • Use a polishing cloth or dry cloth to the brackets. Speaker cable Cable clamp Cable clamp 12 Do not use thinner, benzine, insecticide sprays and other cables and power cord to lock. 1 2 4 ) Confirm...
Owner's Manual
Page 13
...effects on the environment and human health. K058_A_En Published by Pioneer Corporation. input 18 W Rated input 6 W Crossover frequency 3 kHz External Dimensions 105 (W) mm × 876 (H) mm × 64 (D) mm English Weight : Speaker (one ). If you will ensure that requires proper ...80 dB Permissible input : Max. All rights reserved. 13 Copyright © 2008 Pioneer Corporation. Private households in the member states of the EU, in accordance with legislation that your local authorities for two speakers Speaker Brackets TOP-Left × 1 BOTTOM-Left × 1 TOP-Right ×...
...effects on the environment and human health. K058_A_En Published by Pioneer Corporation. input 18 W Rated input 6 W Crossover frequency 3 kHz External Dimensions 105 (W) mm × 876 (H) mm × 64 (D) mm English Weight : Speaker (one ). If you will ensure that requires proper ...80 dB Permissible input : Max. All rights reserved. 13 Copyright © 2008 Pioneer Corporation. Private households in the member states of the EU, in accordance with legislation that your local authorities for two speakers Speaker Brackets TOP-Left × 1 BOTTOM-Left × 1 TOP-Right ×...


