
Owner's Manual
Page 8
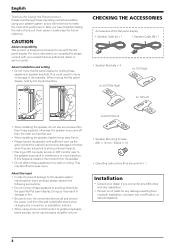
... the connection or installation method. • When using your nearest Pioneer authorized dealer or service center. CHECKING THE ACCESSORIES Accessories of its performance. Please read through these speakers to make the most of the flat panel display • Speaker Cable (L) x 1 • Speaker Cable (R) x 1 • Speaker Brackets × 4 for TOP-Right for BOTTOM-Right for future...
... the connection or installation method. • When using your nearest Pioneer authorized dealer or service center. CHECKING THE ACCESSORIES Accessories of its performance. Please read through these speakers to make the most of the flat panel display • Speaker Cable (L) x 1 • Speaker Cable (R) x 1 • Speaker Brackets × 4 for TOP-Right for BOTTOM-Right for future...
Owner's Manual
Page 9
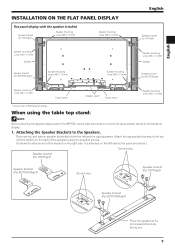
... *: Accessories of the bracket on the back of the speakers using the supplied screws. (It shows the attachment of the flat panel display When using the table top stand: NOTE: Before attaching the speaker, please attach the KRP-TS01 series table top stand (or another flat panel display... stand) to the Speakers. Attaching the Speaker Brackets to the flat panel display. 1. English INSTALLATION ON THE FLAT PANEL ...
... *: Accessories of the bracket on the back of the speakers using the supplied screws. (It shows the attachment of the flat panel display When using the table top stand: NOTE: Before attaching the speaker, please attach the KRP-TS01 series table top stand (or another flat panel display... stand) to the Speakers. Attaching the Speaker Brackets to the flat panel display. 1. English INSTALLATION ON THE FLAT PANEL ...
Owner's Manual
Page 10
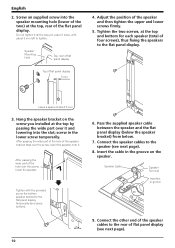
... an supplied screw into the slot; Do not tighten it . Hang the speaker bracket on the speaker. After passing the wide part of four screws), thus fixing the speakers to the flat panel display. Connect the speaker cables to the rear of about 5 mm left to the flat panel display...screw in the lower screw temporarily. Tighten the two screws, at the top, rear of the speaker bracket (top) over the screw, lower the speaker. Connect the other end of the speaker cables to the speaker (see next page). Leave a space of flat panel display (see next page). 8. After passing...
... an supplied screw into the slot; Do not tighten it . Hang the speaker bracket on the speaker. After passing the wide part of four screws), thus fixing the speakers to the flat panel display. Connect the speaker cables to the rear of about 5 mm left to the flat panel display...screw in the lower screw temporarily. Tighten the two screws, at the top, rear of the speaker bracket (top) over the screw, lower the speaker. Connect the other end of the speaker cables to the speaker (see next page). Leave a space of flat panel display (see next page). 8. After passing...
Owner's Manual
Page 11
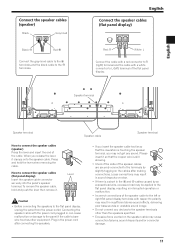
...the lever then remove it clamps onto the speaker cable. Speaker terminal Speaker terminal Speaker cable Speaker terminal How to connect the speaker cables (flat panel display) Insert the speaker cable connector securely into the panel's speaker terminal. To remove the speaker cable, hold the lever when removing the... panel from the power outlet. When you may cause connection failures, sound dropouts and/or connector damage. 11 Connecting the speaker cable with a white connector to L (left or right flat panel display terminals with respect to polarity may result in...
...the lever then remove it clamps onto the speaker cable. Speaker terminal Speaker terminal Speaker cable Speaker terminal How to connect the speaker cables (flat panel display) Insert the speaker cable connector securely into the panel's speaker terminal. To remove the speaker cable, hold the lever when removing the... panel from the power outlet. When you may cause connection failures, sound dropouts and/or connector damage. 11 Connecting the speaker cable with a white connector to L (left or right flat panel display terminals with respect to polarity may result in...

Owner's Manual
Page 12
... top of the cabinet. • Never use furniture wax or cleaners. When moving the flat panel display, hold the latch to the brackets. Speaker cable Cable clamp Cable clamp 12 Do not use thinner, benzine, insecticide sprays and other cables and power cord to wipe off dust and dirt... from the hole. An older clamp is more easily damaged while being removed and may damage the surface of a soft sheet etc., then attach the speakers. 1. For details, refer to lock. 1 2 4 ) Confirm that the cable clamp is used, read the cautions for the chemical cloth carefully. This could ...
... top of the cabinet. • Never use furniture wax or cleaners. When moving the flat panel display, hold the latch to the brackets. Speaker cable Cable clamp Cable clamp 12 Do not use thinner, benzine, insecticide sprays and other cables and power cord to wipe off dust and dirt... from the hole. An older clamp is more easily damaged while being removed and may damage the surface of a soft sheet etc., then attach the speakers. 1. For details, refer to lock. 1 2 4 ) Confirm that the cable clamp is used, read the cautions for the chemical cloth carefully. This could ...
Owner's Manual
Page 13
... it with legislation that requires proper treatment, recovery and recycling. K058_A_En Published by Pioneer Corporation. input 18 W Rated input 6 W Crossover frequency 3 kHz External Dimensions 105 (W) mm × 876 (H) mm × 64 (D) mm English Weight : Speaker (one piece 1.75 kg Speakers (pair) with brackets and screws 4.1 kg Accessory parts (for the correct method of...
... it with legislation that requires proper treatment, recovery and recycling. K058_A_En Published by Pioneer Corporation. input 18 W Rated input 6 W Crossover frequency 3 kHz External Dimensions 105 (W) mm × 876 (H) mm × 64 (D) mm English Weight : Speaker (one piece 1.75 kg Speakers (pair) with brackets and screws 4.1 kg Accessory parts (for the correct method of...


