
Owner's Manual
Page 3
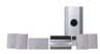
... the port of the subwoofer to keep it free of dust. Powered subwoofer unit (S-DV77SW) LINE VOLTAGE SELECTOR SWITCH ( Multi voltage model only) The line voltage selector switch is different, change voltage selectors settings. When you an electrical shock. Also install 5cm away from its outlet before plugging the power cord into the groove of the selector switch and turn it damaged, ask your nearest PIONEER authorized service center or...
... the port of the subwoofer to keep it free of dust. Powered subwoofer unit (S-DV77SW) LINE VOLTAGE SELECTOR SWITCH ( Multi voltage model only) The line voltage selector switch is different, change voltage selectors settings. When you an electrical shock. Also install 5cm away from its outlet before plugging the power cord into the groove of the selector switch and turn it damaged, ask your nearest PIONEER authorized service center or...

Owner's Manual
Page 6
... Saving station presets 32 Listening to station presets 33 Naming station presets 34 Tuner system displays 35 Playing other connected components 35 Reducing the auxiliary input level 36 5 Using Sound modes and Effects Using the Sound menu 37 Using sound modes 38 Playing Dolby/DTS sources 38 Playing other stereo sources with DSP effects ..... 40 6 Playing Discs Introduction 41 Finding what you want on a disc 41 Switching camera angles 42 Switching subtitles 42 Switching audio language 42 Switching audio channels 43 Making a program list 43 Using random play 45 Using repeat play...
... Saving station presets 32 Listening to station presets 33 Naming station presets 34 Tuner system displays 35 Playing other connected components 35 Reducing the auxiliary input level 36 5 Using Sound modes and Effects Using the Sound menu 37 Using sound modes 38 Playing Dolby/DTS sources 38 Playing other stereo sources with DSP effects ..... 40 6 Playing Discs Introduction 41 Finding what you want on a disc 41 Switching camera angles 42 Switching subtitles 42 Switching audio language 42 Switching audio channels 43 Making a program list 43 Using random play 45 Using repeat play...

Owner's Manual
Page 9
... of Digital Theater Systems, Inc. Use of this system with DVD discs. Confidential unpublished works. © 1992-1997 Dolby Laboratories. connecting up the video frequency range, and also reduces noise outside the video frequency range. English Before You Start 1 Features तᓃ ÷ Superlative audio performance with Dolby Digital* and DTS** software The XV-DV77 delivers breathtaking sound quality with Dolby Digital and DTS discs, and is also compatible with Dolby Digital㕐...
... of Digital Theater Systems, Inc. Use of this system with DVD discs. Confidential unpublished works. © 1992-1997 Dolby Laboratories. connecting up the video frequency range, and also reduces noise outside the video frequency range. English Before You Start 1 Features तᓃ ÷ Superlative audio performance with Dolby Digital* and DTS** software The XV-DV77 delivers breathtaking sound quality with Dolby Digital and DTS discs, and is also compatible with Dolby Digital㕐...

Owner's Manual
Page 16
... Switching on and setting the clock This system has a built in clock, which needs to be set some basic preferences, using all the basic controls for playing discs, using the Setup Navigator to the Setting up the system guide, and plugged into a power outlet. CLOCK ADJUST 3 Press ENTER. 3 Setting Up ணໄ STANDBY /ON 5 2 ENTER 3 ∞ SYSTEM MENU CLOCK/ TIMER Introduction Before starting, make sure that your system is installed...
... Switching on and setting the clock This system has a built in clock, which needs to be set some basic preferences, using all the basic controls for playing discs, using the Setup Navigator to the Setting up the system guide, and plugged into a power outlet. CLOCK ADJUST 3 Press ENTER. 3 Setting Up ணໄ STANDBY /ON 5 2 ENTER 3 ∞ SYSTEM MENU CLOCK/ TIMER Introduction Before starting, make sure that your system is installed...

Owner's Manual
Page 19
... move on surround modes. 5 ͜㕐5 f f d f 6 ܲ㕐3dᔷ౬Ї㕐SURROUND f SURR. Ideally, your listening position should be equidistant from your main listening position to the SURROUND speakers setting. CENTER SP 3.Om 4 ܲ㕐3d CENTER f CENTER SP 3.Om 5 Use the 5 and ∞ buttons to set the distance from the System Setup menu to further enhance the surround sound. The default setting is 3m. SP...
... move on surround modes. 5 ͜㕐5 f f d f 6 ܲ㕐3dᔷ౬Ї㕐SURROUND f SURR. Ideally, your listening position should be equidistant from your main listening position to the SURROUND speakers setting. CENTER SP 3.Om 4 ܲ㕐3d CENTER f CENTER SP 3.Om 5 Use the 5 and ∞ buttons to set the distance from the System Setup menu to further enhance the surround sound. The default setting is 3m. SP...

Owner's Manual
Page 20
... accurately adjust the subwoofer level using this ). You may not be set to either of these settings.) 2 Set the volume to a moderate level. 3 Press TEST TONE (SHIFT and CLR) to start the test tone then adjust the master volume to a suitable level. d d f d f d f fʔཀd f It may prefer to leave it to your liking later when playing surround-sound sources. ءจ f d f 1 Press SURROUND. To help you set levels independently for each speaker in turn : •...
... accurately adjust the subwoofer level using this ). You may not be set to either of these settings.) 2 Set the volume to a moderate level. 3 Press TEST TONE (SHIFT and CLR) to start the test tone then adjust the master volume to a suitable level. d d f d f d f fʔཀd f It may prefer to leave it to your liking later when playing surround-sound sources. ءจ f d f 1 Press SURROUND. To help you set levels independently for each speaker in turn : •...

Owner's Manual
Page 22
...;DVD SETUPf j Audio Video1 V2 Language General Setup Navigator Setup Navigator Start Auto Start Off Setup using the Setup Navigator Move ENTER Select SETUP Exit j 5 ENTER 2 f 22 En/ChH select the highlighted menu option 2 - cursor up/down ENTER - 3 Setting Up ணໄ STANDBY /ON SETUP DVD 5 2 ENTER ∞ 7 Using the setup navigator Before playing any discs, we strongly recommend using these controls: 5, ∞ - Also turn on your TV and make sure that it is set...
...;DVD SETUPf j Audio Video1 V2 Language General Setup Navigator Setup Navigator Start Auto Start Off Setup using the Setup Navigator Move ENTER Select SETUP Exit j 5 ENTER 2 f 22 En/ChH select the highlighted menu option 2 - cursor up/down ENTER - 3 Setting Up ணໄ STANDBY /ON SETUP DVD 5 2 ENTER ∞ 7 Using the setup navigator Before playing any discs, we strongly recommend using these controls: 5, ∞ - Also turn on your TV and make sure that it is set...

Owner's Manual
Page 37
... Sound menu This menu gives you access to various amplifier sound settings: The bass and treble settings have no effect when using the DSP modes, or when the Surround mode is set to anything other than STANDARD or SURROUND OFF. 1 Press SOUND. 2 Use the 2 or 3 buttons to select an option from the Sound menu. • BASS O Adjusts the level of bass. • TREBLE O Adjusts the amount of treble. • EFFECT 7O Adjusts the amount of Advanced Theater...
... Sound menu This menu gives you access to various amplifier sound settings: The bass and treble settings have no effect when using the DSP modes, or when the Surround mode is set to anything other than STANDARD or SURROUND OFF. 1 Press SOUND. 2 Use the 2 or 3 buttons to select an option from the Sound menu. • BASS O Adjusts the level of bass. • TREBLE O Adjusts the amount of treble. • EFFECT 7O Adjusts the amount of Advanced Theater...

Owner's Manual
Page 59
... • Press 2 or 3 to select an option. 2 Select TIMER ON or TIMER OFF. • Change menu options using the 2 and 3 buttons. English Using the Timer Դ֛ࣛ͜ኜ 8 6 Set the switch off time. The timer will not work if the system is left on time, pressing ENTER to ON. The standby light on the front panel lights green to indicate that the...
... • Press 2 or 3 to select an option. 2 Select TIMER ON or TIMER OFF. • Change menu options using the 2 and 3 buttons. English Using the Timer Դ֛ࣛ͜ኜ 8 6 Set the switch off time. The timer will not work if the system is left on time, pressing ENTER to ON. The standby light on the front panel lights green to indicate that the...

Owner's Manual
Page 62
... (Low Frequency Effects) attenuator to reduce the subwoofer level if it also means that when you turn the volume down you see LFE ATT in the display. 3 Use the 5 and ∞ buttons to make the setting. 62 En/ChH R.C. The dynamic range of a source is distorting. 1 Press SYSTEM SETUP. • Access this function together with the SHIFT button. 2 Press the 2 or 3 button until you see D. Switch on...
... (Low Frequency Effects) attenuator to reduce the subwoofer level if it also means that when you turn the volume down you see LFE ATT in the display. 3 Use the 5 and ∞ buttons to make the setting. 62 En/ChH R.C. The dynamic range of a source is distorting. 1 Press SYSTEM SETUP. • Access this function together with the SHIFT button. 2 Press the 2 or 3 button until you see D. Switch on...

Owner's Manual
Page 63
... the displays shown below. 3 Use the 5 and ∞ buttons to change the dual-mono setting. • L-ch1 R-ch2 default setting (the left channel is muted. • MIX The left and right channels are recorded with the SHIFT button. 2 Press the 2 or 3 button until you see the disc box for details. English Advanced Sound Setup 9 Dual-mono setting The dual-mono setting applies only to Dolby Digital discs that may be played...
... the displays shown below. 3 Use the 5 and ∞ buttons to change the dual-mono setting. • L-ch1 R-ch2 default setting (the left channel is muted. • MIX The left and right channels are recorded with the SHIFT button. 2 Press the 2 or 3 button until you see the disc box for details. English Advanced Sound Setup 9 Dual-mono setting The dual-mono setting applies only to Dolby Digital discs that may be played...

Owner's Manual
Page 71
Auto Move SETUP Exit The player uses one of the screen. Pioneer Logo Video Adjust Still Picture - Normal Off Move SETUP Exit When watching DVD discs recorded in 4:3 format ('regular' TV size) on -screen, change the setting to Off. Wide. Position - produces a stable, generally shake-free image. Wide Angle Indicator - If you prefer not to have the operation displays shown on a widescreen TV, it can be difficult to read, select Position...
Auto Move SETUP Exit The player uses one of the screen. Pioneer Logo Video Adjust Still Picture - Normal Off Move SETUP Exit When watching DVD discs recorded in 4:3 format ('regular' TV size) on -screen, change the setting to Off. Wide. Position - produces a stable, generally shake-free image. Wide Angle Indicator - If you prefer not to have the operation displays shown on a widescreen TV, it can be difficult to read, select Position...

Owner's Manual
Page 73
... OSD Language - Italian Spanish Other Setup disc's subtitle language Move SETUP Exit This setting is recorded on a disc, the system automatically plays the disc with those listed, then follow the on-screen display to the Language code list on a DVD disc any time during playback using the AUDIO button. (This does not affect this depends on the Auto Language setting-see Auto Language on page 74). French Subtitle...
... OSD Language - Italian Spanish Other Setup disc's subtitle language Move SETUP Exit This setting is recorded on a disc, the system automatically plays the disc with those listed, then follow the on-screen display to the Language code list on a DVD disc any time during playback using the AUDIO button. (This does not affect this depends on the Auto Language setting-see Auto Language on page 74). French Subtitle...

Owner's Manual
Page 74
... Auto Language to your Audio Language and Subtitle Language settings. On Off Play dialog, etc. 10 DVD Setup Menu DVDணໄ፯ఊ Audio Video1 V2 Language General Subtitle Language List of Languages Code (0~2) ja: Japanese 1 00 1 Setup audio language +/- On Off Play dialog, etc. RETURN Return Move ENTER Select SETUP Exit The DVD format recognizes 136 different languages. You can change or switch off the subtitles on a DVD disc...
... Auto Language to your Audio Language and Subtitle Language settings. On Off Play dialog, etc. 10 DVD Setup Menu DVDணໄ፯ఊ Audio Video1 V2 Language General Subtitle Language List of Languages Code (0~2) ja: Japanese 1 00 1 Setup audio language +/- On Off Play dialog, etc. RETURN Return Move ENTER Select SETUP Exit The DVD format recognizes 136 different languages. You can change or switch off the subtitles on a DVD disc...
Owner's Manual
Page 77
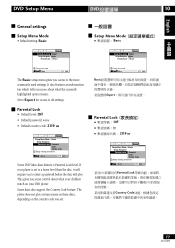
Basic Setup Navigator Parental Lock Password Level Country Code Setup viewing restrictions Move SETUP Exit Some DVD Video discs feature a Parental Lock level. Some discs also support the Country Code feature. Off (us) Change menu mode Move SETUP Exit Basic f d f Expertd f Parental Lock j Off jೌ j 2119 us Audio Video1 V2 Language General Setup Menu Mode - This gives you some control about what your children watch on your player is set to a lower level than the disc, it will require you to...
Basic Setup Navigator Parental Lock Password Level Country Code Setup viewing restrictions Move SETUP Exit Some DVD Video discs feature a Parental Lock level. Some discs also support the Country Code feature. Off (us) Change menu mode Move SETUP Exit Basic f d f Expertd f Parental Lock j Off jೌ j 2119 us Audio Video1 V2 Language General Setup Menu Mode - This gives you some control about what your children watch on your player is set to a lower level than the disc, it will require you to...

Owner's Manual
Page 81
...--SDDEVVO7878NSSLWWY WOIRTH B USSS--DDEVVO7878NSSLWWY WOIRTH 81 En/ChH This will allow you to the AUDIO IN jacks of this system. Connecting Up ஹટ 11 Before making or changing any rear panel connections, make sure that all the components are switched off and unplugged from the power supply. ࠠࠅ d d f Connecting other components 1 Use a stereo audio cable to connect the analog outputs of an external component to play the component through this system.
...--SDDEVVO7878NSSLWWY WOIRTH B USSS--DDEVVO7878NSSLWWY WOIRTH 81 En/ChH This will allow you to the AUDIO IN jacks of this system. Connecting Up ஹટ 11 Before making or changing any rear panel connections, make sure that all the components are switched off and unplugged from the power supply. ࠠࠅ d d f Connecting other components 1 Use a stereo audio cable to connect the analog outputs of an external component to play the component through this system.

Owner's Manual
Page 82
Check the instructions that came with your other component for the optical input). These include CD, MD and DAT players and satellite receivers. 11 Connecting Up ஹટ 3 Use a digital optical cable to a PCM audio output (32kHz, 44.1kHz or 48kHz for the coaxial input; 32kHz, 44.1kHz, 48kHz or 96kHz for more details. ءจ OPTICAL IN d i d d d d㕽㕴d f f 82 En/ChH This will...
Check the instructions that came with your other component for the optical input). These include CD, MD and DAT players and satellite receivers. 11 Connecting Up ஹટ 3 Use a digital optical cable to a PCM audio output (32kHz, 44.1kHz or 48kHz for the coaxial input; 32kHz, 44.1kHz, 48kHz or 96kHz for more details. ءจ OPTICAL IN d i d d d d㕽㕴d f f 82 En/ChH This will...

Owner's Manual
Page 92
... all rear panel connections are 44.1 or 48kHz. • If a track name does not end in the best direction. • If the radio signal is weak, an outdoor antenna will usually give the best reception. power cord and then plug back in the MPEG1 Audio Layer 3 format. • Check that all menu, picture and password settings to be incorrect for proper operation. This will usually reset 1 Switch the system into standby using the remote...
... all rear panel connections are 44.1 or 48kHz. • If a track name does not end in the best direction. • If the radio signal is weak, an outdoor antenna will usually give the best reception. power cord and then plug back in the MPEG1 Audio Layer 3 format. • Check that all menu, picture and password settings to be incorrect for proper operation. This will usually reset 1 Switch the system into standby using the remote...

Other Manual
Page 1
... batteries (size AA/R6P) x 2 Display unit (AXX7107 AM loop antenna FM antenna 㕶㕽˂ᇞ 1 Connect the subwoofer unit and DVD tuner system with the STANDBY/ON button, and disconnect the power cord from the wall socket. Plug the other cables and the display unit and main set up the speakers. Printed in the direction indicated by Pioneer Corporation. Release the lever to the wall socket. ஹટ 㕐...
... batteries (size AA/R6P) x 2 Display unit (AXX7107 AM loop antenna FM antenna 㕶㕽˂ᇞ 1 Connect the subwoofer unit and DVD tuner system with the STANDBY/ON button, and disconnect the power cord from the wall socket. Plug the other cables and the display unit and main set up the speakers. Printed in the direction indicated by Pioneer Corporation. Release the lever to the wall socket. ஹટ 㕐...

Other Manual
Page 2
... speaker cord and speaker. Use a small-sized screwdriver (flat blade). 3. Connect the power cord to a wall socket. 1 AC INLETౢɹஹf 2 f Loading batteries in your TV. 2 VIDEO INౢɹஹf f 110 V -120 V 220 V -230 V 240 V VOLTAGE SELECTOR Line Voltage Selector Switch ( Multi voltage model only) There is some other objects to work improperly. • When the operating range of this remote control...
... speaker cord and speaker. Use a small-sized screwdriver (flat blade). 3. Connect the power cord to a wall socket. 1 AC INLETౢɹஹf 2 f Loading batteries in your TV. 2 VIDEO INౢɹஹf f 110 V -120 V 220 V -230 V 240 V VOLTAGE SELECTOR Line Voltage Selector Switch ( Multi voltage model only) There is some other objects to work improperly. • When the operating range of this remote control...


