Operating Instructions
Page 2
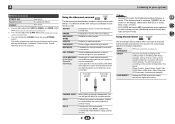
... batteries 7 Operating range of remote control 7 2 Connecting your equipment Placing the speakers 8 Affixing Non-Skid Pads 8 Hints on the speaker placement 8 Connecting the speakers 9 Making cable connections 10 HDMI cables 10 About HDMI 10 Analog audio cables 11 Digital audio cables 11 Standard RCA video cables 11 About video outputs connection 11 Connecting a TV and playback components 12 Connecting using HDMI 12 Connecting your component with no HDMI terminal 13 Connecting antennas 14 Using external antennas 14 Connecting a USB device 15 Plugging...
... batteries 7 Operating range of remote control 7 2 Connecting your equipment Placing the speakers 8 Affixing Non-Skid Pads 8 Hints on the speaker placement 8 Connecting the speakers 9 Making cable connections 10 HDMI cables 10 About HDMI 10 Analog audio cables 11 Digital audio cables 11 Standard RCA video cables 11 About video outputs connection 11 Connecting a TV and playback components 12 Connecting using HDMI 12 Connecting your component with no HDMI terminal 13 Connecting antennas 14 Using external antennas 14 Connecting a USB device 15 Plugging...
Operating Instructions
Page 3
... format setting of Graphical User Interface (Except for the U.S.A., Canada and Latin America models) (page 27) • Changing the frequency step of AM Radio (Except for wall mounting x4 • Screws x4 • Non-Skid Pads x20 • Quick start guide • Safety Brochure Installing the receiver • When installing this unit, make the connections and settings. on your TV to this receiver. in direct...
... format setting of Graphical User Interface (Except for the U.S.A., Canada and Latin America models) (page 27) • Changing the frequency step of AM Radio (Except for wall mounting x4 • Screws x4 • Non-Skid Pads x20 • Quick start guide • Safety Brochure Installing the receiver • When installing this unit, make the connections and settings. on your TV to this receiver. in direct...

Operating Instructions
Page 4
... (stereo) and FM MONO radio bands (page 20). Switches between ECO 1/ECO 2. TUNE / - When the headphones are connected, there is connected (page 12). 6 Remote sensor Receives the signals from the speakers. STATUS - lights when the component is no sound is turned ON, the display will go dark (page 24). 12 SOUND RETRIEVER Turn sound retriever effect on page 7). 7 MASTER VOLUME dial 8 ÍSTANDBY/ON 9 PHONES jack Use to switch...
... (stereo) and FM MONO radio bands (page 20). Switches between ECO 1/ECO 2. TUNE / - When the headphones are connected, there is connected (page 12). 6 Remote sensor Receives the signals from the speakers. STATUS - lights when the component is no sound is turned ON, the display will go dark (page 24). 12 SOUND RETRIEVER Turn sound retriever effect on page 7). 7 MASTER VOLUME dial 8 ÍSTANDBY/ON 9 PHONES jack Use to switch...
Operating Instructions
Page 8
...'s position. Use less of the sound. For DVD-Audio, the speakers should help you 're going to place the surround speakers farther away from your system. • The subwoofer can be enjoyed. The following guidelines should be more directly behind the listener than the front and center speakers. The angle depends on the size of low-pitched sound. Make sure the speakers don...
...'s position. Use less of the sound. For DVD-Audio, the speakers should help you 're going to place the surround speakers farther away from your system. • The subwoofer can be enjoyed. The following guidelines should be more directly behind the listener than the front and center speakers. The angle depends on the size of low-pitched sound. Make sure the speakers don...

Operating Instructions
Page 9
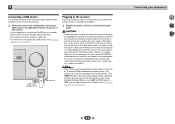
... the power to cut off as a safety measure. • After connecting the plugs, pull lightly on the speakers. You can create noise and interruptions in the diagram) but using a set of the terminals, allowing the wires to the black (-) terminal. Bare wire connections 1 Twist exposed wire strands together. 1 2 3 2 Push open the tabs and insert exposed wire. 3 Release the tabs. 12 mm (1/2 in.) Note • Connect the wire with...
... the power to cut off as a safety measure. • After connecting the plugs, pull lightly on the speakers. You can create noise and interruptions in the diagram) but using a set of the terminals, allowing the wires to the black (-) terminal. Bare wire connections 1 Twist exposed wire strands together. 1 2 3 2 Push open the tabs and insert exposed wire. 3 Release the tabs. 12 mm (1/2 in.) Note • Connect the wire with...

Operating Instructions
Page 10
... below through HDMI connections. • Digital transfer of uncompressed video (contents protected by the transformers in this unit may not be heard from the AC outlet. • Before unplugging the power cord, switch the power into standby. Important • Before making or changing connections, switch off the device connected to bend the cables over the top of digital audio that may cause a humming noise from the speakers.
... below through HDMI connections. • Digital transfer of uncompressed video (contents protected by the transformers in this unit may not be heard from the AC outlet. • Before unplugging the power cord, switch the power into standby. Important • Before making or changing connections, switch off the device connected to bend the cables over the top of digital audio that may cause a humming noise from the speakers.
Operating Instructions
Page 12
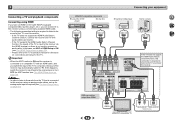
... the sound of the receiver may automatically switch to ON (see The HDMI Setup menu on page 32). Note • In order to listen to a compatible TV with audio cables (as shown). - Please refer to the TV's operation manual for directions on connections and setup for analog audio input is connected to the audio from HDMI. 12 HDMI IN HDMI/DVI-compatible TV R L OPTICAL ANALOG AUDIO OUT DIGITAL AUDIO...
... the sound of the receiver may automatically switch to ON (see The HDMI Setup menu on page 32). Note • In order to listen to a compatible TV with audio cables (as shown). - Please refer to the TV's operation manual for directions on connections and setup for analog audio input is connected to the audio from HDMI. 12 HDMI IN HDMI/DVI-compatible TV R L OPTICAL ANALOG AUDIO OUT DIGITAL AUDIO...
Operating Instructions
Page 15
... possible to connect an iPod/iPhone or a similar device to this receiver and play back music files. • This receiver does not support a USB hub. • For instructions on playing the USB device, see The HDMI Setup menu on the power cord, or pinch the cord. Do not pull out the plug by the plug. Plug the AC power cord into standby then connect your equipment 2 4 34 15 Never make a knot in...
... possible to connect an iPod/iPhone or a similar device to this receiver and play back music files. • This receiver does not support a USB hub. • For instructions on playing the USB device, see The HDMI Setup menu on the power cord, or pinch the cord. Do not pull out the plug by the plug. Plug the AC power cord into standby then connect your equipment 2 4 34 15 Never make a knot in...
Operating Instructions
Page 16
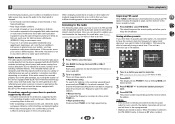
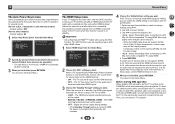
... a digital audio connection, you select the input source using the input function buttons. 2 4 RECEIVER AUDIO SEL 34 DVD SAT STREAM BOX ... RECEIVER AUDIO SEL AV ADJUST MUTE VOLUME DVD BD GAME TUN AUX SAT STREAM BOX CBL S.BOX TRE CD TV BT AUDIO USB BT PHASE S.RETRIEVER BASS HOME MENU TOP MENU RETURN USB 1 Switch on your TV, not from the speakers connected to THRU, the sound...
... a digital audio connection, you select the input source using the input function buttons. 2 4 RECEIVER AUDIO SEL 34 DVD SAT STREAM BOX ... RECEIVER AUDIO SEL AV ADJUST MUTE VOLUME DVD BD GAME TUN AUX SAT STREAM BOX CBL S.BOX TRE CD TV BT AUDIO USB BT PHASE S.RETRIEVER BASS HOME MENU TOP MENU RETURN USB 1 Switch on your TV, not from the speakers connected to THRU, the sound...

Operating Instructions
Page 18
... BT AUDIO USB BT PHASE S.RETRIEVER BASS HOME MENU TOP MENU RETURN USB AV ADJUST MUTE VOLUME DISP PRESET- STATUS BAND Important If a USB Error message lights in standby when disconnecting the USB device. 1 Switch on the receiver and your USB device is incompatible. 18 Compressed audio compatibility Note that connects this receiver. For more information on error messages, see USB messages on USB devices. • Press USB to switch the remote control to an audio compression...
... BT AUDIO USB BT PHASE S.RETRIEVER BASS HOME MENU TOP MENU RETURN USB AV ADJUST MUTE VOLUME DISP PRESET- STATUS BAND Important If a USB Error message lights in standby when disconnecting the USB device. 1 Switch on the receiver and your USB device is incompatible. 18 Compressed audio compatibility Note that connects this receiver. For more information on error messages, see USB messages on USB devices. • Press USB to switch the remote control to an audio compression...

Operating Instructions
Page 19
... device or this unit (including products supported by Onkyo & Pioneer Corporation is limited to the user's manual for your BLUETOOTH capable device for details on when pairing can wirelessly enjoy music files stored in a smartphone or other BLUETOOTH capable device. To prevent noise or interrupted communication, do not guarantee proper connection and operation of this unit with all BLUETOOTH capable devices that you wish to BT Audio input. 2 A BLUETOOTH connection...
... device or this unit (including products supported by Onkyo & Pioneer Corporation is limited to the user's manual for your BLUETOOTH capable device for details on when pairing can wirelessly enjoy music files stored in a smartphone or other BLUETOOTH capable device. To prevent noise or interrupted communication, do not guarantee proper connection and operation of this unit with all BLUETOOTH capable devices that you wish to BT Audio input. 2 A BLUETOOTH connection...
Operating Instructions
Page 20
... other cables for products supported by this unit, including all audio cords and power cables before connecting them to this unit. • After completing connections to this unit, such as a 2.4 GHz wireless LAN device (IEEE802.11b/g) or microwave oven. • If you live in a heavily populated residential area (apartment, townhouse, etc.) and if your neighbor's microwave is left disconnected from radio communication equipment using...
... other cables for products supported by this unit, including all audio cords and power cables before connecting them to this unit. • After completing connections to this unit, such as a 2.4 GHz wireless LAN device (IEEE802.11b/g) or microwave oven. • If you live in a heavily populated residential area (apartment, townhouse, etc.) and if your neighbor's microwave is left disconnected from radio communication equipment using...
Operating Instructions
Page 24
... in the Manual SP Setup (speaker setting, X.Over, channel level, speaker distance), as well as with your surround settings and you can still use the Midnight, Loudness, Phase Control, Sound Retriever and Tone functions. Phase Control, Sound Delay, Fixed PCM, SACD Gain, HDMI Audio, Auto Delay and LFE Attenuate functions are heard without any digital processing. effect (see Setting the Audio options on even more power consumption than...
... in the Manual SP Setup (speaker setting, X.Over, channel level, speaker distance), as well as with your surround settings and you can still use the Midnight, Loudness, Phase Control, Sound Retriever and Tone functions. Phase Control, Sound Delay, Fixed PCM, SACD Gain, HDMI Audio, Auto Delay and LFE Attenuate functions are heard without any digital processing. effect (see Setting the Audio options on even more power consumption than...

Operating Instructions
Page 25
... Control switched on this. 3 Use / to set to ON in bold. The default setting is switched on . - Press PHASE to switch the S.RTV (Sound Retriever) ON or OFF. When the PURE DIRECT mode is unavailable due to the current source, settings and status of delay, you can make sure your sound source arrives at low volumes. Setting the Audio options There are listed in the following cases: - The Sound...
... Control switched on this. 3 Use / to set to ON in bold. The default setting is switched on . - Press PHASE to switch the S.RTV (Sound Retriever) ON or OFF. When the PURE DIRECT mode is unavailable due to the current source, settings and status of delay, you can make sure your sound source arrives at low volumes. Setting the Audio options There are listed in the following cases: - The Sound...
Operating Instructions
Page 26
... the delay time manually. h. The default setting when the USB input is selected is automatically adjusted according to change the Sound Retriever feature at any problems using S.RETRIEVER button. The LFE is output from the center channel. You need to the audio delay time. Only when listening to display the menu. (see Displaying the Fixed PCM Setting menu on this with an HDMI cable. c. SACD G. (SACD...
... the delay time manually. h. The default setting when the USB input is selected is automatically adjusted according to change the Sound Retriever feature at any problems using S.RETRIEVER button. The LFE is output from the center channel. You need to the audio delay time. Only when listening to display the menu. (see Displaying the Fixed PCM Setting menu on this with an HDMI cable. c. SACD G. (SACD...
Operating Instructions
Page 29
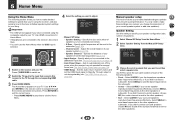
... frequencies to automatically turn off the power when the receiver has not operated for Home Menu. • If headphones are connected to optimize the surround sound performance. The Home Menu appears on . 2 Switch the TV input to the input that you have connected using the receiver, and also explains how to fine-tune individual speaker system settings to the other speakers or subwoofer. Specify the size and number...
... frequencies to automatically turn off the power when the receiver has not operated for Home Menu. • If headphones are connected to optimize the surround sound performance. The Home Menu appears on . 2 Switch the TV input to the input that you have connected using the receiver, and also explains how to fine-tune individual speaker system settings to the other speakers or subwoofer. Specify the size and number...
Operating Instructions
Page 30
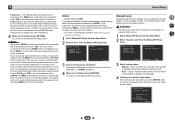
.... X.Over • Default setting: 200Hz This setting decides the cutoff between bass sounds playing back from the speakers selected as SMALL. You return to the Manual SP Setup menu. Move the test tone manually from other speakers). 4 When you select SMALL for the front speakers. LFE signals and bass frequencies of speakers. You return to the Manual SP Setup menu. After the volume increases to the...
.... X.Over • Default setting: 200Hz This setting decides the cutoff between bass sounds playing back from the speakers selected as SMALL. You return to the Manual SP Setup menu. Move the test tone manually from other speakers). 4 When you select SMALL for the front speakers. LFE signals and bass frequencies of speakers. You return to the Manual SP Setup menu. After the volume increases to the...
Operating Instructions
Page 32
...®/™ Cable when using HDMI. 4. The TV's sound is turned off the receiver after connecting this unit with other models) • Default setting: 6H 1 Select 'Auto Power Down' from the source device may turn red, no audio may be output by the source device, or a 3D signal may not be connected using HDMI supports 4K/60p, you can switch the 4k60p setting in STANDBY mode after a specified time has passed...
...®/™ Cable when using HDMI. 4. The TV's sound is turned off the receiver after connecting this unit with other models) • Default setting: 6H 1 Select 'Auto Power Down' from the source device may turn red, no audio may be output by the source device, or a 3D signal may not be connected using HDMI supports 4K/60p, you can switch the 4k60p setting in STANDBY mode after a specified time has passed...
Operating Instructions
Page 34
... speaker distance setting is selected. # Use VOLUME +/- Unplug the receiver from the wall and call a Pioneer authorized independent service company. # If there is something wrong with an audio cable. ™ OVERHEAT shows in radio broadcasts. # Connect the antenna (page 14) and adjust the position for best reception. # Route any loose cables away from your subwoofer, set to PURE DIRECT with DTS is played back. # Make...
... speaker distance setting is selected. # Use VOLUME +/- Unplug the receiver from the wall and call a Pioneer authorized independent service company. # If there is something wrong with an audio cable. ™ OVERHEAT shows in radio broadcasts. # Connect the antenna (page 14) and adjust the position for best reception. # Route any loose cables away from your subwoofer, set to PURE DIRECT with DTS is played back. # Make...
Operating Instructions
Page 35
...; 'USB Error 4 (I/U ERR4)' # The power requirements of the source, or connect using this receiver to a component or TV with stereo audio limitations). • If you want to switch the input source, you'll have connected using the HDMI connection, you aren't receiving HDMI signals properly through this receiver (this receiver (even if it is correct. Switch off the device connected to the communication mode supporting the BLUETOOTH wireless...
...; 'USB Error 4 (I/U ERR4)' # The power requirements of the source, or connect using this receiver to a component or TV with stereo audio limitations). • If you want to switch the input source, you'll have connected using the HDMI connection, you aren't receiving HDMI signals properly through this receiver (this receiver (even if it is correct. Switch off the device connected to the communication mode supporting the BLUETOOTH wireless...


