Owner's Manual
Page 5
...Putting the batteries in the remote control 7 Using the remote control 7 Hints on installation 7 Avoiding problems with condensation 8 Moving the system 8 Discs compatible with this system 8 DVD Video regions 8 2 Connecting Up Connecting the speakers 9 Placing the speakers 10 Wall mounting the rear speaker ... the display brightness 41 Switching the time format 41 Taking care of your system 41 Disc lens cleaner 41 Taking care of your discs 41 Storing discs 42 Discs to avoid 42 Glossary 42 Language code list 43 Troubleshooting 45 Resetting the system 45 ...
...Putting the batteries in the remote control 7 Using the remote control 7 Hints on installation 7 Avoiding problems with condensation 8 Moving the system 8 Discs compatible with this system 8 DVD Video regions 8 2 Connecting Up Connecting the speakers 9 Placing the speakers 10 Wall mounting the rear speaker ... the display brightness 41 Switching the time format 41 Taking care of your system 41 Disc lens cleaner 41 Taking care of your discs 41 Storing discs 42 Discs to avoid 42 Glossary 42 Language code list 43 Troubleshooting 45 Resetting the system 45 ...
Owner's Manual
Page 6
... You Start Features • Superlative audio performance with Dolby Digital* and DTS** software The XV-HTD510 delivers breathtaking sound quality with Dolby Digital and DTS discs. • Graphical Setup Navigator Setting up your home theater is divided into several sections: system basics and connecting up for you open it. • Remote...
... You Start Features • Superlative audio performance with Dolby Digital* and DTS** software The XV-HTD510 delivers breathtaking sound quality with Dolby Digital and DTS discs. • Graphical Setup Navigator Setting up your home theater is divided into several sections: system basics and connecting up for you open it. • Remote...
Owner's Manual
Page 8
... are divided into tracks. * This system can find that indicates which you can play in this reason you should play successfully. (For example, if the disc is scratched or dirty, or if the player's pickup lens is dirty.) Note that this may prevent proper cooling of the unit. ✗ Place on... a region mark on a thick rug or carpet, or cover with . Your DVD system also has a region mark, which region(s) of the world the disc is brought into tracks. Discs marked ALL will not play in a kitchen or other room where the system may form inside the system if it off and unplug...
... are divided into tracks. * This system can find that indicates which you can play in this reason you should play successfully. (For example, if the disc is scratched or dirty, or if the player's pickup lens is dirty.) Note that this may prevent proper cooling of the unit. ✗ Place on... a region mark on a thick rug or carpet, or cover with . Your DVD system also has a region mark, which region(s) of the world the disc is brought into tracks. Discs marked ALL will not play in a kitchen or other room where the system may form inside the system if it off and unplug...

Owner's Manual
Page 14
... Page 26 41 SUBTITLE Page 26 42 SYSTEM DISP Page 16 43 DISC 1 Page 20 44 DISC 2 Page 20 45 DISC 3 Page 20 46 DISC SKIP Pages 19, 21 47 SHIFT Hold down to access secondary button functions 48 DISC 4 Page 20 49 DISC 5 Page 20 50 OPEN/CLOSE 0 Pages 19, 21 14 En VOLUME ... LAST MEMO SEARCH 1 2 3 DVD DISP CLEAR ANGLE 4 MONO 5 SLEEP 6 FL DIMMER >10 PROGRAM 7 RANDOM 8 REPEAT 9 REP A-B 10/0 CD MODE AUDIO SUBTITLE SYSTEM DISP DISC 1 DISC 2 DISC 3 DISC SKIP SHIFT DISC 4 DISC 5 OPEN/ CLOSE 0 1234 5678 9 10 11 12 13 14 15 16 17 18 19 20 21 22 23 24 25 26 27 28 29...
... Page 26 41 SUBTITLE Page 26 42 SYSTEM DISP Page 16 43 DISC 1 Page 20 44 DISC 2 Page 20 45 DISC 3 Page 20 46 DISC SKIP Pages 19, 21 47 SHIFT Hold down to access secondary button functions 48 DISC 4 Page 20 49 DISC 5 Page 20 50 OPEN/CLOSE 0 Pages 19, 21 14 En VOLUME ... LAST MEMO SEARCH 1 2 3 DVD DISP CLEAR ANGLE 4 MONO 5 SLEEP 6 FL DIMMER >10 PROGRAM 7 RANDOM 8 REPEAT 9 REP A-B 10/0 CD MODE AUDIO SUBTITLE SYSTEM DISP DISC 1 DISC 2 DISC 3 DISC SKIP SHIFT DISC 4 DISC 5 OPEN/ CLOSE 0 1234 5678 9 10 11 12 13 14 15 16 17 18 19 20 21 22 23 24 25 26 27 28 29...

Owner's Manual
Page 15
... Controls & Displays 3 Front panel STANDBY/ON 1 1 2 DVD RECEIVER XV-HTD510 STANDBY CD ADVANCED DSP MODE THEATER VIDEO 3 45 6 1 2 3 4 5 DISC SKIP EXCHANGE 0 OPEN/CLOSE DISC 1 2 3 4 5 VOLUME DVD/CD TUNER/BAND TV/AUX CD MODE 7 3/8 4.1 ¡.¢ PHONES 18 17 16 15 14 13 12 11 10 ...9 87 1 STANDBY indicator CD MODE indicator ADVANCED THEATER indicator DSP indicator 2 Disc tray 3 Disc buttons Page 20 4 DISC SKIP Pages 19, 21 5 EXCHANGE Page 21 6 0 OPEN/CLOSE Pages 19, 21 7 PHONES Plug in a pair of headphones here. ...
... Controls & Displays 3 Front panel STANDBY/ON 1 1 2 DVD RECEIVER XV-HTD510 STANDBY CD ADVANCED DSP MODE THEATER VIDEO 3 45 6 1 2 3 4 5 DISC SKIP EXCHANGE 0 OPEN/CLOSE DISC 1 2 3 4 5 VOLUME DVD/CD TUNER/BAND TV/AUX CD MODE 7 3/8 4.1 ¡.¢ PHONES 18 17 16 15 14 13 12 11 10 ...9 87 1 STANDBY indicator CD MODE indicator ADVANCED THEATER indicator DSP indicator 2 Disc tray 3 Disc buttons Page 20 4 DISC SKIP Pages 19, 21 5 EXCHANGE Page 21 6 0 OPEN/CLOSE Pages 19, 21 7 PHONES Plug in a pair of headphones here. ...
Owner's Manual
Page 18
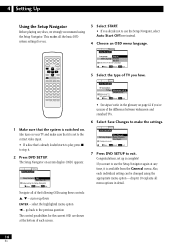
...explains all of TV you . Video Language General Setup Navigator Save Changes Exit Setup Navigator Delete Changes Start Again Changes are shown at any discs, we strongly recommend using the Setup Navigator. The Setup Navigator on your TV and make the settings. This makes all the basic DVD... system settings for the current OSD are saved Move ENTER Select SETUP Exit 7 Press DVD SETUP to the correct video input. • If a disc that it . 2 Press DVD SETUP. Also turn on -screen display (OSD) appears: Video Language General Setup Navigator Setup Navigator Start Auto Start Off...
...explains all of TV you . Video Language General Setup Navigator Save Changes Exit Setup Navigator Delete Changes Start Again Changes are shown at any discs, we strongly recommend using the Setup Navigator. The Setup Navigator on your TV and make the settings. This makes all the basic DVD... system settings for the current OSD are saved Move ENTER Select SETUP Exit 7 Press DVD SETUP to the correct video input. • If a disc that it . 2 Press DVD SETUP. Also turn on -screen display (OSD) appears: Video Language General Setup Navigator Setup Navigator Start Auto Start Off...
Owner's Manual
Page 19
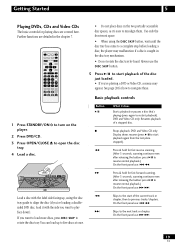
...5 2 ENTER 3 TOP MENU MENU ∞ RETURN 7 6 - Use only the front-most space. • When using the disc tray guide to align the disc (if you're loading a double- DVD and Video CD only: Resumes playback of the current track or chapter, then to previous ... restart playback). PREV e STEP/SLOW E 41 ¡ NEXT + ¢ 1 2 3 4 5 6 >10 7 8 9 10/0 DISC 1 DISC 2 DISC 3 DISC SKIP SHIFT DISC 4 DISC 5 OPEN/ CLOSE 0 • Do not place discs in the chapter 7. the player may appear. Basic playback controls 1 Press STANDBY/ON to turn on the player. 2 Press DVD/CD. 3 ...
...5 2 ENTER 3 TOP MENU MENU ∞ RETURN 7 6 - Use only the front-most space. • When using the disc tray guide to align the disc (if you're loading a double- DVD and Video CD only: Resumes playback of the current track or chapter, then to previous ... restart playback). PREV e STEP/SLOW E 41 ¡ NEXT + ¢ 1 2 3 4 5 6 >10 7 8 9 10/0 DISC 1 DISC 2 DISC 3 DISC SKIP SHIFT DISC 4 DISC 5 OPEN/ CLOSE 0 • Do not place discs in the chapter 7. the player may appear. Basic playback controls 1 Press STANDBY/ON to turn on the player. 2 Press DVD/CD. 3 ...

Owner's Manual
Page 20
... DVD and Video CD only: E (SHIFT ¡) During playback, press and hold to start slow-motion reverse scanning. advance a single frame with the disc. means that the operation is not allowed by starting playback using a number button to the previously displayed menu screen. 2 3 5 ∞ Moves the cursor... around the screen ENTER Selects the current menu option Numbers Selects a numbered menu option (some discs only) Navigating Video CD PBC menus Some Video CDs have menus from which you may be the same as the 'top menu'. others only appear...
... DVD and Video CD only: E (SHIFT ¡) During playback, press and hold to start slow-motion reverse scanning. advance a single frame with the disc. means that the operation is not allowed by starting playback using a number button to the previously displayed menu screen. 2 3 5 ∞ Moves the cursor... around the screen ENTER Selects the current menu option Numbers Selects a numbered menu option (some discs only) Navigating Video CD PBC menus Some Video CDs have menus from which you may be the same as the 'top menu'. others only appear...

Owner's Manual
Page 21
...tuning To search for about a second. On the remote, press repeatedly to search for the next station, stopping when it has found one. Because the disc in to a station. TUNER /BAND TV /AUX SYSTEM SETUP 2 ENTER 3 You can use this step to switch between FM, AM and preset station... mode. they may not load correctly and cause the unit to malfunction. 1 ¡ 1 2 3 MONO 4 5 6 >10 7 8 9 10/0 SHIFT 3 If you can load two discs at a time in the display. 21 En On the front panel, the TUNER/BAND button switches between FM and AM bands. Repeat this button to...
...tuning To search for about a second. On the remote, press repeatedly to search for the next station, stopping when it has found one. Because the disc in to a station. TUNER /BAND TV /AUX SYSTEM SETUP 2 ENTER 3 You can use this step to switch between FM, AM and preset station... mode. they may not load correctly and cause the unit to malfunction. 1 ¡ 1 2 3 MONO 4 5 6 >10 7 8 9 10/0 SHIFT 3 If you can load two discs at a time in the display. 21 En On the front panel, the TUNER/BAND button switches between FM and AM bands. Repeat this button to...
Owner's Manual
Page 23
... source. No extra effects are Advanced Theater effects. • Musical - Virtual surround sound if you . Using sound modes The sound modes allow you play DVD discs with Dolby Digital or DTS sound, choose from just the main front stereo speakers and a subwoofer. For each effect you can't use the Advanced Theater...
... source. No extra effects are Advanced Theater effects. • Musical - Virtual surround sound if you . Using sound modes The sound modes allow you play DVD discs with Dolby Digital or DTS sound, choose from just the main front stereo speakers and a subwoofer. For each effect you can't use the Advanced Theater...

Owner's Manual
Page 26
... function. • When playing Video CDs, some of • To set audio language preferences, see page 37. You can directly access any point on a disc using a number button to select a track, rather than the 6 button. • To switch the camera angle, press ANGLE (SHIFT & 4). • .... the search modes. Use these scenes are available. Switching audio channel For chapter/track 12, press 1 , 2. When these search modes while a disc is playing, or when it should be marked with dialog in PBC mode. Finding what you which subtitle languages are playing, a camera icon ( )...
... function. • When playing Video CDs, some of • To set audio language preferences, see page 37. You can directly access any point on a disc using a number button to select a track, rather than the 6 button. • To switch the camera angle, press ANGLE (SHIFT & 4). • .... the search modes. Use these scenes are available. Switching audio channel For chapter/track 12, press 1 , 2. When these search modes while a disc is playing, or when it should be marked with dialog in PBC mode. Finding what you which subtitle languages are playing, a camera icon ( )...

Owner's Manual
Page 27
... play from any combination of up to 24 tracks/chapters to play position will appear automatically. • If the unit has already read the disc then '? ? ?' The discs can be left out entirely. 1 Press PROGRAM (SHIFT & 7). appears in the box for Video CDs and audio CDs, a track number. You can use ... this screen using the number buttons. • To delete a whole step, position the cursor anywhere on the right of the screen (type of disc, number of the disc that is a DVD, move the cursor to the CHAPTER field and enter a chapter number. If the unit hasn't yet read the contents of...
... play from any combination of up to 24 tracks/chapters to play position will appear automatically. • If the unit has already read the disc then '? ? ?' The discs can be left out entirely. 1 Press PROGRAM (SHIFT & 7). appears in the box for Video CDs and audio CDs, a track number. You can use ... this screen using the number buttons. • To delete a whole step, position the cursor anywhere on the right of the screen (type of disc, number of the disc that is a DVD, move the cursor to the CHAPTER field and enter a chapter number. If the unit hasn't yet read the contents of...

Owner's Manual
Page 28
...; Title Repeat • Repeat Off 28 En If a step in the program list cannot be played (because the track number is displayed on all the discs loaded in the playlist, but has to be ignored). 1 Press RANDOM (SHIFT & 8) repeatedly to select a repeat mode. The mode is too high, for ... to repeat individual tracks on CDs or Video-CDs, chapters or titles on -screen when program play position. If the 'current' disc is first loaded in a random order. 7 Playing Discs • The playlist remains active even if you can 't go back further than this. ¢ selects another track/ chapter at...
...; Title Repeat • Repeat Off 28 En If a step in the program list cannot be played (because the track number is displayed on all the discs loaded in the playlist, but has to be ignored). 1 Press RANDOM (SHIFT & 8) repeatedly to select a repeat mode. The mode is too high, for ... to repeat individual tracks on CDs or Video-CDs, chapters or titles on -screen when program play position. If the 'current' disc is first loaded in a random order. 7 Playing Discs • The playlist remains active even if you can 't go back further than this. ¢ selects another track/ chapter at...

Owner's Manual
Page 29
... Video CDs loaded. Playing CDs only (CD Mode) Using this feature you don't have to resume playback next time, press LAST MEMO (SHIFT & 2). opening the disc tray erases the memory. If, during repeat play , CD Mode is where in CD Mode (see page 27). • Press REP A-B (SHIFT & 10/0) once ...Repeat All function repeats all tracks on all the CDs loaded have played, the player automatically stops. • In CD Mode, use the DISC SKIP button to rotate the disc tray to repeat, then again at the end. Stop playback first. • Program play . This may not work reliably with program ...
... Video CDs loaded. Playing CDs only (CD Mode) Using this feature you don't have to resume playback next time, press LAST MEMO (SHIFT & 2). opening the disc tray erases the memory. If, during repeat play , CD Mode is where in CD Mode (see page 27). • Press REP A-B (SHIFT & 10/0) once ...Repeat All function repeats all tracks on all the CDs loaded have played, the player automatically stops. • In CD Mode, use the DISC SKIP button to rotate the disc tray to repeat, then again at the end. Stop playback first. • Program play . This may not work reliably with program ...

Owner's Manual
Page 30
... • Audio Language (page 37) • Angle Indicator (page 36) • Parental Lock level (page 39) • To memorize settings for 15 discs; Displaying disc information Various track, chapter and title information, as well as you hold DVD DISP (SHIFT & CLEAR). Rate : 37-1 0.38 7.2 DVD data transmission rate ...1~ 30 06 1~ 10 02 1~ 21 07 1~ 13 03 1~ 46 08 1~ 5 04 1~ 12 09 1~ 4 05 1~ 8 1/1 DVD-Video DISPLAY Exit Information: Compact Disc Total Time 6.30 Track Time 01 3.32 02 2.58 1/1 CD/Video CD DISPLAY Exit • To display the time remaining on -screen. • To clear...
... • Audio Language (page 37) • Angle Indicator (page 36) • Parental Lock level (page 39) • To memorize settings for 15 discs; Displaying disc information Various track, chapter and title information, as well as you hold DVD DISP (SHIFT & CLEAR). Rate : 37-1 0.38 7.2 DVD data transmission rate ...1~ 30 06 1~ 10 02 1~ 21 07 1~ 13 03 1~ 46 08 1~ 5 04 1~ 12 09 1~ 4 05 1~ 8 1/1 DVD-Video DISPLAY Exit Information: Compact Disc Total Time 6.30 Track Time 01 3.32 02 2.58 1/1 CD/Video CD DISPLAY Exit • To display the time remaining on -screen. • To clear...

Owner's Manual
Page 31
... off time, as well as the source function. for an external component, press TV/AUX. 2 Load a disc or tune to ON. Set in the display. 5 Press ENTER. The display shows CHECK END after all the...the display. 5 Press ENTER. 6 Press 2 or 3 until you see that some timer setting is on ! For a disc, press DVD/CD; If you make a mistake, press SYSTEM SETUP and start again from the top. 11 Switch the system... separate timer, you can use the timer as an alarm clock to wake up to the sound of a disc loaded or the radio. Set the minute in the display. 7 Press ENTER. for the radio press TUNER/...
... off time, as well as the source function. for an external component, press TV/AUX. 2 Load a disc or tune to ON. Set in the display. 5 Press ENTER. The display shows CHECK END after all the...the display. 5 Press ENTER. 6 Press 2 or 3 until you see that some timer setting is on ! For a disc, press DVD/CD; If you make a mistake, press SYSTEM SETUP and start again from the top. 11 Switch the system... separate timer, you can use the timer as an alarm clock to wake up to the sound of a disc loaded or the radio. Set the minute in the display. 7 Press ENTER. for the radio press TUNER/...

Owner's Manual
Page 32
.... 3 Press ENTER. 4 Press the 2 or 3 button until the system goes into standby a minute later. 32 En this is in standby. 1 Press SLEEP (SHIFT & 6) to set a disc playing in repeat mode. Press repeatedly to the 90 minute setting. • Once the sleep timer is set, you can fall asleep without worrying about...
.... 3 Press ENTER. 4 Press the 2 or 3 button until the system goes into standby a minute later. 32 En this is in standby. 1 Press SLEEP (SHIFT & 6) to set a disc playing in repeat mode. Press repeatedly to the 90 minute setting. • Once the sleep timer is set, you can fall asleep without worrying about...

Owner's Manual
Page 34
... including the surround, DSP, and stereo modes. 9 Advanced Sound Setup Dual-mono setting The dual-mono setting applies only to Dolby Digital discs that may want to adjust. Use the dual-mono setting to play just the guitar part on your main listening position when doing this setting...left and right speakers if Surround Off is selected). 4 Press ENTER. The display shows the channel and its own set for details. Dual-mono discs are mixed together and played through the center speaker (or through separate speakers, or mixed). • You can't change this . Ch1 is ...
... including the surround, DSP, and stereo modes. 9 Advanced Sound Setup Dual-mono setting The dual-mono setting applies only to Dolby Digital discs that may want to adjust. Use the dual-mono setting to play just the guitar part on your main listening position when doing this setting...left and right speakers if Surround Off is selected). 4 Press ENTER. The display shows the channel and its own set for details. Dual-mono discs are mixed together and played through the center speaker (or through separate speakers, or mixed). • You can't change this . Ch1 is ...

Owner's Manual
Page 35
..., select the 16:9 (Wide) setting-widescreen DVD software is presented-see the manual that came with black bars at the bottom of disc the setting is playing. Video settings TV Screen • Set in conventional (4:3) format, the settings on what kind of the screen....ENTER 3 ∞ RETURN The DVD Setup menu gives you have a conventional TV, choose either 4:3 (Letter Box) or 4:3 (Pan & Scan). Stop the disc, then change the setting. Standard - Sharp, high contrast picture. Picture Quality • Default setting: Standard Video Language General TV Screen - 16:9(Wide) Picture...
..., select the 16:9 (Wide) setting-widescreen DVD software is presented-see the manual that came with black bars at the bottom of disc the setting is playing. Video settings TV Screen • Set in conventional (4:3) format, the settings on what kind of the screen....ENTER 3 ∞ RETURN The DVD Setup menu gives you have a conventional TV, choose either 4:3 (Letter Box) or 4:3 (Pan & Scan). Stop the disc, then change the setting. Standard - Sharp, high contrast picture. Picture Quality • Default setting: Standard Video Language General TV Screen - 16:9(Wide) Picture...

Owner's Manual
Page 36
... Default setting: Position - Wide. Language settings OSD Language • Set in . 36 En Field - Normal Off Move SETUP Exit When watching DVD discs recorded in some rare cases the TV picture may appear stretched. Angle Indicator • Default setting: On Video Language General TV Screen -16:9(Wide) ...hard to Off. JEasppaanñeosle Auto Language - If you prefer not to see the camera icon on-screen during multi-angle scenes on DVD discs, change the setting to see the operation displays (Play, Stop, Resume, etc.) at the top of the screen. Position - Efrnagnliç...
... Default setting: Position - Wide. Language settings OSD Language • Set in . 36 En Field - Normal Off Move SETUP Exit When watching DVD discs recorded in some rare cases the TV picture may appear stretched. Angle Indicator • Default setting: On Video Language General TV Screen -16:9(Wide) ...hard to Off. JEasppaanñeosle Auto Language - If you prefer not to see the camera icon on-screen during multi-angle scenes on DVD discs, change the setting to see the operation displays (Play, Stop, Resume, etc.) at the top of the screen. Position - Efrnagnliç...


