
Owner's Manual
Page 1
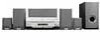
DVD RECEIVER XV-HTD510 SPEAKER SYSTEM S-HTD510 Operating Instructions
DVD RECEIVER XV-HTD510 SPEAKER SYSTEM S-HTD510 Operating Instructions

Owner's Manual
Page 4
... clock at a safe level. Energy-saving design This system is designed to use 1W of electricity when power is switched to use in front of speakers, thunderclap 140 Gunshot blast, jet plane 180 Rocket launching pad Information courtesy of sound levels is for general household purposes. This product is included for...
... clock at a safe level. Energy-saving design This system is designed to use 1W of electricity when power is switched to use in front of speakers, thunderclap 140 Gunshot blast, jet plane 180 Rocket launching pad Information courtesy of sound levels is for general household purposes. This product is included for...
Owner's Manual
Page 5
... condensation 8 Moving the system 8 Discs compatible with this system 8 DVD Video regions 8 2 Connecting Up Connecting the speakers 9 Placing the speakers 10 Wall mounting the rear speaker system 10 Connecting to your TV 11 Connecting the supplied antennas 12 AM loop antenna 12 FM wire antenna 12 Connecting...Front panel 15 Display 15 4 Setting Up Switching on and setting the clock 16 Setting up for surround sound 16 Setting the speaker distances 16 Balancing the surround sound 17 Using the Setup Navigator 18 5 Getting Started Playing DVDs, CDs and Video CDs 19...
... condensation 8 Moving the system 8 Discs compatible with this system 8 DVD Video regions 8 2 Connecting Up Connecting the speakers 9 Placing the speakers 10 Wall mounting the rear speaker system 10 Connecting to your TV 11 Connecting the supplied antennas 12 AM loop antenna 12 FM wire antenna 12 Connecting...Front panel 15 Display 15 4 Setting Up Switching on and setting the clock 16 Setting up for surround sound 16 Setting the speaker distances 16 Balancing the surround sound 17 Using the Setup Navigator 18 5 Getting Started Playing DVDs, CDs and Video CDs 19...
Owner's Manual
Page 6
... (yellow) • Power cord • These operating instructions • Warranty card • Speaker cords 5m (16 ft. 5 in.) x2 (for front L-R speakers) • Speaker cord 2m (6 ft. 7 in.) x1 (for center speaker) • Speaker cords 6m (19 ft. 8 in.) x2 (for rear L-R speakers) • Speaker cord 3m (9 ft. 10 in the box when you . • This product...
... (yellow) • Power cord • These operating instructions • Warranty card • Speaker cords 5m (16 ft. 5 in.) x2 (for front L-R speakers) • Speaker cord 2m (6 ft. 7 in.) x1 (for center speaker) • Speaker cords 6m (19 ft. 8 in.) x2 (for rear L-R speakers) • Speaker cord 3m (9 ft. 10 in the box when you . • This product...

Owner's Manual
Page 9
... make sure that all the components are color-coded for each speaker correctly. Connecting the speakers Subwoofer Center Front R FRONT REAR L R L L FRONT REAR L L R R R R SUB- Colored sleeve Black tab Colored tab 9 En CENTER WOOFER SPEAKERS DIGITAL COAX R L IN TV/ VCR IN VIDEO OUT 1 ... grey sleeves to connect the subwoofer to the SUBWOOFER terminals. 4 Use the speaker cable with the colored sleeve into the black terminal. 3 Release the speaker terminal tabs to secure the speaker cable. Rear L 1 Twist off and unplugged from the power supply. Colored...
... make sure that all the components are color-coded for each speaker correctly. Connecting the speakers Subwoofer Center Front R FRONT REAR L R L L FRONT REAR L L R R R R SUB- Colored sleeve Black tab Colored tab 9 En CENTER WOOFER SPEAKERS DIGITAL COAX R L IN TV/ VCR IN VIDEO OUT 1 ... grey sleeves to connect the subwoofer to the SUBWOOFER terminals. 4 Use the speaker cable with the colored sleeve into the black terminal. 3 Release the speaker terminal tabs to secure the speaker cable. Rear L 1 Twist off and unplugged from the power supply. Colored...
Owner's Manual
Page 10
... you connect and use other speakers with tape or by some other suitable means. Ideally, the other amplifier. However, placing them . Please find the correct screws for advice. • PIONEER is extremely dangerous. En • If you install the center speaker on plywood boards or soft-...surface walls. The front and center speakers supplied with this system. Do not mount it , in which case the...
... you connect and use other speakers with tape or by some other suitable means. Ideally, the other amplifier. However, placing them . Please find the correct screws for advice. • PIONEER is extremely dangerous. En • If you install the center speaker on plywood boards or soft-...surface walls. The front and center speakers supplied with this system. Do not mount it , in which case the...

Owner's Manual
Page 11
... than using the standard VIDEO OUT. • See S-Video Out on your TV. Connecting Up 2 Connecting to your TV FRONT REAR L DILGITAL COAX R R IN SUBWOOFER 1 SPEAKERS CENTER VIDEO OUT 1 DIGITAL IN VIDEO OUT S-VIDEO OUT COAX R TV/ VCR IN IN AUX OUT TV/ VCR IN L IN AUX R H AM LOOP ANTENNA FM...
... than using the standard VIDEO OUT. • See S-Video Out on your TV. Connecting Up 2 Connecting to your TV FRONT REAR L DILGITAL COAX R R IN SUBWOOFER 1 SPEAKERS CENTER VIDEO OUT 1 DIGITAL IN VIDEO OUT S-VIDEO OUT COAX R TV/ VCR IN IN AUX OUT TV/ VCR IN L IN AUX R H AM LOOP ANTENNA FM...

Owner's Manual
Page 12
... AM antenna on a wall or other electrical appliances and do this. For best results, extend the FM antenna fully and fix to the FM SUBWOOFER SPEAKERS CENTER AM 240V 1 DIGITAL COAX R L IN TV/ VCR IN VIDEO OUT S-VIDEO OUT IN AUX OUT LOOP ANTENNA H ANTENNA 220230V 110127V AM LOOP ANTENNA FM...
... AM antenna on a wall or other electrical appliances and do this. For best results, extend the FM antenna fully and fix to the FM SUBWOOFER SPEAKERS CENTER AM 240V 1 DIGITAL COAX R L IN TV/ VCR IN VIDEO OUT S-VIDEO OUT IN AUX OUT LOOP ANTENNA H ANTENNA 220230V 110127V AM LOOP ANTENNA FM...

Owner's Manual
Page 13
Connecting the power Before connecting the power and switching on for more details. 13 En FRONT L L R R REAR L R SUBWOOFER SPEAKERS CENTER DIGITAL COAX R L IN TV/ VCR IN VIDEO OUT S-VIDEO OUT IN AUX OUT H AM LOOP ANTENNA FM UNBAL 75Ω H AC INLET ...properly. 1 Plug one end of the supplied power cord into the AC INLET. 2 Plug the other components 1 FRONT L REAR OAX L L R L R R R TV/ VCR IN SUBWOOFER SPEAKERS CENTER DIGITAL COAX R L IN TV/ VCR IN VIDEO OUT 1 AUX S-VIDEO OUT IN IN AUX OUT OUT H AM LOOP ANTENNA FM UNBAL 75Ω H AC...
Connecting the power Before connecting the power and switching on for more details. 13 En FRONT L L R R REAR L R SUBWOOFER SPEAKERS CENTER DIGITAL COAX R L IN TV/ VCR IN VIDEO OUT S-VIDEO OUT IN AUX OUT H AM LOOP ANTENNA FM UNBAL 75Ω H AC INLET ...properly. 1 Plug one end of the supplied power cord into the AC INLET. 2 Plug the other components 1 FRONT L REAR OAX L L R L R R R TV/ VCR IN SUBWOOFER SPEAKERS CENTER DIGITAL COAX R L IN TV/ VCR IN VIDEO OUT 1 AUX S-VIDEO OUT IN IN AUX OUT OUT H AM LOOP ANTENNA FM UNBAL 75Ω H AC...

Owner's Manual
Page 16
... in the display. 3 Use the 5 and ∞ buttons to set the distance from the two front speakers. Ideally, your listening position should be able to use this system to your speakers or main listening position, you only need to make most of these settings once. You can use the timer...ENTER. 5 Press 2 or 3 until you see CLOCK ADJ in the display. 6 Press ENTER. Unless you change the layout of your listening room. SHIFT Setting the speaker distances 1 Press SYSTEM SETUP. 2 Press the 2 or 3 button until you see FRT. 4 Setting Up Switching on and setting the clock This system has a ...
... in the display. 3 Use the 5 and ∞ buttons to set the distance from the two front speakers. Ideally, your listening position should be able to use this system to your speakers or main listening position, you only need to make most of these settings once. You can use the timer...ENTER. 5 Press 2 or 3 until you see CLOCK ADJ in the display. 6 Press ENTER. Unless you change the layout of your listening room. SHIFT Setting the speaker distances 1 Press SYSTEM SETUP. 2 Press the 2 or 3 button until you see FRT. 4 Setting Up Switching on and setting the clock This system has a ...

Owner's Manual
Page 17
... the DSP mode when Record mode is active (see Direct recording on page 25). 6 Press 3 to move on this. • The speaker distance settings have no headphones connected). You can be set the distance from your surround sound. Ideally, your listening position should be possible to ... For best results, sit in turn : • Front left • Center • Front right • Surround right • Surround left /right speakers. Setting Up 4 4 Press 3 to move on surround modes. However, you can set the distance from your main listening position when doing this. The...
... the DSP mode when Record mode is active (see Direct recording on page 25). 6 Press 3 to move on this. • The speaker distance settings have no headphones connected). You can be set the distance from your surround sound. Ideally, your listening position should be possible to ... For best results, sit in turn : • Front left • Center • Front right • Surround right • Surround left /right speakers. Setting Up 4 4 Press 3 to move on surround modes. However, you can set the distance from your main listening position when doing this. The...
Owner's Manual
Page 23
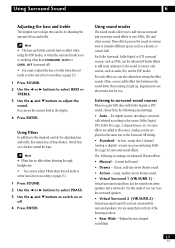
...soundstage. 23 En No extra effects are played in front of bass and treble. • The bass and treble controls have connected the surround speakers, but are Advanced Theater effects. • Musical - Use this mode if you can also adjust how strong the effect sounds. for adjusting... surround sources, such as DVDs, use the Advanced Theater effects to add room ambience to simulate different spaces such as audio CDs, use the surround speakers. • Virtual Surround 2 (VIR.SURR.2) - As Auto, except that 2-channel (analog or digital) sources are processed using the DSP modes, ...
...soundstage. 23 En No extra effects are played in front of bass and treble. • The bass and treble controls have connected the surround speakers, but are Advanced Theater effects. • Musical - Use this mode if you can also adjust how strong the effect sounds. for adjusting... surround sources, such as DVDs, use the Advanced Theater effects to add room ambience to simulate different spaces such as audio CDs, use the surround speakers. • Virtual Surround 2 (VIR.SURR.2) - As Auto, except that 2-channel (analog or digital) sources are processed using the DSP modes, ...
Owner's Manual
Page 24
All sources are seven DSP effects to choose from the surround and center speakers. • You cannot change the surround mode when Record mode is active (see Direct recording on the following page). 1 Press DSP to select a sound mode. ... adjust the effect level when using the DSP modes. Live jazz club sound. • Dance - There are played through only the front left and right speakers, and the subwoofer. Classic, mid-size movie theater sound. • Theater 2 - 6 Using Surround Sound • Surround Off (SUR.OFF) -
All sources are seven DSP effects to choose from the surround and center speakers. • You cannot change the surround mode when Record mode is active (see Direct recording on the following page). 1 Press DSP to select a sound mode. ... adjust the effect level when using the DSP modes. Live jazz club sound. • Dance - There are played through only the front left and right speakers, and the subwoofer. Classic, mid-size movie theater sound. • Theater 2 - 6 Using Surround Sound • Surround Off (SUR.OFF) -

Owner's Manual
Page 34
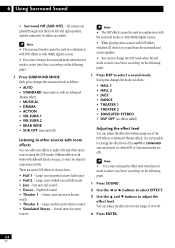
... disc might have the guitar recorded on one channel and all the other instruments on your main listening position when doing this. Ch2 through separate speakers, or mixed). • You can't change this in any other . Ch1 and Ch2 are recorded with two independent channels that may want ... • Remember that not all channels are available in all Advanced Theater effects. • The headphone level is played through both left speaker; You can adjust each speaker in the range of +/-10dB. 4 When you see the disc box for the Surround mode apply to Standard and all sound modes. 3...
... disc might have the guitar recorded on one channel and all the other instruments on your main listening position when doing this. Ch2 through separate speakers, or mixed). • You can't change this in any other . Ch1 and Ch2 are recorded with two independent channels that may want ... • Remember that not all channels are available in all Advanced Theater effects. • The headphone level is played through both left speaker; You can adjust each speaker in the range of +/-10dB. 4 When you see the disc box for the Surround mode apply to Standard and all sound modes. 3...

Owner's Manual
Page 47
... Closed-box bookshelf type System 8.7 cm (3 7/16 in.) 1-way system Speaker 8.7 cm (3 7/16 in . Weight 0.8 kg (1 lbs. 12 oz.) Center speaker Enclosure Closed-box bookshelf type (magnetically shielded †) System 8.7 cm (3 7/16 in.) 1-way system Speaker 8.7 cm (3 7/16 in . Copyright © 2001 Pioneer Corporation. input 100 W Dimensions 150 (W) x 270 (H) x 178 (D) mm 5 7/8 (W) x 10 5/8 (H) x 7 (D) in .) (cone...
... Closed-box bookshelf type System 8.7 cm (3 7/16 in.) 1-way system Speaker 8.7 cm (3 7/16 in . Weight 0.8 kg (1 lbs. 12 oz.) Center speaker Enclosure Closed-box bookshelf type (magnetically shielded †) System 8.7 cm (3 7/16 in.) 1-way system Speaker 8.7 cm (3 7/16 in . Copyright © 2001 Pioneer Corporation. input 100 W Dimensions 150 (W) x 270 (H) x 178 (D) mm 5 7/8 (W) x 10 5/8 (H) x 7 (D) in .) (cone...


