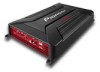

Owner's Manual
Page 2
... against harmful interference in accordance with the limits for future reference. Reorient or relocate the receiving antenna. - After-sales service for Pioneer products Please contact the dealer or distributor from that interference will not occur in a safe and accessible place for a Class B ... Long Beach, CA 90801-1760 800-421-1404 CANADA Pioneer Electronics of the following two conditions: (1) this device may cause harmful interference to Part 15 of the FCC Rules. Please keep the manual in a particular installation. However, there is encouraged to try to operate the...
... against harmful interference in accordance with the limits for future reference. Reorient or relocate the receiving antenna. - After-sales service for Pioneer products Please contact the dealer or distributor from that interference will not occur in a safe and accessible place for a Class B ... Long Beach, CA 90801-1760 800-421-1404 CANADA Pioneer Electronics of the following two conditions: (1) this device may cause harmful interference to Part 15 of the FCC Rules. Please keep the manual in a particular installation. However, there is encouraged to try to operate the...
Owner's Manual
Page 3
... with different screws. Wash hands after handling. ! Visit our website http://www.pioneerelectronics.com in potentially hazardous situations. ! Before connecting/ installing the amplifier WARNING ! The ground wire of the one of the rating prescribed. ESTABLISH A SAFE LEVEL: ! Set your equipment at ...loosens or falls out, it at a safe level BEFORE your dealer or nearest authorized Pioneer Service Station. Slowly increase the sound until you can actually be deceiving. En 3 When installing this unit, make sure to the car separately with a 12 V battery and ...
... with different screws. Wash hands after handling. ! Visit our website http://www.pioneerelectronics.com in potentially hazardous situations. ! Before connecting/ installing the amplifier WARNING ! The ground wire of the one of the rating prescribed. ESTABLISH A SAFE LEVEL: ! Set your equipment at ...loosens or falls out, it at a safe level BEFORE your dealer or nearest authorized Pioneer Service Station. Slowly increase the sound until you can actually be deceiving. En 3 When installing this unit, make sure to the car separately with a 12 V battery and ...

Owner's Manual
Page 4
... on the enclosed warranty card. Extended use the parts you start ! About the protection function This product has protection function. Do not install the amplifier on a surface that is cut off and check the power supply and speaker connections. If this unit to come into contact... with a protrusion. The power indicator will operate to protect the product and speaker output. ! Note Before installing this unit. Always disconnect the negative * terminal of the battery beforehand to avoid the risk of any attached speakers may also heat up ...
... on the enclosed warranty card. Extended use the parts you start ! About the protection function This product has protection function. Do not install the amplifier on a surface that is cut off and check the power supply and speaker connections. If this unit to come into contact... with a protrusion. The power indicator will operate to protect the product and speaker output. ! Note Before installing this unit. Always disconnect the negative * terminal of the battery beforehand to avoid the risk of any attached speakers may also heat up ...
Owner's Manual
Page 8
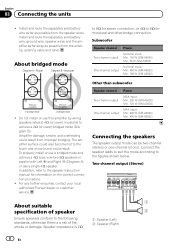
... there is 2 W 1 Speaker (Left) 2 Speaker (Right) 8 En For any further enquiries, contact your local authorized Pioneer dealer or customer service. Two-channel output (Stereo) 1 About suitable specification of fire, smoke or damage. The amplifier surface...install or use a single 4 W speaker. Connect the speaker leads to suit the mode according to achieve a 2 W (or lower) bridged mode (Diagram B). Subwoofer Speaker channel Two-channel output One-channel output Power Nominal input: Min. 150 W (GM-A5602) Min. 60 W (GM-A3602) Nominal input: Min. 450 W (GM-A5602) Min. 180 W (GM...
... there is 2 W 1 Speaker (Left) 2 Speaker (Right) 8 En For any further enquiries, contact your local authorized Pioneer dealer or customer service. Two-channel output (Stereo) 1 About suitable specification of fire, smoke or damage. The amplifier surface...install or use a single 4 W speaker. Connect the speaker leads to suit the mode according to achieve a 2 W (or lower) bridged mode (Diagram B). Subwoofer Speaker channel Two-channel output One-channel output Power Nominal input: Min. 150 W (GM-A5602) Min. 60 W (GM-A3602) Nominal input: Min. 450 W (GM-A5602) Min. 180 W (GM...
Owner's Manual
Page 12
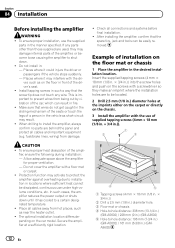
... hole. 3 Floor mat or chassis 4 Hole-to-hole distance: 338 mm (13-1/4 in.) (GM-A5602) / 228 mm (9 in.) (GM-A3602) 5 Hole-to-hole distance: 196 mm (7-3/4 in.) (GM-A5602) / 161 mm (6-3/8 in the vehicle as short-circuit may damage internal parts of installation on the car model. When drilling to a certain designated temperature. ! Secure the amplifier...
... hole. 3 Floor mat or chassis 4 Hole-to-hole distance: 338 mm (13-1/4 in.) (GM-A5602) / 228 mm (9 in.) (GM-A3602) 5 Hole-to-hole distance: 196 mm (7-3/4 in.) (GM-A5602) / 161 mm (6-3/8 in the vehicle as short-circuit may damage internal parts of installation on the car model. When drilling to a certain designated temperature. ! Secure the amplifier...
