
Owner's Manual
Page 3
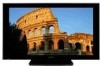
...of the FCC Rules. D8-10-3a_En IMPORTANT NOTICE - Product Name: Plasma Display Model Number: PRO-FHD1 Product Category: Class B Personal Computers & Peripherals Responsible Party Name: PIONEER ELECTRONICS SERVICE, INC. To prevent electromagnetic interference with other reproductive harm. ...THIS IS FOR YOUR SECURITY. D1-4-2-6-1_En CAUTION: This Model PRO-FHD1 for a Class B digital device, pursuant to Part ...
...of the FCC Rules. D8-10-3a_En IMPORTANT NOTICE - Product Name: Plasma Display Model Number: PRO-FHD1 Product Category: Class B Personal Computers & Peripherals Responsible Party Name: PIONEER ELECTRONICS SERVICE, INC. To prevent electromagnetic interference with other reproductive harm. ...THIS IS FOR YOUR SECURITY. D1-4-2-6-1_En CAUTION: This Model PRO-FHD1 for a Class B digital device, pursuant to Part ...
Owner's Manual
Page 6
... the unit was purchased. Over the course of its lifetime, the luminosity of the Pioneer PRO-FHD1 Plasma Display will not be placed in front of the plasma panel, which furthers Pioneer's continued goal of time, when using only parts and accessories designed by PIONEER. To ensure safety, please take the proper measures to mount or install the...
... the unit was purchased. Over the course of its lifetime, the luminosity of the Pioneer PRO-FHD1 Plasma Display will not be placed in front of the plasma panel, which furthers Pioneer's continued goal of time, when using only parts and accessories designed by PIONEER. To ensure safety, please take the proper measures to mount or install the...
Owner's Manual
Page 12
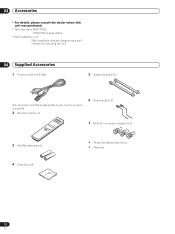
03 Accessories Accessories • For details, please consult the dealer where this unit was purchased. 1 Table top stand (PDK-TS23): PRO-FHD1 display stand. 2 Wall installation unit: Wall installation bracket designed as a wall interface for securing the unit. 04 Supplied Accessories 1 Power cord (2 m/6.6 feet) 5 Speed clamps (x 2) Only ...
03 Accessories Accessories • For details, please consult the dealer where this unit was purchased. 1 Table top stand (PDK-TS23): PRO-FHD1 display stand. 2 Wall installation unit: Wall installation bracket designed as a wall interface for securing the unit. 04 Supplied Accessories 1 Power cord (2 m/6.6 feet) 5 Speed clamps (x 2) Only ...
Owner's Manual
Page 23
... to burning of video signals currently received. • Each time you cannot select "Contrast", "Brightness", "Color", "Tint", "Sharpness", "Pro Adjust", and "Reset"; For 14:9 letterbox pictures. Unless doing so would infringe copyright restrictions, it is progressively stretched toward each side. For...16:9 letterbox pictures. Enabled only when input source size is not recommended to customize settings as desired. NOTE • The Plasma Display's imaging characteristics may remain on the types of time over several days, a permanent after-image may deteriorate if the...
... to burning of video signals currently received. • Each time you cannot select "Contrast", "Brightness", "Color", "Tint", "Sharpness", "Pro Adjust", and "Reset"; For 14:9 letterbox pictures. Unless doing so would infringe copyright restrictions, it is progressively stretched toward each side. For...16:9 letterbox pictures. Enabled only when input source size is not recommended to customize settings as desired. NOTE • The Plasma Display's imaging characteristics may remain on the types of time over several days, a permanent after-image may deteriorate if the...
Owner's Manual
Page 24
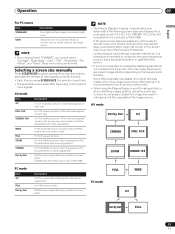
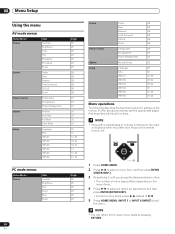
.... 08 Menu Setup Menu Setup Using the menu AV mode menus Home Menu Picture Sound Power Control Option Setup Item Contrast Brightness Color Tint Sharpness Pro Adjust Reset Treble Bass Balance Front Surround FOCUS Reset Energy Save No Signal off Power Management Position Auto Size 4:3 Mode Drive Mode Language SR+ INPUT1...
.... 08 Menu Setup Menu Setup Using the menu AV mode menus Home Menu Picture Sound Power Control Option Setup Item Contrast Brightness Color Tint Sharpness Pro Adjust Reset Treble Bass Balance Front Surround FOCUS Reset Energy Save No Signal off Power Management Position Auto Size 4:3 Mode Drive Mode Language SR+ INPUT1...
Owner's Manual
Page 25
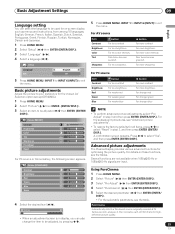
...DISP.). Press / to be adjusted, by pressing / . 25 En Picture STANDARD Contrast 40 Brightness 0 Advanced picture adjustments The Plasma Display provides various advanced functions for high- Basic Adjustment Settings 09 Basic Adjustment Settings English Language setting You can also change the item... select "Reset" in step 3, and then press ENTER (ENTER/ DISP.). Pro Adjust Reset For PC source or Home Gallery, the following screen appears. Several functions are not available when 1080p@50 Hz or 1080p@60 Hz signals are input. Picture MOVIE Contrast 40 Brightness...
...DISP.). Press / to be adjusted, by pressing / . 25 En Picture STANDARD Contrast 40 Brightness 0 Advanced picture adjustments The Plasma Display provides various advanced functions for high- Basic Adjustment Settings 09 Basic Adjustment Settings English Language setting You can also change the item... select "Reset" in step 3, and then press ENTER (ENTER/ DISP.). Pro Adjust Reset For PC source or Home Gallery, the following screen appears. Several functions are not available when 1080p@50 Hz or 1080p@60 Hz signals are input. Picture MOVIE Contrast 40 Brightness...
Owner's Manual
Page 26
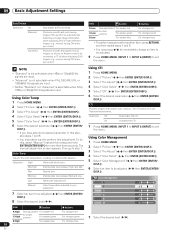
... • "Advanced" is not selectable when PAL, SECAM, 576i, or 1080i@50 Hz signals are input. • Neither "Standard" nor "Advanced" is selectable when 576p, 1080p or 720p@ 50 Hz signals are input. CTI Provides images with reddish tone R 0 Manual Color ...ENTER/DISP.)). 5 Select "CTI" ( / then ENTER (ENTER/DISP.)). Using Color Temp 1 Press HOME MENU. 2 Select "Picture" ( / then ENTER (ENTER/DISP.)). 3 Select "Pro Adjust" ( / then ENTER (ENTER/DISP.)). 6 Select the desired parameter ( / then ENTER (ENTER/ DISP.)). B 0 8 Select the desired level ( / ). Color Temp Adjusts the...
... • "Advanced" is not selectable when PAL, SECAM, 576i, or 1080i@50 Hz signals are input. • Neither "Standard" nor "Advanced" is selectable when 576p, 1080p or 720p@ 50 Hz signals are input. CTI Provides images with reddish tone R 0 Manual Color ...ENTER/DISP.)). 5 Select "CTI" ( / then ENTER (ENTER/DISP.)). Using Color Temp 1 Press HOME MENU. 2 Select "Picture" ( / then ENTER (ENTER/DISP.)). 3 Select "Pro Adjust" ( / then ENTER (ENTER/DISP.)). 6 Select the desired parameter ( / then ENTER (ENTER/ DISP.)). B 0 8 Select the desired level ( / ). Color Temp Adjusts the...

Owner's Manual
Page 27
...still images. Using the Dynamic Range Expander (DRE) functions 1 Press HOME MENU. 2 Select "Picture" ( / then ENTER (ENTER/DISP.)). 3 Select "Pro Adjust" ( / then ENTER (ENTER/DISP.)). 4 Select "DRE" ( / then ENTER (ENTER/DISP.)). 5 Select an item to be adjusted ( / then ENTER .... 2 Select "Picture" ( / then ENTER (ENTER/DISP.)). Reducing the noise in images 1 Press HOME MENU. 2 Select "Picture" ( / then ENTER (ENTER/DISP.)). 3 Select "Pro Adjust" ( / then ENTER (ENTER/DISP.)). 4 Select "NR" ( / then ENTER (ENTER/DISP.)). 5 Select an item to be adjusted ( / then ENTER (ENTER/ DISP.)). &#...
...still images. Using the Dynamic Range Expander (DRE) functions 1 Press HOME MENU. 2 Select "Picture" ( / then ENTER (ENTER/DISP.)). 3 Select "Pro Adjust" ( / then ENTER (ENTER/DISP.)). 4 Select "DRE" ( / then ENTER (ENTER/DISP.)). 5 Select an item to be adjusted ( / then ENTER .... 2 Select "Picture" ( / then ENTER (ENTER/DISP.)). Reducing the noise in images 1 Press HOME MENU. 2 Select "Picture" ( / then ENTER (ENTER/DISP.)). 3 Select "Pro Adjust" ( / then ENTER (ENTER/DISP.)). 4 Select "NR" ( / then ENTER (ENTER/DISP.)). 5 Select an item to be adjusted ( / then ENTER (ENTER/ DISP.)). &#...


