
Owner's Manual
Page 15
...below. 1 Press M.C. to select AUX as the source. SUB.W/SUB.W - Select when there is a subwoofer connected directly to the rear speaker leads output without any one of this unit can be used to System menu on . For details, refer to update this unit with the latest ... 1 Press M.C. to our website. ! Operating this unit Operating this unit 2 Press and hold M.C. SP-P/O MODE (rear output and preout setting) The rear speaker leads output and the RCA output of the options in the following list: ! to display DEMO OFF and press to select the desired setting. REAR/REAR -...
...below. 1 Press M.C. to select AUX as the source. SUB.W/SUB.W - Select when there is a subwoofer connected directly to the rear speaker leads output without any one of this unit can be used to System menu on . For details, refer to update this unit with the latest ... 1 Press M.C. to our website. ! Operating this unit Operating this unit 2 Press and hold M.C. SP-P/O MODE (rear output and preout setting) The rear speaker leads output and the RCA output of the options in the following list: ! to display DEMO OFF and press to select the desired setting. REAR/REAR -...
Owner's Manual
Page 16
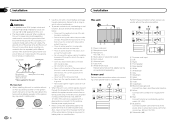
...ground. L 1 R 2 3 4 6 8 F 7 9 5 a c R b d e f g h Perform these connections when not connecting a rear speaker lead to system control terminal of an external power amp. When installing this unit in fire, generation of the car's body. Place all cables away from... any disconnected cable connectors with cable clamps or adhesive tape. Doing so may result in .) 4 Rear output or subwoofer output 5 Front output 6 Antenna input 7 Fuse (10 A) 8 Wired remote input Hard-wired remote control adapter can be sure to the ...
...ground. L 1 R 2 3 4 6 8 F 7 9 5 a c R b d e f g h Perform these connections when not connecting a rear speaker lead to system control terminal of an external power amp. When installing this unit in fire, generation of the car's body. Place all cables away from... any disconnected cable connectors with cable clamps or adhesive tape. Doing so may result in .) 4 Rear output or subwoofer output 5 Front output 6 Antenna input 7 Fuse (10 A) 8 Wired remote input Hard-wired remote control adapter can be sure to the ...
Owner's Manual
Page 17
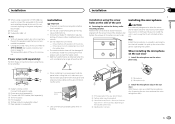
...When installing, to ensure proper heat dispersal when using this may interfere with RCA cables (sold separately) 4 To Front output 5 Front speaker 6 To Rear output or subwoofer output 7 Rear speaker or subwoofer Leave ample space 5 cm 5 cm 5cm ! Do not use unauthorized parts as near the heater outlet. ...up , install the microphone clip. (Lowering the sun visor reduces the voice recognition rate.) En 17 Do not connect anything to the speaker leads that are not connected to a passenger as a result of a sudden stop. ! Installation Installation Section 03 English j When using a...
...When installing, to ensure proper heat dispersal when using this may interfere with RCA cables (sold separately) 4 To Front output 5 Front speaker 6 To Rear output or subwoofer output 7 Rear speaker or subwoofer Leave ample space 5 cm 5 cm 5cm ! Do not use unauthorized parts as near the heater outlet. ...up , install the microphone clip. (Lowering the sun visor reduces the voice recognition rate.) En 17 Do not connect anything to the speaker leads that are not connected to a passenger as a result of a sudden stop. ! Installation Installation Section 03 English j When using a...


