
Owner's Manual
Page 12
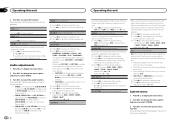
...to select the desired setting. When selecting FM as the level is effective for deficiencies in the selected range are outputted from the subwoofer output frequency range to prevent radical changes in common for each source to play ) 1 Press M.C. to SLA. ! to SP... page 15. ! For details, refer to stop ) 1 Press M.C. For details, refer to display the setting mode. 2 Turn M.C. to SUB.W (subwoofer on/off ) 1 is effective for low compression rates, and 2 is increased or decreased. to -6 LOUDNESS (loudness) 12 En Loudness compensates for high compression...
...to select the desired setting. When selecting FM as the level is effective for deficiencies in the selected range are outputted from the subwoofer output frequency range to prevent radical changes in common for each source to play ) 1 Press M.C. to SLA. ! to SP... page 15. ! For details, refer to stop ) 1 Press M.C. For details, refer to display the setting mode. 2 Turn M.C. to SUB.W (subwoofer on/off ) 1 is effective for low compression rates, and 2 is increased or decreased. to -6 LOUDNESS (loudness) 12 En Loudness compensates for high compression...
Owner's Manual
Page 15
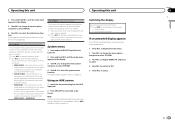
... - range speaker connected to the rear speaker leads output without any one of this unit 2 Press and hold M.C. Select when there is a subwoofer connected directly to the rear speaker leads output and there is being updated. 1 Press M.C. to select AUX as the source. Using an AUX ... turns off the unwanted display using the procedures listed below. 1 Press M.C. Note AUX cannot be selected unless the auxiliary setting is a subwoofer connected to the rear speaker leads output and the RCA output. Switching the display Selecting the desired text information 1 Press DISP to display ...
... - range speaker connected to the rear speaker leads output without any one of this unit 2 Press and hold M.C. Select when there is a subwoofer connected directly to the rear speaker leads output and there is being updated. 1 Press M.C. to select AUX as the source. Using an AUX ... turns off the unwanted display using the procedures listed below. 1 Press M.C. Note AUX cannot be selected unless the auxiliary setting is a subwoofer connected to the rear speaker leads output and the RCA output. Switching the display Selecting the desired text information 1 Press DISP to display ...
Owner's Manual
Page 16
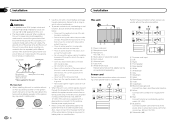
...to the power terminal of smoke or malfunction. Use speakers over 50 W (output value) and between 4 W to a subwoofer. Do not shorten any disconnected cable connectors with other device must be connected to the car separately with a glass antenna,... operation of the car's body. Place all cables away from moving parts, such as near the heater outlet. - Power cord Perform these connections when using a subwoofer without an ACC (accessory) position on , control signals are sent through the hole to protect the wiring. - L 1 R 2 3 4 6 8 F 7 9 5 ...
...to the power terminal of smoke or malfunction. Use speakers over 50 W (output value) and between 4 W to a subwoofer. Do not shorten any disconnected cable connectors with other device must be connected to the car separately with a glass antenna,... operation of the car's body. Place all cables away from moving parts, such as near the heater outlet. - Power cord Perform these connections when using a subwoofer without an ACC (accessory) position on , control signals are sent through the hole to protect the wiring. - L 1 R 2 3 4 6 8 F 7 9 5 ...
Owner's Manual
Page 17
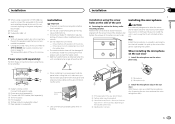
...screw holes are aligned with RCA cables (sold separately) 4 To Front output 5 Front speaker 6 To Rear output or subwoofer output 7 Rear speaker or subwoofer Leave ample space 5 cm 5 cm 5cm ! Consult your dealer if installation requires drilling of holes or other modifications to... 1 Microphone 2 Microphone clip 2 Install the microphone clip on the side of the unit % Fastening the unit to the factory radiomounting bracket. l Subwoofer (4 W) × 2 Notes ! Optimum performance is obtained when the unit is installed at 3 locations on each side. When installing, to ensure...
...screw holes are aligned with RCA cables (sold separately) 4 To Front output 5 Front speaker 6 To Rear output or subwoofer output 7 Rear speaker or subwoofer Leave ample space 5 cm 5 cm 5cm ! Consult your dealer if installation requires drilling of holes or other modifications to... 1 Microphone 2 Microphone clip 2 Install the microphone clip on the side of the unit % Fastening the unit to the factory radiomounting bracket. l Subwoofer (4 W) × 2 Notes ! Optimum performance is obtained when the unit is installed at 3 locations on each side. When installing, to ensure...
Owner's Manual
Page 23
...× 96 mm × 17 mm (6-3/4 in.× 3-3/4 in.× 5/8 in.) Weight 1.2 kg (2.6 lbs) Audio Maximum power output ... 50 W × 4 70 W × 1/2 W (for subwoofer) Continuous power output 22 W × 4 (50 Hz to 15 000 Hz, 5 % THD, 4 W load, both channels driven) Load impedance 4 W (4 W to 8 W allowable) Preout maximum output level...-30 dB) Equalizer (5-Band Graphic Equalizer): Frequency 80 Hz/250 Hz/800 Hz/ 2.5 kHz/8 kHz Equalization range .... ±12 dB (2 dB step) Subwoofer (mono): Frequency 50 Hz/63 Hz/80 Hz/100 Hz/ 125 Hz/160 Hz/200 Hz Slope 6 dB/oct, -12 dB/oct Gain 6 dB ...
...× 96 mm × 17 mm (6-3/4 in.× 3-3/4 in.× 5/8 in.) Weight 1.2 kg (2.6 lbs) Audio Maximum power output ... 50 W × 4 70 W × 1/2 W (for subwoofer) Continuous power output 22 W × 4 (50 Hz to 15 000 Hz, 5 % THD, 4 W load, both channels driven) Load impedance 4 W (4 W to 8 W allowable) Preout maximum output level...-30 dB) Equalizer (5-Band Graphic Equalizer): Frequency 80 Hz/250 Hz/800 Hz/ 2.5 kHz/8 kHz Equalization range .... ±12 dB (2 dB step) Subwoofer (mono): Frequency 50 Hz/63 Hz/80 Hz/100 Hz/ 125 Hz/160 Hz/200 Hz Slope 6 dB/oct, -12 dB/oct Gain 6 dB ...


