Owner's Manual
Page 2
About Display Indications Important 7 Resetting the Microprocessor 7 Precaution 8 After-sales Service for Pioneer Products .......... 8 Basic Operation 9 To Listen to Music 9 Setting the Display Angle 10 Basic Operation of Built-in CD Player 22 - Band ...compatible type 33 - Blank Skip (B.SKIP) - Open/Eject - Track Search and Fast Forward/Reverse - Best Stations Memory (BSM) Using the Built-in CD Player .......... 12 - Manual and Seek Tuning - Disc Title Input (TITLE IN) - Disc Search - ITS Programming (ITS) - Erase a Track Program - Dolby B NR (B NR) Using Multi-CD ...
About Display Indications Important 7 Resetting the Microprocessor 7 Precaution 8 After-sales Service for Pioneer Products .......... 8 Basic Operation 9 To Listen to Music 9 Setting the Display Angle 10 Basic Operation of Built-in CD Player 22 - Band ...compatible type 33 - Blank Skip (B.SKIP) - Open/Eject - Track Search and Fast Forward/Reverse - Best Stations Memory (BSM) Using the Built-in CD Player .......... 12 - Manual and Seek Tuning - Disc Title Input (TITLE IN) - Disc Search - ITS Programming (ITS) - Erase a Track Program - Dolby B NR (B NR) Using Multi-CD ...
Owner's Manual
Page 8
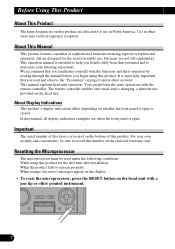
...convenience, be reset under the following conditions: When using this product are allocated for the easiest possible use in North America. About This Manual This product features a number of this product for the first time after installation. Before Using This Product About This Product The tuner ...one-touch source changing, a function not provided on this product. Resetting the Microprocessor The microprocessor must be sure to record this manual, all display indication examples are designed for use , but many are not self-explanatory. All are when the front panel is open . ...
...convenience, be reset under the following conditions: When using this product are allocated for the easiest possible use in North America. About This Manual This product features a number of this product for the first time after installation. Before Using This Product About This Product The tuner ...one-touch source changing, a function not provided on this product. Resetting the Microprocessor The microprocessor must be sure to record this manual, all display indication examples are designed for use , but many are not self-explanatory. All are when the front panel is open . ...
Owner's Manual
Page 9
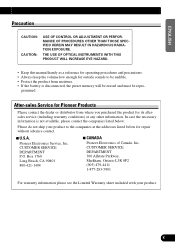
... for repair without advance contact. 7 U.S.A. Box 1760 Long Beach, CA 90801 800-421-1404 7 CANADA Pioneer Electronics of Canada, Inc. THE USE OF OPTICAL INSTRUMENTS WITH THIS PRODUCT WILL INCREASE EYE HAZARD. • Keep this manual handy as a reference for operating procedures and precautions. • Always keep the volume low enough for...
... for repair without advance contact. 7 U.S.A. Box 1760 Long Beach, CA 90801 800-421-1404 7 CANADA Pioneer Electronics of Canada, Inc. THE USE OF OPTICAL INSTRUMENTS WITH THIS PRODUCT WILL INCREASE EYE HAZARD. • Keep this manual handy as a reference for operating procedures and precautions. • Always keep the volume low enough for...
Owner's Manual
Page 12
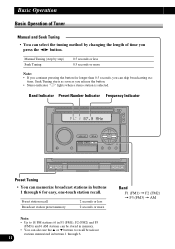
...less 2 seconds or more Note: • If you continue pressing the button for easy, one-touch station recall. Basic Operation Basic Operation of Tuner Manual and Seek Tuning • You can select the tuning method by step) Seek Tuning 0.5 seconds or less 0.5 seconds or more Note: • Up... to recall broadcast stations memorized in buttons 1 through 6. 11 Band F1 (FM1) = F2 (FM2) = F3 (FM3) = AM tions. Manual Tuning (step by changing the length of time you release the button. • Stereo indicator "" lights when a stereo station is selected.
...less 2 seconds or more Note: • If you continue pressing the button for easy, one-touch station recall. Basic Operation Basic Operation of Tuner Manual and Seek Tuning • You can select the tuning method by step) Seek Tuning 0.5 seconds or less 0.5 seconds or more Note: • Up... to recall broadcast stations memorized in buttons 1 through 6. 11 Band F1 (FM1) = F2 (FM2) = F3 (FM3) = AM tions. Manual Tuning (step by changing the length of time you release the button. • Stereo indicator "" lights when a stereo station is selected.
Owner's Manual
Page 16
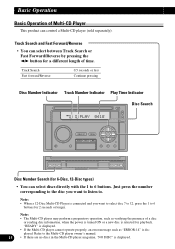
... a new disc is connected and you want to select disc 7 to 12, press the 1 to 6 buttons for playback. Refer to the Multi-CD player owner's manual. 15 • If there are no discs in the Multi-CD player magazine, "NO DISC" is displayed. Just press the number corresponding to the disc...
... a new disc is connected and you want to select disc 7 to 12, press the 1 to 6 buttons for playback. Refer to the Multi-CD player owner's manual. 15 • If there are no discs in the Multi-CD player magazine, "NO DISC" is displayed. Just press the number corresponding to the disc...
Owner's Manual
Page 17
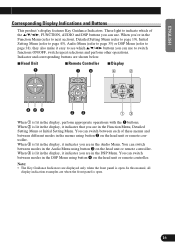
... can use to see which of these menus and between modes in the display, perform appropriate operations with the z buttons. When 4 is open . In this manual, all display indication examples are when the front panel is lit in the display, it indicates that you can use . When 3 is lit in the...
... can use to see which of these menus and between modes in the display, perform appropriate operations with the z buttons. When 4 is open . In this manual, all display indication examples are when the front panel is lit in the display, it indicates that you can use . When 3 is lit in the...
Owner's Manual
Page 35
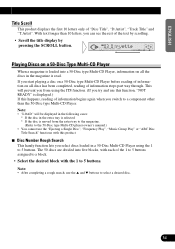
... to 5 buttons. Note: • "LOAD" will prevent you from the extra tray to the magazine. (Refer to the 50-Disc type Multi-CD player owner's manual.) • You cannot use the "Ejecting a Single Disc", "Frequency Play", "Music Group Play" or "ABC Disc Title Search" functions with the 1 to 5 buttons. If you...
... to 5 buttons. Note: • "LOAD" will prevent you from the extra tray to the magazine. (Refer to the 50-Disc type Multi-CD player owner's manual.) • You cannot use the "Ejecting a Single Disc", "Frequency Play", "Music Group Play" or "ABC Disc Title Search" functions with the 1 to 5 buttons. If you...
Other Manual
Page 1
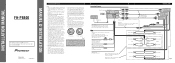
... Connecting the Units Note: • This unit is for details on the unit will not be used, do not connect anything to the owner's manual for vehicles with a 12-volt battery and negative grounding. Likewise, do , the protection circuit may result in the electrical system, be sure to disconnect... remove the caps attached to the end of both products and connect cords that get hot, such as near the heater outlet. INSTALLATION MANUAL OF OF FH-P8800 This product conforms to this is not done, the vehicle battery may be different colors even if they lie against metal parts. •...
... Connecting the Units Note: • This unit is for details on the unit will not be used, do not connect anything to the owner's manual for vehicles with a 12-volt battery and negative grounding. Likewise, do , the protection circuit may result in the electrical system, be sure to disconnect... remove the caps attached to the end of both products and connect cords that get hot, such as near the heater outlet. INSTALLATION MANUAL OF OF FH-P8800 This product conforms to this is not done, the vehicle battery may be different colors even if they lie against metal parts. •...


