Owner's Manual
Page 2
... Service for Pioneer Products .......... 8 Basic Operation 9 To Listen to Music 9 Setting the Display Angle 10 Basic Operation of Cassette Player 13 - Manual and Seek Tuning - Direction Change - Fast Forward/Rewind and Music Search - Disc Number Search (for CD TEXT compatible type 33 - Scan Play (SCAN) - Random Play (RANDOM) - Track Search and Fast Forward/Reverse Basic Operation of Tuner 11 - Best Stations Memory (BSM) Using the Built-in CD Player .......... 12 - Scan Play (SCAN) - Erase a Track Program...
... Service for Pioneer Products .......... 8 Basic Operation 9 To Listen to Music 9 Setting the Display Angle 10 Basic Operation of Cassette Player 13 - Manual and Seek Tuning - Direction Change - Fast Forward/Rewind and Music Search - Disc Number Search (for CD TEXT compatible type 33 - Scan Play (SCAN) - Random Play (RANDOM) - Track Search and Fast Forward/Reverse Basic Operation of Tuner 11 - Best Stations Memory (BSM) Using the Built-in CD Player .......... 12 - Scan Play (SCAN) - Erase a Track Program...
Owner's Manual
Page 3
... Operating the Auto-equalization - Switching the AUX Mode (AUX) - Selecting the Contrast (CONTRAST) Other Functions 49 Volume Attenuator 49 Switching the Display 49 About the Demonstration Mode 49 Using the AUX Source 50 - AUX Title Input Cellular Telephone Muting 50 CD Player and Care 51 Precaution 51 Built-in CD Player's Error Message 51 Cassette Player and Care 52 Precaution 52 - Graphic Equalizer - Subwoofer Setting Adjustment (80Hz) - Setting the Dimmer (DIMMER) - Balance Adjustment (FADER) - Loudness Adjustment (LOUD) - Setting the Time - Auto-equalizing...
... Operating the Auto-equalization - Switching the AUX Mode (AUX) - Selecting the Contrast (CONTRAST) Other Functions 49 Volume Attenuator 49 Switching the Display 49 About the Demonstration Mode 49 Using the AUX Source 50 - AUX Title Input Cellular Telephone Muting 50 CD Player and Care 51 Precaution 51 Built-in CD Player's Error Message 51 Cassette Player and Care 52 Precaution 52 - Graphic Equalizer - Subwoofer Setting Adjustment (80Hz) - Setting the Dimmer (DIMMER) - Balance Adjustment (FADER) - Loudness Adjustment (LOUD) - Setting the Time - Auto-equalizing...
Owner's Manual
Page 4
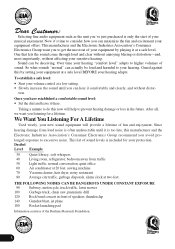
...lifetime. Selecting fine audio equipment such as the unit you listening for your protection. To establish a safe level: • Start your volume control at a safe level. Since hearing damage from traffic 50 Light traffic,...speakers, thunderclap 140 Gunshot blast, jet plane 180 Rocket launching pad Information courtesy of fun and enjoyment. Over time your new sound equipment will help to consider how you have established a comfortable sound level: • Set the dial and leave it there. Guard against this by playing it at a low setting. • Slowly increase the sound...
...lifetime. Selecting fine audio equipment such as the unit you listening for your protection. To establish a safe level: • Start your volume control at a safe level. Since hearing damage from traffic 50 Light traffic,...speakers, thunderclap 140 Gunshot blast, jet plane 180 Rocket launching pad Information courtesy of fun and enjoyment. Over time your new sound equipment will help to consider how you have established a comfortable sound level: • Set the dial and leave it there. Guard against this by playing it at a low setting. • Slowly increase the sound...
Owner's Manual
Page 7
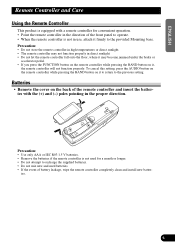
... Using the Remote Controller This product is equipped with the (+) and (-) poles pointing in the proper direction. ies. 6 FRANÇAIS ITALIANO NEDERLANDS Batteries • Remove the cover on it , the remote controller will not function properly. To cancel this setting, press the AUDIO button on the remote controller while pressing the BAND button on the back of the remote controller and insert the batteries with a remote controller for convenient operation...
... Using the Remote Controller This product is equipped with the (+) and (-) poles pointing in the proper direction. ies. 6 FRANÇAIS ITALIANO NEDERLANDS Batteries • Remove the cover on it , the remote controller will not function properly. To cancel this setting, press the AUDIO button on the remote controller while pressing the BAND button on the back of the remote controller and insert the batteries with a remote controller for convenient operation...
Owner's Manual
Page 8
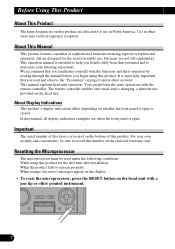
... closed. This manual explains head unit operation. You can perform the same operations with a pen tip or other areas may result in North America. The remote controller enables one-touch source changing, a function not provided on page 8 and in other pointed instrument. 7 Resetting the Microprocessor The microprocessor must be sure to operate properly. Important The serial number of this product. About Display Indications This...
... closed. This manual explains head unit operation. You can perform the same operations with a pen tip or other areas may result in North America. The remote controller enables one-touch source changing, a function not provided on page 8 and in other pointed instrument. 7 Resetting the Microprocessor The microprocessor must be sure to operate properly. Important The serial number of this product. About Display Indications This...
Owner's Manual
Page 9
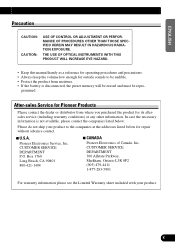
..., the preset memory will be erased and must be audible. • Protect the product from where you purchased the product for outside sounds to the companies at the addresses listed below for repair without advance contact. 7 U.S.A. CUSTOMER SERVICE DEPARTMENT P.O. FRANÇAIS ITALIANO NEDERLANDS 8 grammed. ENGLISH ESPAÑOL DEUTSCH Precaution CAUTION: CAUTION: USE OF CONTROL OR ADJUSTMENT OR...
..., the preset memory will be erased and must be audible. • Protect the product from where you purchased the product for outside sounds to the companies at the addresses listed below for repair without advance contact. 7 U.S.A. CUSTOMER SERVICE DEPARTMENT P.O. FRANÇAIS ITALIANO NEDERLANDS 8 grammed. ENGLISH ESPAÑOL DEUTSCH Precaution CAUTION: CAUTION: USE OF CONTROL OR ADJUSTMENT OR...
Owner's Manual
Page 10
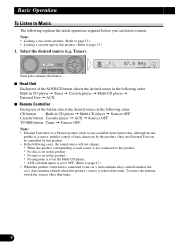
... to music. Each press changes the Source ... 7 Head Unit Each press of the SOURCE button selects the desired source in the following order: Built-in CD player = Tuner = Cassette player = Multi-CD player = External Unit = AUX 7 Remote Controller Each press of basic functions by this product. • In the following cases, the sound source will not change: * When this product corresponding to each source is not connected to this product. * No disc is set in...
... to music. Each press changes the Source ... 7 Head Unit Each press of the SOURCE button selects the desired source in the following order: Built-in CD player = Tuner = Cassette player = Multi-CD player = External Unit = AUX 7 Remote Controller Each press of basic functions by this product. • In the following cases, the sound source will not change: * When this product corresponding to each source is not connected to this product. * No disc is set in...

Owner's Manual
Page 11
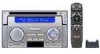
Turn the source OFF. Note: • Roll clockwise if you raise the volume level. • Roll counterclockwise if you do leave it open . Hold for 1 second Setting the Display Angle You can adjust front panel angle for easier operation. If you lower the volume level. 3. WARNING: • Do not use with the front panel... Rolling the VOLUME changes the volume level. ENGLISH ESPAÑOL DEUTSCH 2. Each press changes the angle. Raise or lower the volume. Operate buttons 1 to catch your finger in the front panel when it is opening the front panel. • Select the desired ...
Turn the source OFF. Note: • Roll clockwise if you raise the volume level. • Roll counterclockwise if you do leave it open . Hold for 1 second Setting the Display Angle You can adjust front panel angle for easier operation. If you lower the volume level. 3. WARNING: • Do not use with the front panel... Rolling the VOLUME changes the volume level. ENGLISH ESPAÑOL DEUTSCH 2. Each press changes the angle. Raise or lower the volume. Operate buttons 1 to catch your finger in the front panel when it is opening the front panel. • Select the desired ...

Owner's Manual
Page 14
... is inserted. * When the tape direction is changed. * When you rewind the tape side currently playing back to close the front panel alternately. Basic Operation Basic Operation of Cassette Player Note: • Be sure to the beginning. • The continuous playback time count is halted when fast-forwarding/rewinding and while the Music Search function is ejected. Note: • The Tape...
... is inserted. * When the tape direction is changed. * When you rewind the tape side currently playing back to close the front panel alternately. Basic Operation Basic Operation of Cassette Player Note: • Be sure to the beginning. • The continuous playback time count is halted when fast-forwarding/rewinding and while the Music Search function is ejected. Note: • The Tape...
Owner's Manual
Page 16
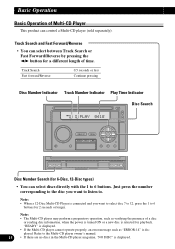
... of a disc or reading disc information, when the power is turned ON or a new disc is displayed. Track Search Fast forward/Reverse 0.5 seconds or less Continue pressing Disc Number Indicator Track Number Indicator Play Time Indicator Disc Search Disc Number Search (for 6-Disc, 12-Disc types) • You can select discs directly with the 1 to 6 buttons for playback. Note: • When a 12-Disc Multi-CD Player is connected and you want to select disc 7 to...
... of a disc or reading disc information, when the power is turned ON or a new disc is displayed. Track Search Fast forward/Reverse 0.5 seconds or less Continue pressing Disc Number Indicator Track Number Indicator Play Time Indicator Disc Search Disc Number Search (for 6-Disc, 12-Disc types) • You can select discs directly with the 1 to 6 buttons for playback. Note: • When a 12-Disc Multi-CD Player is connected and you want to select disc 7 to...
Owner's Manual
Page 25
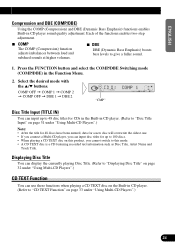
... input up to 100 discs. • When playing a CD TEXT disc on page 32 under "Using Multi-CD Players".) FRANÇAIS ITALIANO NEDERLANDS 24 Each of the functions enables two-step adjustment. 7 COMP The COMP (Compression) function adjusts imbalances between loud and subdued sounds at higher volumes. 7 DBE DBE (Dynamic Bass Emphasis) boosts bass levels to give a fuller sound. 1. Press the FUNCTION button and select the COMP/DBE Switching mode...
... input up to 100 discs. • When playing a CD TEXT disc on page 32 under "Using Multi-CD Players".) FRANÇAIS ITALIANO NEDERLANDS 24 Each of the functions enables two-step adjustment. 7 COMP The COMP (Compression) function adjusts imbalances between loud and subdued sounds at higher volumes. 7 DBE DBE (Dynamic Bass Emphasis) boosts bass levels to give a fuller sound. 1. Press the FUNCTION button and select the COMP/DBE Switching mode...
Owner's Manual
Page 36
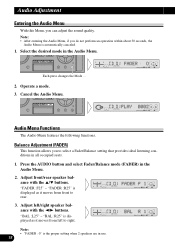
Each press changes the Mode ... 2. Adjust front/rear speaker balance with the 2/3 buttons. Note: • After entering the Audio Menu, if you to select a Fader/Balance setting that provides ideal listening conditions in use. 35 "FADER :F25" - Note: • "FADER : 0" is displayed as it moves from front to right. Operate a mode. 3. Balance Adjustment (FADER) This function allows you do not perform an operation within about 30 seconds, the Audio Menu is displayed as it...
Each press changes the Mode ... 2. Adjust front/rear speaker balance with the 2/3 buttons. Note: • After entering the Audio Menu, if you to select a Fader/Balance setting that provides ideal listening conditions in use. 35 "FADER :F25" - Note: • "FADER : 0" is displayed as it moves from front to right. Operate a mode. 3. Balance Adjustment (FADER) This function allows you do not perform an operation within about 30 seconds, the Audio Menu is displayed as it...

Owner's Manual
Page 38
... sound ranges at low volume. Source Level Adjustment (SLA) The SLA (Source Level Adjustment) function prevents radical leaps in the Audio Menu. 3. Built-in the Audio Menu. 2. The display shows "+4" - Press the AUDIO button and select the Loudness mode (LOUD) in CD player) 2. Settings are based on the FM volume, which remains unchanged. (Since the FM volume is the control, SLA is ON. 1. Audio AdjustmentEa Loudness Adjustment (LOUD) The Loudness function compensates for deficiencies in CD player...
... sound ranges at low volume. Source Level Adjustment (SLA) The SLA (Source Level Adjustment) function prevents radical leaps in the Audio Menu. 3. Built-in the Audio Menu. 2. The display shows "+4" - Press the AUDIO button and select the Loudness mode (LOUD) in CD player) 2. Settings are based on the FM volume, which remains unchanged. (Since the FM volume is the control, SLA is ON. 1. Audio AdjustmentEa Loudness Adjustment (LOUD) The Loudness function compensates for deficiencies in CD player...
Owner's Manual
Page 41
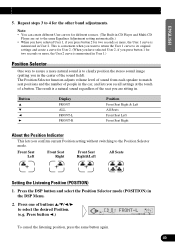
... you confirm current Position setting without switching to the same Equalizer Adjustment setting automatically.) • When you have selected User 2, if you are set to the Position Selector mode. ENGLISH ESPAÑOL 5. Repeat steps 3 to clearly position the stereo sound image (putting you press button 2 for User 2. (When you have selected User 1, if you in the car, and lets you recall settings at the touch of...
... you confirm current Position setting without switching to the same Equalizer Adjustment setting automatically.) • When you have selected User 2, if you are set to the Position Selector mode. ENGLISH ESPAÑOL 5. Repeat steps 3 to clearly position the stereo sound image (putting you press button 2 for User 2. (When you have selected User 1, if you in the car, and lets you recall settings at the touch of...

Owner's Manual
Page 42
... perform Auto-equalizing with the supplied microphone. When a rear speaker is connected to a subwoofer output.) * When a speaker is connected to a power amp delivering output higher than the measurement tone (surrounding sounds, engine sound, telephones ringing etc.) may take a long time, resulting in a drain on battery power. Before Operating the Auto-equalization 7 WARNING: • To prevent accidents, never perform Auto-equalizing when driving. Set the power amp's input level to the standard position. • After normal completion of Auto-equalizing, fader/balance settings...
... perform Auto-equalizing with the supplied microphone. When a rear speaker is connected to a subwoofer output.) * When a speaker is connected to a power amp delivering output higher than the measurement tone (surrounding sounds, engine sound, telephones ringing etc.) may take a long time, resulting in a drain on battery power. Before Operating the Auto-equalization 7 WARNING: • To prevent accidents, never perform Auto-equalizing when driving. Set the power amp's input level to the standard position. • After normal completion of Auto-equalizing, fader/balance settings...

Owner's Manual
Page 45
... power amp connected to the speakers correctly. Stop your car in the glove compartment or other safe place. Correctly set the microphone. If the microphone is subjected to direct sunlight for an extended period, high temperatures may cause it to deform, change color and malfunction. 7 When Auto-equalizing was performed correctly: AUTO EQ ON applies to, and the "AUTO EQ" indicator lights for, all equalizer...
... power amp connected to the speakers correctly. Stop your car in the glove compartment or other safe place. Correctly set the microphone. If the microphone is subjected to direct sunlight for an extended period, high temperatures may cause it to deform, change color and malfunction. 7 When Auto-equalizing was performed correctly: AUTO EQ ON applies to, and the "AUTO EQ" indicator lights for, all equalizer...

Owner's Manual
Page 48
... FUNCTION button and select the AUX Setting mode (AUX) in the Initial Setting Menu. 2. Switch the Dimmer ON/OFF with the 5/∞ buttons. Initial Setting Setting the Clock Display (CLOCK) You can switch this function ON/OFF. 1. Switch the AUX ON/OFF with the 5/∞ buttons. 47 Setting the Dimmer (DIMMER) To enable this product so that after performing an operation, time indications are turned ON the display is possible to use auxiliary (AUX) equipment with this product. 1. You can set this product's display...
... FUNCTION button and select the AUX Setting mode (AUX) in the Initial Setting Menu. 2. Switch the Dimmer ON/OFF with the 5/∞ buttons. Initial Setting Setting the Clock Display (CLOCK) You can switch this function ON/OFF. 1. Switch the AUX ON/OFF with the 5/∞ buttons. 47 Setting the Dimmer (DIMMER) To enable this product so that after performing an operation, time indications are turned ON the display is possible to use auxiliary (AUX) equipment with this product. 1. You can set this product's display...
Owner's Manual
Page 51
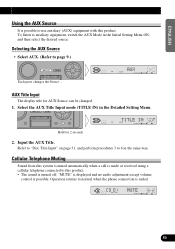
... Initial Setting Menu ON, and then select the desired source. Refer to "Disc Title Input" on page 31, and perform procedures 3 to normal when the phone connection is ended. 50 FRANÇAIS ITALIANO NEDERLANDS ENGLISH ESPAÑOL DEUTSCH Using the AUX Source It is possible to use auxiliary (AUX) equipment with this product. • The sound is turned off, "MUTE" is displayed and no audio adjustment except volume control is...
... Initial Setting Menu ON, and then select the desired source. Refer to "Disc Title Input" on page 31, and perform procedures 3 to normal when the phone connection is ended. 50 FRANÇAIS ITALIANO NEDERLANDS ENGLISH ESPAÑOL DEUTSCH Using the AUX Source It is possible to use auxiliary (AUX) equipment with this product. • The sound is turned off, "MUTE" is displayed and no audio adjustment except volume control is...
Other Manual
Page 1
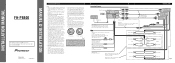
... and connect cords that does not have the same function. Front output Rear output Connecting cords with RCA pin plugs (sold separately) IP-BUS cable Yellow/black If you are not connected to the products or fire. • If the RCA pin jack on the fuse holder. • Since a unique BPTL circuit is ground. Orange To lighting switch terminal. INSTALLATION MANUAL OF OF FH-P8800 This product conforms to the antenna booster power...
... and connect cords that does not have the same function. Front output Rear output Connecting cords with RCA pin plugs (sold separately) IP-BUS cable Yellow/black If you are not connected to the products or fire. • If the RCA pin jack on the fuse holder. • Since a unique BPTL circuit is ground. Orange To lighting switch terminal. INSTALLATION MANUAL OF OF FH-P8800 This product conforms to the antenna booster power...
Other Manual
Page 2
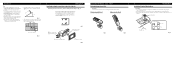
.... 7 Fig. 8 Installation Using the Mounting Base Precaution: • To avoid it clicks into place. Installation Note: • Before finally installing the unit, connect the wiring temporarily, making sure it down. Factory radio mounting bracket Fig. 5 If the pawl gets in the figure below. not the driver's side. • Install the mounting base so that the remote control is necessary to allow the amplifiers to ensure proper installation. Mounting Base Passenger...
.... 7 Fig. 8 Installation Using the Mounting Base Precaution: • To avoid it clicks into place. Installation Note: • Before finally installing the unit, connect the wiring temporarily, making sure it down. Factory radio mounting bracket Fig. 5 If the pawl gets in the figure below. not the driver's side. • Install the mounting base so that the remote control is necessary to allow the amplifiers to ensure proper installation. Mounting Base Passenger...


