Installation Manual
Page 8
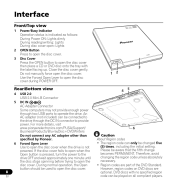
...force open the disc cover when the drive is not powered. For more details, visit www.pioneerelectronics.com/PUSA/Support/ BusinessProducts/Blu-rayDisc+DVDWriters Do not connect any AC adapter other than specified by Pioneer. An AC adapter (not included) can only be aware that the ...fifth change becomes PERMANENT. Please be changed five (5) times, including the initial setting. Interface Front/Top view 1 Power/Busy Indicator Operation status is ...
...force open the disc cover when the drive is not powered. For more details, visit www.pioneerelectronics.com/PUSA/Support/ BusinessProducts/Blu-rayDisc+DVDWriters Do not connect any AC adapter other than specified by Pioneer. An AC adapter (not included) can only be aware that the ...fifth change becomes PERMANENT. Please be changed five (5) times, including the initial setting. Interface Front/Top view 1 Power/Busy Indicator Operation status is ...
Installation Manual
Page 9
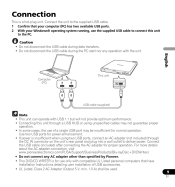
... the supplied USB cable to connect this unit through the DC IN connector on the unit's rear panel and plug into a wall outlet to deliver power. English This unit Computer (PC) USB cable (supplied) Note • This unit can operate with compatible UL Listed personal computers that your computer ...8226; Do not disconnect the USB cable during data transfers. • Do not disconnect the USB cable during the PC start nor any AC adapter other than specified by Pioneer. • This DVD/CD WRITER is a hot-plug unit. Connection This is for proper operation. Connect the unit to the PC.
... the supplied USB cable to connect this unit through the DC IN connector on the unit's rear panel and plug into a wall outlet to deliver power. English This unit Computer (PC) USB cable (supplied) Note • This unit can operate with compatible UL Listed personal computers that your computer ...8226; Do not disconnect the USB cable during data transfers. • Do not disconnect the USB cable during the PC start nor any AC adapter other than specified by Pioneer. • This DVD/CD WRITER is a hot-plug unit. Connection This is for proper operation. Connect the unit to the PC.

Installation Manual
Page 11
......170 ms Seek Time DVD-ROM ...170 ms CD-ROM ...160 ms Power Stand by Pioneer Corporation. Copyright © 2010 Pioneer Corporation. Published by ...0.3 W DC IN Connector Power Supply ...DC +5 V, 1.0 A (AVE) Physical Information Dimensions (excluding...176;C) Storage Humidity ...5 % to 90 % (no condensation) Accessories Operating Instructions (This document) USB Cable (PIONEER, DDF1038/DDF1039) ...1 Software disc...1 Warranty card ...1 English Note Specifications and designs are subject to possible modifications without...8cm adapter.) Disc Transfer Rate * Media that is horizontal use.
......170 ms Seek Time DVD-ROM ...170 ms CD-ROM ...160 ms Power Stand by Pioneer Corporation. Copyright © 2010 Pioneer Corporation. Published by ...0.3 W DC IN Connector Power Supply ...DC +5 V, 1.0 A (AVE) Physical Information Dimensions (excluding...176;C) Storage Humidity ...5 % to 90 % (no condensation) Accessories Operating Instructions (This document) USB Cable (PIONEER, DDF1038/DDF1039) ...1 Software disc...1 Warranty card ...1 English Note Specifications and designs are subject to possible modifications without...8cm adapter.) Disc Transfer Rate * Media that is horizontal use.


