Owner's Manual
Page 6
...as titles, and titles are divided into chapters. Some tracks are divided into tracks. Get familiar with many titles, assigning a title to throughout this manual. Set up exactly the same way. The Setup screen menus, described in the section starting on a DVD player, SACDs, Video CDs and CDs all... title to a single track, however, tracks may be made , you can be set up the player corresponding to the answers given in This Manual DVD is also a list of getting set up into indexes. No entertainment system seems to get familiar with DVD. The section "Setting Up the...
...as titles, and titles are divided into chapters. Some tracks are divided into tracks. Get familiar with many titles, assigning a title to throughout this manual. Set up exactly the same way. The Setup screen menus, described in the section starting on a DVD player, SACDs, Video CDs and CDs all... title to a single track, however, tracks may be made , you can be set up the player corresponding to the answers given in This Manual DVD is also a list of getting set up into indexes. No entertainment system seems to get familiar with DVD. The section "Setting Up the...

Owner's Manual
Page 8
... (over 1 month), remove the batteries to operate the player. Remote Control Operation 7m (23 feet) 8 En When operating the remote control, point it at this manual) 78 RANDOM REPEAT 6 +10 5 4 CLEAR 1 2 3C E e STEP/SLOW SEARCH MODE RETURN REV FWD 1¡ PREVIOUS NEXT 4¢ PAUSE 8 PLAY 3 STOP 7 JOG FL DIMMER JOG MODE...
... (over 1 month), remove the batteries to operate the player. Remote Control Operation 7m (23 feet) 8 En When operating the remote control, point it at this manual) 78 RANDOM REPEAT 6 +10 5 4 CLEAR 1 2 3C E e STEP/SLOW SEARCH MODE RETURN REV FWD 1¡ PREVIOUS NEXT 4¢ PAUSE 8 PLAY 3 STOP 7 JOG FL DIMMER JOG MODE...
Owner's Manual
Page 11
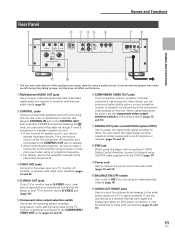
... to the amplifier using an audio or video cord, even when using only digital components. • For details, refer to the operation manuals of another PIONEER component bearing the Î mark, you can output the digital signal via either coaxial or optical output jack to an AV amplifier or ...it were a component in a system (system control). • If you connect for system control, you are using this player with the optional C-AX10 Digital Control Amplifier, connect to this player's CONTROL IN jack to the CONTROL OUT jack of the connected components. 3 VIDEO OUT jacks Connect to the...
... to the amplifier using an audio or video cord, even when using only digital components. • For details, refer to the operation manuals of another PIONEER component bearing the Î mark, you can output the digital signal via either coaxial or optical output jack to an AV amplifier or ...it were a component in a system (system control). • If you connect for system control, you are using this player with the optional C-AX10 Digital Control Amplifier, connect to this player's CONTROL IN jack to the CONTROL OUT jack of the connected components. 3 VIDEO OUT jacks Connect to the...
Owner's Manual
Page 14
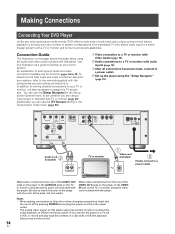
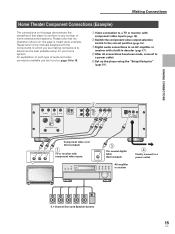
... with the player. You can use the [Setup Navigator] in the Setup screen General menu to a power outlet. 4 Set up your system, refer to the manuals supplied with a VCR, the playback picture may not be normal. 14 En Connection Guide The illustration on the TV or monitor using the audio and...
... with the player. You can use the [Setup Navigator] in the Setup screen General menu to a power outlet. 4 Set up your system, refer to the manuals supplied with a VCR, the playback picture may not be normal. 14 En Connection Guide The illustration on the TV or monitor using the audio and...
Owner's Manual
Page 15
Please refer to the manuals supplied with the components to which you are making connections to a power outlet. 5 Set up the player using the "Setup Navigator" (page 19). An explanation ...
Please refer to the manuals supplied with the components to which you are making connections to a power outlet. 5 Set up the player using the "Setup Navigator" (page 19). An explanation ...
Owner's Manual
Page 16
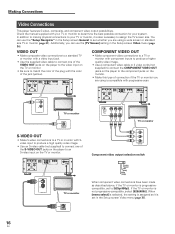
... making physical connections to set whether you are using is compatible with your TV or monitor to assign the TV screen size. GND 2 - Check the manual supplied with progressive scan. R L SURROUND SUB WOOFER AUDIO OUT 1 - HOT (+) 3 - If the TV or monitor is also necessary to determine the best possible connection for...
... making physical connections to set whether you are using is compatible with your TV or monitor to assign the TV screen size. GND 2 - Check the manual supplied with progressive scan. R L SURROUND SUB WOOFER AUDIO OUT 1 - HOT (+) 3 - If the TV or monitor is also necessary to determine the best possible connection for...
Owner's Manual
Page 17
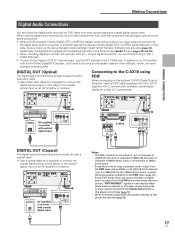
Additionally, the digital audio settings can be adjusted manually in the Setup screen Audio 1 menu (pages 29 and 30). •... OUT DIGITAL IN AV amplifier or receiver with optical digital input OPT 2COAX 1COAX PCM PDIF DIGITAL OUT C-AX10 OPT 2COAX 1COAX PCM PDIF DIGITAL OUT DIGITAL OUT (Coaxial) The digital signal is transmitted electronically through ...be copy protected: audio output from both optical digital and coaxial digital output jacks. In addition to the optional C-AX10 Digital Control Amplifier, use the OPT (optical) or the 2 COAX jack. HOT (+) 3 - For 96kHz/...
Additionally, the digital audio settings can be adjusted manually in the Setup screen Audio 1 menu (pages 29 and 30). •... OUT DIGITAL IN AV amplifier or receiver with optical digital input OPT 2COAX 1COAX PCM PDIF DIGITAL OUT C-AX10 OPT 2COAX 1COAX PCM PDIF DIGITAL OUT DIGITAL OUT (Coaxial) The digital signal is transmitted electronically through ...be copy protected: audio output from both optical digital and coaxial digital output jacks. In addition to the optional C-AX10 Digital Control Amplifier, use the OPT (optical) or the 2 COAX jack. HOT (+) 3 - For 96kHz/...
Owner's Manual
Page 18
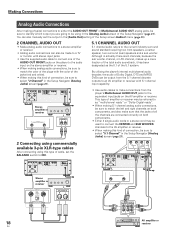
... both components. • Either 2 single audio cords or a stereo cord may be referred to as the 0.1 of Dolby Digital, DTS and MPEG DVDs can also manually set the BALANCE switch to select "5.1 Channel" in the Setup Navigator [Analog Jacks] screen (page 21). 2 Connecting using commercially available 3-pin XLR-type cables After...
... both components. • Either 2 single audio cords or a stereo cord may be referred to as the 0.1 of Dolby Digital, DTS and MPEG DVDs can also manually set the BALANCE switch to select "5.1 Channel" in the Setup Navigator [Analog Jacks] screen (page 21). 2 Connecting using commercially available 3-pin XLR-type cables After...
Owner's Manual
Page 19
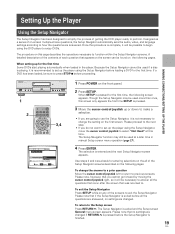
... Select SETUP Exit 1 Press POWER on the following screen appears. Designed as a basis for the first time Some DVDs start playing automatically when loaded in manual Setup screen menu operation (page 27). 4 Press ENTER. Once this page describes the operations necessary to previous screens. If a DVD has been loaded, be necessary...
... Select SETUP Exit 1 Press POWER on the following screen appears. Designed as a basis for the first time Some DVDs start playing automatically when loaded in manual Setup screen menu operation (page 27). 4 Press ENTER. Once this page describes the operations necessary to previous screens. If a DVD has been loaded, be necessary...
Owner's Manual
Page 27
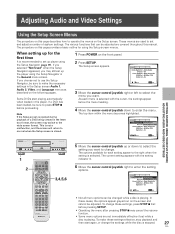
... the cursor control joystick right or left to select the menu you choose not to use the Setup Navigator, be adjusted are covered throughout this manual. The top item within the menu becomes highlighted. The current setting appears with the cursor, the settings appear below the menu heading. 4 Move the cursor...
... the cursor control joystick right or left to select the menu you choose not to use the Setup Navigator, be adjusted are covered throughout this manual. The top item within the menu becomes highlighted. The current setting appears with the cursor, the settings appear below the menu heading. 4 Move the cursor...
Owner's Manual
Page 28
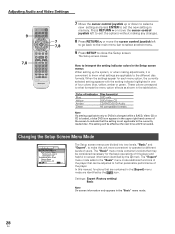
.... In this unit more convenient to further personalize performance of users. Off Background Color - These colors correspond to what settings are applicable to make this manual, functions that can be effective the next time a DVD is loaded, a blue DVD icon appears in the [Expert] menu mode are divided into two levels...
.... In this unit more convenient to further personalize performance of users. Off Background Color - These colors correspond to what settings are applicable to make this manual, functions that can be effective the next time a DVD is loaded, a blue DVD icon appears in the [Expert] menu mode are divided into two levels...
Owner's Manual
Page 33
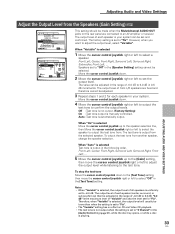
...; The test tone is not output when the setting is selected, the output level will usually be adjusted in 0.5 dB increments. Auto :Test tone is manually controlled. To output the test tone from the Speakers (Gain Setting) Expert 1 Audio2 Video Language General Audio DRC - Front Left, Center, Front Right, Surround Left...
...; The test tone is not output when the setting is selected, the output level will usually be adjusted in 0.5 dB increments. Auto :Test tone is manually controlled. To output the test tone from the Speakers (Gain Setting) Expert 1 Audio2 Video Language General Audio DRC - Front Left, Center, Front Right, Surround Left...
Owner's Manual
Page 48
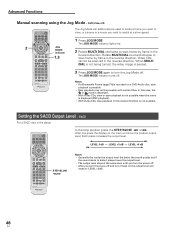
... frame in the forward direction. Notes • If a Browsable Picture (page 71) is recorded on the main unit show the present output level. Advanced Functions Manual scanning using the Jog Mode - The JOG MODE indicator lights red. 2 Rotate MULTI DIAL clockwise to scan frame by frame in the reverse direction. In...
... frame in the forward direction. Notes • If a Browsable Picture (page 71) is recorded on the main unit show the present output level. Advanced Functions Manual scanning using the Jog Mode - The JOG MODE indicator lights red. 2 Rotate MULTI DIAL clockwise to scan frame by frame in the reverse direction. In...
Owner's Manual
Page 55
... into or added to select "On". 2 Press ENTER. By turning the Program Memory to "On", the player will be held in memory is possible to manually erase programs stored in memory. 1 Load a DVD that you may start automatically. DVD-Video This player can be erased in chronological order from the oldest...
... into or added to select "On". 2 Press ENTER. By turning the Program Memory to "On", the player will be held in memory is possible to manually erase programs stored in memory. 1 Load a DVD that you may start automatically. DVD-Video This player can be erased in chronological order from the oldest...
Owner's Manual
Page 73
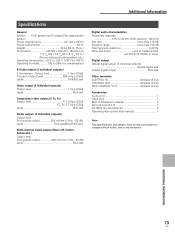
... CONTROL OUT Minijack (3.5 ø) Accessories Audio cord 1 Video cord 1 BNC to RCA/phono adapter 3 Remote control unit 1 AA (R6P) dry cell batteries 2 Operating Instructions (this manual 1 Note The specifications and design of this product are subject to change without notice, due to 88 kHz (DVD-Audio fs: 192 kHz) S/N ratio more...
... CONTROL OUT Minijack (3.5 ø) Accessories Audio cord 1 Video cord 1 BNC to RCA/phono adapter 3 Remote control unit 1 AA (R6P) dry cell batteries 2 Operating Instructions (this manual 1 Note The specifications and design of this product are subject to change without notice, due to 88 kHz (DVD-Audio fs: 192 kHz) S/N ratio more...


