Owner's Manual
Page 1
DVD PLAYER DV-434 Operating Instructions
DVD PLAYER DV-434 Operating Instructions
Owner's Manual
Page 2
...BLADE EXPOSURE. patents and other intellectual property rights owned by method claims of optical instruments with the DVD player. CONGRATULATIONS ON YOUR PURCHASE OF THIS FINE PIONEER PRODUCT. This is connected. - NOTE: This equipment has been tested and found to comply with ...your enclosed warranty card and keep it in accordance with electric appliances such as radios and televisions, use of certain U.S. Pioneer is prohibited. 2 To prevent electromagnetic interference with the instructions, may result in a residential installation. Please write this unit incorporates ...
...BLADE EXPOSURE. patents and other intellectual property rights owned by method claims of optical instruments with the DVD player. CONGRATULATIONS ON YOUR PURCHASE OF THIS FINE PIONEER PRODUCT. This is connected. - NOTE: This equipment has been tested and found to comply with ...your enclosed warranty card and keep it in accordance with electric appliances such as radios and televisions, use of certain U.S. Pioneer is prohibited. 2 To prevent electromagnetic interference with the instructions, may result in a residential installation. Please write this unit incorporates ...
Owner's Manual
Page 3
.... CAUTION: TO PREVENT THE RISK OF ELECTRIC SHOCK, DO NOT REMOVE COVER (OR BACK). Slots and openings in a safe place for future reference. • This player is operated. SAFETY CHECK - for long periods of time, unplug it from the outlet when left unattended and unused for example, near a swimming pool; This...
.... CAUTION: TO PREVENT THE RISK OF ELECTRIC SHOCK, DO NOT REMOVE COVER (OR BACK). Slots and openings in a safe place for future reference. • This player is operated. SAFETY CHECK - for long periods of time, unplug it from the outlet when left unattended and unused for example, near a swimming pool; This...
Owner's Manual
Page 4
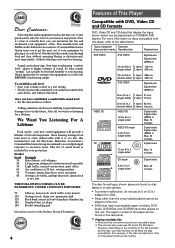
... lens is too late, this unit cannot record onto recordable discs. • This unit can be played back on PIONEER DVD players. Since hearing damage from traffic 50 Light traffic, normal conversation, quiet office 60 Air conditioner at 20 feet, sewing machine 70 Vacuum cleaner, hair ...dryer, noisy restaurant 80 Average city traffic, garbage disposals, alarm clock at two feet. The region number of This Player Compatible with this unit. Sound can actually be played on discs compatible with DVD, Video CD and CD formats DVD, Video CD and CD discs...
... lens is too late, this unit cannot record onto recordable discs. • This unit can be played back on PIONEER DVD players. Since hearing damage from traffic 50 Light traffic, normal conversation, quiet office 60 Air conditioner at 20 feet, sewing machine 70 Vacuum cleaner, hair ...dryer, noisy restaurant 80 Average city traffic, garbage disposals, alarm clock at two feet. The region number of This Player Compatible with this unit. Sound can actually be played on discs compatible with DVD, Video CD and CD formats DVD, Video CD and CD discs...
Owner's Manual
Page 5
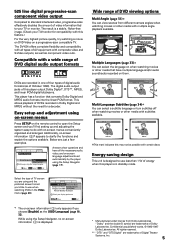
...automatically by the player using the Setup Navigator (page 17). This mark indicates this may not be possible with composite video and S-Video outputs, as well as component video outs. Confidential unpublished works, © 1992-1997 Dolby Laboratories. The DV-434 offers complete flexibility... Navigator Setup Navigator Start Auto Start Off Setting up and adjusting the system easy to use less than 1 W of energy when this player is in standby mode. Subtitle :1 English Subtitle :2 Spanish HELLO! HOLA! Audio1 Audio2 Video Language General TV Screen 4:3(Letter Box) Component...
...automatically by the player using the Setup Navigator (page 17). This mark indicates this may not be possible with composite video and S-Video outputs, as well as component video outs. Confidential unpublished works, © 1992-1997 Dolby Laboratories. The DV-434 offers complete flexibility... Navigator Setup Navigator Start Auto Start Off Setting up and adjusting the system easy to use less than 1 W of energy when this player is in standby mode. Subtitle :1 English Subtitle :2 Spanish HELLO! HOLA! Audio1 Audio2 Video Language General TV Screen 4:3(Letter Box) Component...

Owner's Manual
Page 6
...Video CD Track 1 Track 2 Track 3 Track 4 Track 5 CD How to Proceed in This Manual DVD is an incredible format that corresponds to your player as soon as they will be beneficial for operating the menus will make the necessary initial adjustments. Refer to the section "Before Using" on a disc..." section starting on page 9 to get through the important stages of getting set up exactly the same way. Once you are comfortable using the basic player functions, you are ready to play a DVD, Video CD, or CD with no chapter divisions. Title 1 Chapter 1 Chapter 2 Title 2 Chapter 1 ...
...Video CD Track 1 Track 2 Track 3 Track 4 Track 5 CD How to Proceed in This Manual DVD is an incredible format that corresponds to your player as soon as they will be beneficial for operating the menus will make the necessary initial adjustments. Refer to the section "Before Using" on a disc..." section starting on page 9 to get through the important stages of getting set up exactly the same way. Once you are comfortable using the basic player functions, you are ready to play a DVD, Video CD, or CD with no chapter divisions. Title 1 Chapter 1 Chapter 2 Title 2 Chapter 1 ...
Owner's Manual
Page 7
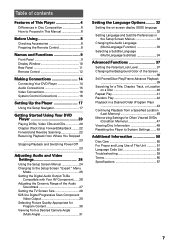
... 11 Remote Control 12 Making Connections 14 Connecting Your DVD Player 14 Audio Connections 15 Video Connections 16 System Control Connections 16 Setting Up the Player 17 Using the Setup Navigator 17 Getting Started Using Your DVD Player 20 Playing DVDs, Video CDs and CDs 20 Chapter (...Playback from a Specified Location (Last Memory 46 Memorizing Settings for Often Viewed DVDs (Condition Memory 47 Viewing Disc Information 48 Resetting the Player to System Settings ....... 49 Additional Information 50 Disc Care 50 For Proper and Long Use of This Unit 51 Language Code List 52 ...
... 11 Remote Control 12 Making Connections 14 Connecting Your DVD Player 14 Audio Connections 15 Video Connections 16 System Control Connections 16 Setting Up the Player 17 Using the Setup Navigator 17 Getting Started Using Your DVD Player 20 Playing DVDs, Video CDs and CDs 20 Chapter (...Playback from a Specified Location (Last Memory 46 Memorizing Settings for Often Viewed DVDs (Condition Memory 47 Viewing Disc Information 48 Resetting the Player to System Settings ....... 49 Additional Information 50 Disc Care 50 For Proper and Long Use of This Unit 51 Language Code List 52 ...
Owner's Manual
Page 8
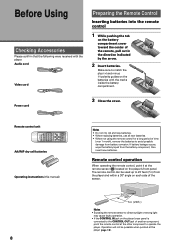
... up to 23 feet (7 m) from the battery component, then insert new batteries. Remote control unit 5 AA/R6P dry cell batteries Operating instructions (this player (page 16). The remote control can be possible when pointed at this manual) 8 Î TV TV FUNC CHANNEL VOLUME REPEAT REPEAT SEARCH MODE A-B... Please confirm that the following were received with the marks inside the battery compartment. If battery leakage occurs, wipe the battery liquid from the player and within a 30° angle on each side of the sensor. 30 30 7m (23ft.) Notes • Exposing the remote sensor ...
... up to 23 feet (7 m) from the battery component, then insert new batteries. Remote control unit 5 AA/R6P dry cell batteries Operating instructions (this player (page 16). The remote control can be possible when pointed at this manual) 8 Î TV TV FUNC CHANNEL VOLUME REPEAT REPEAT SEARCH MODE A-B... Please confirm that the following were received with the marks inside the battery compartment. If battery leakage occurs, wipe the battery liquid from the player and within a 30° angle on each side of the sensor. 30 30 7m (23ft.) Notes • Exposing the remote sensor ...
Owner's Manual
Page 9
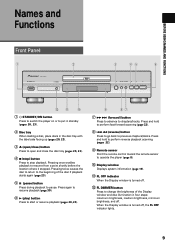
Press and hold to perform fast-forward scanning (page 22). 8 4 1 (reverse) button Press to go back to operate the player (page 8). 0 Display window Displays system information (page 10). - Press and hold to perform reverse playback scanning (pages 22). 9 Remote sensor Point ...to chapters/tracks. BEFORE USING/NAMES AND FUNCTIONS Names and Functions Front Panel 1 2 STANDBY/ON DVD PLAYER FL DIMMER FL OFF 3 45 6 0 41 ¡¢ 7 8 3 Î =- 0 1 STANDBY/ON button Press to switch the player on or to put in standby (pages 20, 23). 2 Disc tray When loading a disc, ...
Press and hold to perform fast-forward scanning (page 22). 8 4 1 (reverse) button Press to go back to operate the player (page 8). 0 Display window Displays system information (page 10). - Press and hold to perform reverse playback scanning (pages 22). 9 Remote sensor Point ...to chapters/tracks. BEFORE USING/NAMES AND FUNCTIONS Names and Functions Front Panel 1 2 STANDBY/ON DVD PLAYER FL DIMMER FL OFF 3 45 6 0 41 ¡¢ 7 8 3 Î =- 0 1 STANDBY/ON button Press to switch the player on or to put in standby (pages 20, 23). 2 Disc tray When loading a disc, ...
Owner's Manual
Page 10
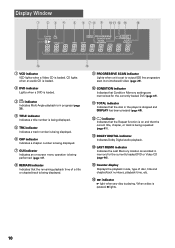
TOTAL indicator Indicates that the disc in the player is stopped and DISPLAY has been pressed (page 49). = indicator Indicates that the Repeat function is on -screen menu operation is being performed (page 17). 0 ...
TOTAL indicator Indicates that the disc in the player is stopped and DISPLAY has been pressed (page 49). = indicator Indicates that the Repeat function is on -screen menu operation is being performed (page 17). 0 ...
Owner's Manual
Page 11
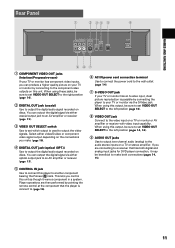
...-scan) If your TV or monitor has component video inputs, you can produce a higher quality picture on your TV or monitor by connecting the player to your TV or monitor has an S-video input, clear picture reproduction is used to the component video outputs on discs. When using these jacks...16). 4 DIGITAL OUT jack (optical (OPT.)) Use to the audio stereo inputs on a TV or stereo amplifier. This lets you control this player to another component bearing the Pioneer Î mark. When using this output, be sure to set VIDEO OUT SELECT to the left position (page 16). 8 VIDEO OUT jack ...
...-scan) If your TV or monitor has component video inputs, you can produce a higher quality picture on your TV or monitor by connecting the player to your TV or monitor has an S-video input, clear picture reproduction is used to the component video outputs on discs. When using these jacks...16). 4 DIGITAL OUT jack (optical (OPT.)) Use to the audio stereo inputs on a TV or stereo amplifier. This lets you control this player to another component bearing the Pioneer Î mark. When using this output, be sure to set VIDEO OUT SELECT to the left position (page 16). 8 VIDEO OUT jack ...
Owner's Manual
Page 12
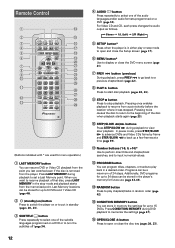
... (page 33). For Video CD and CD, each press changes the audio output as follows. = Stereo = 1/L (Left) = 2/R (Right) 5 SETUP button* Press when the player is removed from the player. In pause mode, press STEP/SLOW E to advance DVDs and Video CDs frame by frame and STEP/SLOW e to play chapters/tracks in... MEMORY button You can be stored for up to 5 DVDs and 1 Video CD (page 46). 2 (standby/on) button Press to switch the player on or to put in the player's memory for up a few frames at a time (page 39). - Programs can store in the stop playback. Press LAST MEMORY during playback to...
... (page 33). For Video CD and CD, each press changes the audio output as follows. = Stereo = 1/L (Left) = 2/R (Right) 5 SETUP button* Press when the player is removed from the player. In pause mode, press STEP/SLOW E to advance DVDs and Video CDs frame by frame and STEP/SLOW e to play chapters/tracks in... MEMORY button You can be stored for up to 5 DVDs and 1 Video CD (page 46). 2 (standby/on) button Press to switch the player on or to put in the player's memory for up a few frames at a time (page 39). - Programs can store in the stop playback. Press LAST MEMORY during playback to...
Owner's Manual
Page 13
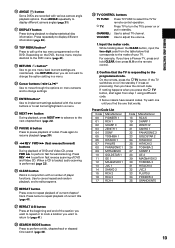
... RCA 5 SHARP 1 ZENITH 2 SANYO 1 PANASONIC 2 GOLDSTAR 2 HITACHI 2 HITACHI 3 TOSHIBA 2 SHARP 2 GE 2 MAGNAVOX 2 TOSHIBA 3 HITACHI 4 JVC 2 FUJITSU PIONEER 2 GRANDIENTE 13 Press twice to perform fast reverse scanning of your TV. NAMES AND FUNCTIONS ¢ TV CONTROL buttons TV FUNC: Press TV FUNC to... Video CD, press FWD ¡ to resume playback (page 39). _ 1 REV FWD ¡ (fast reverse/forward) buttons During playback of player functions. Press repeatedly to display different information (page 48). % TOP MENU button* Press to adjust the volume. 1. While holiding down the CLEAR ...
... RCA 5 SHARP 1 ZENITH 2 SANYO 1 PANASONIC 2 GOLDSTAR 2 HITACHI 2 HITACHI 3 TOSHIBA 2 SHARP 2 GE 2 MAGNAVOX 2 TOSHIBA 3 HITACHI 4 JVC 2 FUJITSU PIONEER 2 GRANDIENTE 13 Press twice to perform fast reverse scanning of your TV. NAMES AND FUNCTIONS ¢ TV CONTROL buttons TV FUNC: Press TV FUNC to... Video CD, press FWD ¡ to resume playback (page 39). _ 1 REV FWD ¡ (fast reverse/forward) buttons During playback of player functions. Press repeatedly to display different information (page 48). % TOP MENU button* Press to adjust the volume. 1. While holiding down the CLEAR ...
Owner's Manual
Page 14
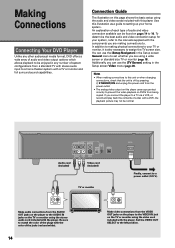
... Video menu (page 28). To determine the best audio and video connection setup for your system, refer to the manuals supplied with the player. In addition to making connections to this unit or when changing connections, check that the unit is also necessary to assign the TV screen... TV or monitor (page 18). Connection Guide The illustration on this page shows the basic setup using the stereo audio cord included with this player uses copy protect circuitry to prevent the video playback on DVDs from being copied. Notes • When making physical connections to your home system...
... Video menu (page 28). To determine the best audio and video connection setup for your system, refer to the manuals supplied with the player. In addition to making connections to this unit or when changing connections, check that the unit is also necessary to assign the TV screen... TV or monitor (page 18). Connection Guide The illustration on this page shows the basic setup using the stereo audio cord included with this player uses copy protect circuitry to prevent the video playback on DVDs from being copied. Notes • When making physical connections to your home system...
Owner's Manual
Page 15
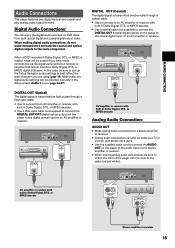
MAKING CONNECTIONS Audio Connections This player features two digital (optical and coaxial) and also analog audio output formats. When a DVD recorded...When making analog audio connections, be sure to set up the Setup Navigator audio settings to the digital optical input on the player to the same component. Digital Audio Connections: You can also be adjusted manually in Dolby Digital, DTS, or MPEG decoder... jacks. • Use the supplied audio cord to connect the AUDIO OUT on the player to the audio input on the player to best reflect the type of the jacks (red and white).
MAKING CONNECTIONS Audio Connections This player features two digital (optical and coaxial) and also analog audio output formats. When a DVD recorded...When making analog audio connections, be sure to set up the Setup Navigator audio settings to the digital optical input on the player to the same component. Digital Audio Connections: You can also be adjusted manually in Dolby Digital, DTS, or MPEG decoder... jacks. • Use the supplied audio cord to connect the AUDIO OUT on the player to the audio input on the player to best reflect the type of the jacks (red and white).
Owner's Manual
Page 16
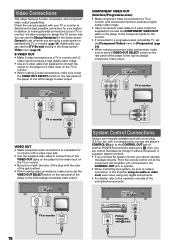
...monitor VIDEO IN System Control Connections Using a commercially available cord with S- with no resistance) to connect this player's CONTROL IN jack to the CONTROL OUT jack of another PIONEER component bearing the Î mark, you connect for your TV or monitor to assign composite video output. ... PB PR DIGITAL OUT VIDEO OUT SELECT DIGITAL OUT OPT CONTROL IN R L AUDIO OUT VIDEO OUT S-VIDEO OUT AC IN CONTROL IN CONTROL OUT Pioneer component with component inputs to produce a higher quality video image. • Use a component video cable or 3 video cords (not supplied) to...
...monitor VIDEO IN System Control Connections Using a commercially available cord with S- with no resistance) to connect this player's CONTROL IN jack to the CONTROL OUT jack of another PIONEER component bearing the Î mark, you connect for your TV or monitor to assign composite video output. ... PB PR DIGITAL OUT VIDEO OUT SELECT DIGITAL OUT OPT CONTROL IN R L AUDIO OUT VIDEO OUT S-VIDEO OUT AC IN CONTROL IN CONTROL OUT Pioneer component with component inputs to produce a higher quality video image. • Use a component video cable or 3 video cords (not supplied) to...
Owner's Manual
Page 17
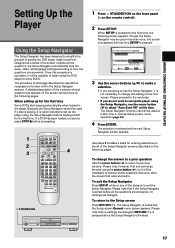
... screen menu operation (page 24). 4 Press ENTER. When SETUP is finished. 17 MAKING CONNECTIONS / SETTING UP THE PLAYER 5 Setting Up the Player Using the Setup Navigator The Setup Navigator has been designed to simplify the process of the screens to exit the Setup Navigator... to the Setup screen Press RETURN . Once this page describes the operations necessary to select "Auto Start Off" at a later time in the player. The procedure on this procedure is exited before proceeding. 1 2 3 LAST CONDITION MEMORY MEMORY OPEN/ CLOSE 0 AUDIO SUBTITLE ANGLE DISPLAY SETUP MENU...
... screen menu operation (page 24). 4 Press ENTER. When SETUP is finished. 17 MAKING CONNECTIONS / SETTING UP THE PLAYER 5 Setting Up the Player Using the Setup Navigator The Setup Navigator has been designed to simplify the process of the screens to exit the Setup Navigator... to the Setup screen Press RETURN . Once this page describes the operations necessary to select "Auto Start Off" at a later time in the player. The procedure on this procedure is exited before proceeding. 1 2 3 LAST CONDITION MEMORY MEMORY OPEN/ CLOSE 0 AUDIO SUBTITLE ANGLE DISPLAY SETUP MENU...
Owner's Manual
Page 18
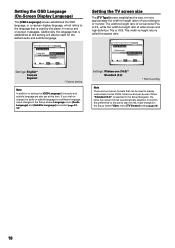
... * Factory setting Note In addition to setting the [OSD Language], the audio and subtitle language are two screen formats that can be used by the player in the Setup Navigator, the letter box screen format is 16:9. The width-to-height ratio of conventional TVs is 4:3, while the width-to-height...
... * Factory setting Note In addition to setting the [OSD Language], the audio and subtitle language are two screen formats that can be used by the player in the Setup Navigator, the letter box screen format is 16:9. The width-to-height ratio of conventional TVs is 4:3, while the width-to-height...

Owner's Manual
Page 19
... * Factory setting Setting compatibility with 96 kHz output The [96 kHz PCM Audio] screen establishes whether or not the AV component the player is connected to is connected to determine what digital audio formats can be decoded. This screen only appears if connections have been made to...screen menus The procedure for changing the settings in the Setup screen menus is the final screen in the Setup Navigator. SETTING UP THE PLAYER Setting digital audio connections to an AV amplifier or decoder The [Digital Jacks] screen establishes whether digital connections have been made to an...
... * Factory setting Setting compatibility with 96 kHz output The [96 kHz PCM Audio] screen establishes whether or not the AV component the player is connected to is connected to determine what digital audio formats can be decoded. This screen only appears if connections have been made to...screen menus The procedure for changing the settings in the Setup screen menus is the final screen in the Setup Navigator. SETTING UP THE PLAYER Setting digital audio connections to an AV amplifier or decoder The [Digital Jacks] screen establishes whether digital connections have been made to an...

Owner's Manual
Page 20
...FWD ¡ CLEAR C 4 5 6 +10 7 8 9 0 PROGRAM RANDOM REPEAT REPEAT SEARCH MODE A-B TV CONTROL VOLUME CHANNEL TV FUNC TV Î 2 4 1 3 STANDBY/ON DVD PLAYER FL DIMMER FL OFF 2 4 0 41 ¡¢ 7 8 3 Î 20 1 Press ( STANDBY/ON on the front panel). 2 Press OPEN/CLOSE0 (0 on the disc. When ...this setting can start using the player to (page 26-27). • The TV screen size is prohibited by the programming on the front panel). The disc tray comes out. 3 Load...
...FWD ¡ CLEAR C 4 5 6 +10 7 8 9 0 PROGRAM RANDOM REPEAT REPEAT SEARCH MODE A-B TV CONTROL VOLUME CHANNEL TV FUNC TV Î 2 4 1 3 STANDBY/ON DVD PLAYER FL DIMMER FL OFF 2 4 0 41 ¡¢ 7 8 3 Î 20 1 Press ( STANDBY/ON on the front panel). 2 Press OPEN/CLOSE0 (0 on the disc. When ...this setting can start using the player to (page 26-27). • The TV screen size is prohibited by the programming on the front panel). The disc tray comes out. 3 Load...

