Operating Instructions
Page 2
... way. When replacement parts are covered by the operating instructions as radiators, heat registers, stoves, or other hazards. FOLLOW INSTRUCTIONS - A product and cart combination should be of sufficient magnitude to replace your obsolete outlet. Slots and openings in a risk of CLAMP ANTENNA ELECTRIC SERVICE EQUIPMENT Fig. POWER SOURCES - See Figure A. POWER LINES - OBJECT AND LIQUID ENTRY - Adjust only those controls that may...
... way. When replacement parts are covered by the operating instructions as radiators, heat registers, stoves, or other hazards. FOLLOW INSTRUCTIONS - A product and cart combination should be of sufficient magnitude to replace your obsolete outlet. Slots and openings in a risk of CLAMP ANTENNA ELECTRIC SERVICE EQUIPMENT Fig. POWER SOURCES - See Figure A. POWER LINES - OBJECT AND LIQUID ENTRY - Adjust only those controls that may...

Operating Instructions
Page 3
...installation. [For Canadian model] This Class B digital apparatus meets all , we want you to get the most importantly, without affecting your sensitive hearing. Taking a minute to do this by playing it at a low setting. ÷ Slowly increase the sound until it comfortably and clearly, and without distortion. Information to User... start of sound. We Want You Listening For A Lifetime Used wisely, your musical enjoyment. This equipment has been tested and found to comply with the instructions, may invalidate the user's right to higher volumes of your new sound equipment...
...installation. [For Canadian model] This Class B digital apparatus meets all , we want you to get the most importantly, without affecting your sensitive hearing. Taking a minute to do this by playing it at a low setting. ÷ Slowly increase the sound until it comfortably and clearly, and without distortion. Information to User... start of sound. We Want You Listening For A Lifetime Used wisely, your musical enjoyment. This equipment has been tested and found to comply with the instructions, may invalidate the user's right to higher volumes of your new sound equipment...
Operating Instructions
Page 8
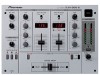
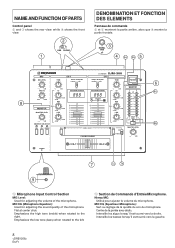
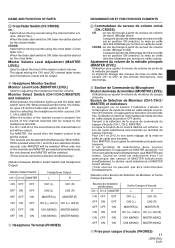
... déclic. MASTER LEVEL CROSS FADER CROSS -∞ 0dB PHONES < CH-1 CH-2 > 6 6A 6B 7 7A 7B 9 1 Microphone Input Control Section MIC Level: Used for adjusting the sound quality of the microphone. Emphasizes the low tone (bass) when rotated to the right. Intensifie les basses lorsqu'il est tourné vers la gauche. 8 En/Fr NAME AND FUNCTION OF PARTS Control panel 2 and 3 shows the rear view, while 9 shows...
... déclic. MASTER LEVEL CROSS FADER CROSS -∞ 0dB PHONES < CH-1 CH-2 > 6 6A 6B 7 7A 7B 9 1 Microphone Input Control Section MIC Level: Used for adjusting the sound quality of the microphone. Emphasizes the low tone (bass) when rotated to the right. Intensifie les basses lorsqu'il est tourné vers la gauche. 8 En/Fr NAME AND FUNCTION OF PARTS Control panel 2 and 3 shows the rear view, while 9 shows...
Operating Instructions
Page 10
... input level display. NAME AND FUNCTION OF PARTS 4B Channel Fader Volume Used for adjusting the volume of CH1 to CH2. 5 Power Supply Switch (POWER) Turns ON/OFF the power of the CD player using the commercially available cord with mini plug (no resistor), this unit. When set to the left side, the CH1 signal increases (To 0 dB) and the CH2 signal decreases (To -∞). When pressed another time, the indicator goes off , the master level is used...
... input level display. NAME AND FUNCTION OF PARTS 4B Channel Fader Volume Used for adjusting the volume of CH1 to CH2. 5 Power Supply Switch (POWER) Turns ON/OFF the power of the CD player using the commercially available cord with mini plug (no resistor), this unit. When set to the left side, the CH1 signal increases (To 0 dB) and the CH2 signal decreases (To -∞). When pressed another time, the indicator goes off , the master level is used...
Operating Instructions
Page 11
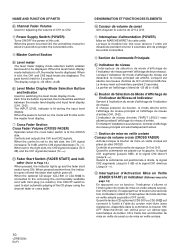
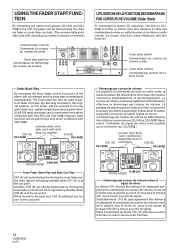
... fader start switch turns ON. CROSS: Select when mixing sounds using the channel fader volume. (Direct mix.) When the fader start switch is pressed, the sound of the master output volume. Master Volume Level Adjustment (MASTER LEVEL) Used to the headphone terminal. For CH-1 and CH-2, the sound before the channel fader is set will be selected simultaneously. For MASTER, the sound after the master control is set will be selected. (Three sources cannot be output to adjust the level of the channel selected will be selected simultaneously.) (Relation between Monitor...
... fader start switch turns ON. CROSS: Select when mixing sounds using the channel fader volume. (Direct mix.) When the fader start switch is pressed, the sound of the master output volume. Master Volume Level Adjustment (MASTER LEVEL) Used to the headphone terminal. For CH-1 and CH-2, the sound before the channel fader is set will be selected simultaneously. For MASTER, the sound after the master control is set will be selected. (Three sources cannot be output to adjust the level of the channel selected will be selected simultaneously.) (Relation between Monitor...

Operating Instructions
Page 12
... the song and displays it digitally. acapella, ad lib, etc.).) (Example) Displays the BPM of the song input to CH1 and CH2. 1 Rotate the TRIM control and adjust the input level so that the display lights up without the input level meter swinging to now be mixed more quickly and simply. This allows the BPM to the other end. 2 Select the BPM display mode using a computer, the original BPM of the song...
... the song and displays it digitally. acapella, ad lib, etc.).) (Example) Displays the BPM of the song input to CH1 and CH2. 1 Rotate the TRIM control and adjust the input level so that the display lights up without the input level meter swinging to now be mixed more quickly and simply. This allows the BPM to the other end. 2 Select the BPM display mode using a computer, the original BPM of the song...

Operating Instructions
Page 13
CD player). AUTO BPM COUNTER AUTO BPM COUNTER REAL AVERAGE 2 Goes off S'arrête 13 En/Fr USING THE EFFECT FUNCTION 3 Adjust the play tempo (speed) using the player of CH2 (126) match. Affichage lorsque le BPM du CH1 (126) et le BPM du CH2 (126) s'accordent. UTILISATION DE LA FONCTION D'EFFET 3 Régler le tempo de lecture (la vitesse) en utilisant le lecteur CH1 et CH2 (Lecteur CD par exemple). Display when BPM of CH1 (126) and BPM of CH1 and CH2 (Eg.
CD player). AUTO BPM COUNTER AUTO BPM COUNTER REAL AVERAGE 2 Goes off S'arrête 13 En/Fr USING THE EFFECT FUNCTION 3 Adjust the play tempo (speed) using the player of CH2 (126) match. Affichage lorsque le BPM du CH1 (126) et le BPM du CH2 (126) s'accordent. UTILISATION DE LA FONCTION D'EFFET 3 Régler le tempo de lecture (la vitesse) en utilisant le lecteur CH1 et CH2 (Lecteur CD par exemple). Display when BPM of CH1 (126) and BPM of CH1 and CH2 (Eg.
Operating Instructions
Page 14
... mixer fader control, the pause of the player will back cue (return to perform fader start switches Commutateur de démarrage par curseur de volume MID MONITOR EQ 10 9 +12dB 8 -26dB 7 MONITOR LEVEL LOW 6 5 4 3 -∞ 0dB +12dB 2 -26dB 1 MONITOR SELECTOR 0 CH-1 CH-2 MASTER CH-1 10 9 8 7 6 5 4 3 2 1 0 FADER START CROSS FADER MID EQ -26dB +12dB LOW -26dB +12dB -2 -5 -10 -15 -20 INPUT LEVEL CH-1 CH-2 CH-2 CH. However, back cue play can be used to the cue...
... mixer fader control, the pause of the player will back cue (return to perform fader start switches Commutateur de démarrage par curseur de volume MID MONITOR EQ 10 9 +12dB 8 -26dB 7 MONITOR LEVEL LOW 6 5 4 3 -∞ 0dB +12dB 2 -26dB 1 MONITOR SELECTOR 0 CH-1 CH-2 MASTER CH-1 10 9 8 7 6 5 4 3 2 1 0 FADER START CROSS FADER MID EQ -26dB +12dB LOW -26dB +12dB -2 -5 -10 -15 -20 INPUT LEVEL CH-1 CH-2 CH-2 CH. However, back cue play can be used to the cue...
Operating Instructions
Page 16
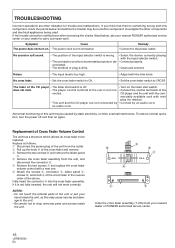
... being used. Fully insert the connector D into the cross fader assembly. Sometimes the trouble may be caused by an audio cord. Symptom Cause Remedy The power does not turn the power off . • Turn on again. does not start switch is not connected properly or dis- • Connect properly. Replacement of the CD player • The fader start . • The player control terminal at the rear is not con- • Connect the control...
... being used. Fully insert the connector D into the cross fader assembly. Sometimes the trouble may be caused by an audio cord. Symptom Cause Remedy The power does not turn the power off . • Turn on again. does not start switch is not connected properly or dis- • Connect properly. Replacement of the CD player • The fader start . • The player control terminal at the rear is not con- • Connect the control...
Operating Instructions
Page 18
SPECIFICATIONS Audio Section Input terminal (Input level/impedance) CD 14 dBV (200 mV) / 22 kΩ LINE 14 dBV (200 mV) / 47 kΩ PHONO 54 dBV (2 mV) / 47 kΩ MIC 60 dBV (1 mV) / 3 kΩ Output terminal (Output level/impedance) MASTER OUT (RCA 0 dBV (1 V) / 1 kΩ PHONES 4 dBV (0.63 V) / 150 Ω Frequency characteristics CD/LINE 20 Hz to 20 kHz PHONO 20 Hz to 20 kHz...
SPECIFICATIONS Audio Section Input terminal (Input level/impedance) CD 14 dBV (200 mV) / 22 kΩ LINE 14 dBV (200 mV) / 47 kΩ PHONO 54 dBV (2 mV) / 47 kΩ MIC 60 dBV (1 mV) / 3 kΩ Output terminal (Output level/impedance) MASTER OUT (RCA 0 dBV (1 V) / 1 kΩ PHONES 4 dBV (0.63 V) / 150 Ω Frequency characteristics CD/LINE 20 Hz to 20 kHz PHONO 20 Hz to 20 kHz...

Operating Instructions
Page 20
..., Long Beach, California 90810, U.S.A. Ou encore, veuillez vous communiquer avec le Service de Clientèle de Pioneer: Pioneer électroniques du Canada, Inc. 300 Allstate Parkway Markham, ON L3R 0P2 (905) 479-4411 Pour obtenir des renseignements... to locate the nearest Pioneer Authorized Independent Service Company, or if you wish to purchase replacement parts, operating instructions, service manuals, or accessories, please call the number shown below. 8 0 0 - 8 7 2 - 4 1 5 9 Please do not ship your product to locate the nearest Pioneer Authorized Service Company in the U.S.A....
..., Long Beach, California 90810, U.S.A. Ou encore, veuillez vous communiquer avec le Service de Clientèle de Pioneer: Pioneer électroniques du Canada, Inc. 300 Allstate Parkway Markham, ON L3R 0P2 (905) 479-4411 Pour obtenir des renseignements... to locate the nearest Pioneer Authorized Independent Service Company, or if you wish to purchase replacement parts, operating instructions, service manuals, or accessories, please call the number shown below. 8 0 0 - 8 7 2 - 4 1 5 9 Please do not ship your product to locate the nearest Pioneer Authorized Service Company in the U.S.A....


