
Owner's Manual
Page 2
... and care of an audio file 22 Selecting files from theft 8 - Installing the battery 10 - Removing the battery 10 - Searching songs by category 24 - Please read through this manual 7 After-sales service for Pioneer products 7 Visit our website 7 Features 8 Operating environment 8 Protecting your... iPod 15 2 En Introduction to advanced operations 15 Storing the strongest broadcast frequencies 15 Tuning in strong signals 15 Built-in CD Player Basic Operations 17 Displaying ...
... and care of an audio file 22 Selecting files from theft 8 - Installing the battery 10 - Removing the battery 10 - Searching songs by category 24 - Please read through this manual 7 After-sales service for Pioneer products 7 Visit our website 7 Features 8 Operating environment 8 Protecting your... iPod 15 2 En Introduction to advanced operations 15 Storing the strongest broadcast frequencies 15 Tuning in strong signals 15 Built-in CD Player Basic Operations 17 Displaying ...
Owner's Manual
Page 6
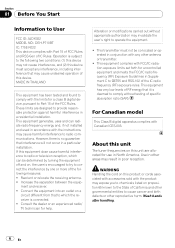
...may result in a particular installation. MADE IN THAILAND This equipment has been tested and found to comply with Part 15 of FCC Rules and RSS-Gen of IC Rules. Section 01 Before You Start Information to User FCC ID: AJDK022 MODEL NO.: DEH-P710BT IC: 775E-K022 This device...on proposition 65 known to cause cancer and birth defects or other antenna or transmitter. ! If this equipment dose cause harmful interference to radio or television reception, which the receiver is subject to the following measures: ! Use in other governmental entities to the State of the ...
...may result in a particular installation. MADE IN THAILAND This equipment has been tested and found to comply with Part 15 of FCC Rules and RSS-Gen of IC Rules. Section 01 Before You Start Information to User FCC ID: AJDK022 MODEL NO.: DEH-P710BT IC: 775E-K022 This device...on proposition 65 known to cause cancer and birth defects or other antenna or transmitter. ! If this equipment dose cause harmful interference to radio or television reception, which the receiver is subject to the following measures: ! Use in other governmental entities to the State of the ...

Owner's Manual
Page 9
... pointed instrument. Important The red lead (ACC) of the front panel and pull it securely into the provided protective case for the first time after installation ! Reverse mode If you do not perform an operation within about 30 seconds, screen indications start . RESET button 3 Put the front panel into the mounting...
... pointed instrument. Important The red lead (ACC) of the front panel and pull it securely into the provided protective case for the first time after installation ! Reverse mode If you do not perform an operation within about 30 seconds, screen indications start . RESET button 3 Put the front panel into the mounting...
Owner's Manual
Page 10
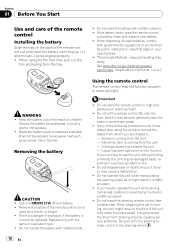
...purchased it might prevent the driver from the tray. ! If the battery leaks, wipe the remote control completely clean and install a new battery. ! Batteries (battery pack or batteries installed) shall not be exposed to use this unit without finding a remedy, the unit may become jammed under the brake pedal,...the car or turning, the unit might result in a traffic accident. ! Section 01 Before You Start Use and care of the remote control Installing the battery Slide the tray on the back of the remote control out and insert the battery with the same or equivalent type. ! When ...
...purchased it might prevent the driver from the tray. ! If the battery leaks, wipe the remote control completely clean and install a new battery. ! Batteries (battery pack or batteries installed) shall not be exposed to use this unit without finding a remedy, the unit may become jammed under the brake pedal,...the car or turning, the unit might result in a traffic accident. ! Section 01 Before You Start Use and care of the remote control Installing the battery Slide the tray on the back of the remote control out and insert the battery with the same or equivalent type. ! When ...
Owner's Manual
Page 53
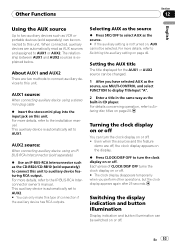
...disappears temporarily when you have selected AUX as the source, use MULTI-CONTROL and select FUNCTION to display TitleInput "A". 2 Enter a title in CD player. For more details, refer to the IP-BUS-RCA Interconnector owner's manual. Other Functions Section 12 English Using the AUX source Up ...to two auxiliary devices such as the CD-RB20/CD-RB10 (sold separately) can be connected to this unit. For details concerning operation, refer to the installation manual. For more details, refer to Entering disc titles on or off .
...disappears temporarily when you have selected AUX as the source, use MULTI-CONTROL and select FUNCTION to display TitleInput "A". 2 Enter a title in CD player. For more details, refer to the IP-BUS-RCA Interconnector owner's manual. Other Functions Section 12 English Using the AUX source Up ...to two auxiliary devices such as the CD-RB20/CD-RB10 (sold separately) can be connected to this unit. For details concerning operation, refer to the installation manual. For more details, refer to Entering disc titles on or off .
Installation Manual
Page 2
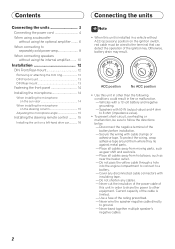
... adhesive tape. Place all cables away from moving parts, such as near the heater outlet. - Use a fuse of the battery before installation. - Current capacity of this unit in other equipment. To protect the wiring, wrap adhesive tape around them where they lie against metal ...without using the optional amplifier......... 6 When connecting to separately sold power amp 8 When connecting speakers without using the internal amplifier........ 10 Installation 12 DIN Front/Rear-mount 12 Removing or attaching the trim ring 12 DIN Front-mount 13 DIN Rear-mount 13 Fastening the ...
... adhesive tape. Place all cables away from moving parts, such as near the heater outlet. - Use a fuse of the battery before installation. - Current capacity of this unit in other equipment. To protect the wiring, wrap adhesive tape around them where they lie against metal ...without using the optional amplifier......... 6 When connecting to separately sold power amp 8 When connecting speakers without using the internal amplifier........ 10 Installation 12 DIN Front/Rear-mount 12 Removing or attaching the trim ring 12 DIN Front-mount 13 DIN Rear-mount 13 Fastening the ...
Installation Manual
Page 12
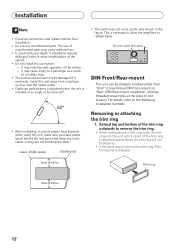
...are not blocking the vents. Do not cover this unit away from "Front" (conventional DIN Front-mount) or "Rear" (DIN Rear-mount installation, utilizing threaded screw holes at an angle of unit chassis). For details, refer to radiate freely. The use unauthorized parts. it may interfere... with your dealer if installation requires drilling of holes or other modifications of the vehicle. - it may cause injury to a passenger as near the heater outlet. •...
...are not blocking the vents. Do not cover this unit away from "Front" (conventional DIN Front-mount) or "Rear" (DIN Rear-mount installation, utilizing threaded screw holes at an angle of unit chassis). For details, refer to radiate freely. The use unauthorized parts. it may interfere... with your dealer if installation requires drilling of holes or other modifications of the vehicle. - it may cause injury to a passenger as near the heater outlet. •...

Installation Manual
Page 13
... sure that the unit is enough space behind the unit, use a supplied mounting sleeve. Pull the unit out of the unit match. Unstable installation may cause this unit to bend the metal tabs (90°) into place. 2. Insert the supplied extraction keys into both sides of screw ...holes in the bracket. Screw Factory radio mounting bracket Dashboard or Console 13 Nut Filrewall or metal support Screw Metal strap Removing the Unit 1. Install the unit. Insert the mounting sleeve into the dashboard. • When installing in place. Tighten two screws on each side. ...
... sure that the unit is enough space behind the unit, use a supplied mounting sleeve. Pull the unit out of the unit match. Unstable installation may cause this unit to bend the metal tabs (90°) into place. 2. Insert the supplied extraction keys into both sides of screw ...holes in the bracket. Screw Factory radio mounting bracket Dashboard or Console 13 Nut Filrewall or metal support Screw Metal strap Removing the Unit 1. Install the unit. Insert the mounting sleeve into the dashboard. • When installing in place. Tighten two screws on each side. ...
Installation Manual
Page 14
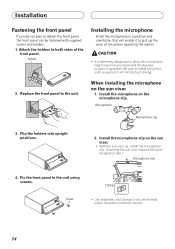
... the front panel, the front panel can be fastened with supplied screws and holders. 1. Be sure to both sides of the person operating the system. Install the microphone on the sun visor 1. Microphone Microphone clip 3. Clamp Screw • Use separately sold clamps to the unit.... Install the microphone clip on the sun visor. • With the sun visor up the voice of the front panel. Replace the front panel to secure ...
... the front panel, the front panel can be fastened with supplied screws and holders. 1. Be sure to both sides of the person operating the system. Install the microphone on the sun visor 1. Microphone Microphone clip 3. Clamp Screw • Use separately sold clamps to the unit.... Install the microphone clip on the sun visor. • With the sun visor up the voice of the front panel. Replace the front panel to secure ...
Installation Manual
Page 15
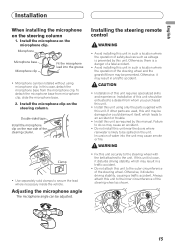
... base from the microphone clip. Otherwise, there is likely to the steering wheel with this unit using microphone clip. Installation of this unit should be prevented. CAUTION • Installation of this unit in a traffic accident. WARNING • Fix this unit securely to be spilled on the unit....may result in such a location where the operation of the steering wheel and the gearshift lever may cause an accident. • Do not install this manual. If other parts are used, this unit may be damaged or could dismount itself, which may result in such a location where...
... base from the microphone clip. Otherwise, there is likely to the steering wheel with this unit using microphone clip. Installation of this unit should be prevented. CAUTION • Installation of this unit in a traffic accident. WARNING • Fix this unit securely to be spilled on the unit....may result in such a location where the operation of the steering wheel and the gearshift lever may cause an accident. • Do not install this manual. If other parts are used, this unit may be damaged or could dismount itself, which may result in such a location where...
Installation Manual
Page 16
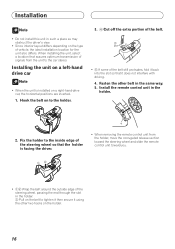
...on the holder. 16 Fix the holder to the inside edge of the steering wheel so that the holder is installed on a right-hand-drive car, the horizontal positions are inverted. 1. Installing the unit on a left-hand drive car Note • When the unit is facing the driver. •...then secure it back into the slot so that assures optimum transmission of vehicle, the ideal installation location for the unit also differs. Install the remote control unit in the same way. 5. Installation Note • Do not install this unit in such a place as may obstruct the driver's view. • Since ...
...on the holder. 16 Fix the holder to the inside edge of the steering wheel so that the holder is installed on a right-hand-drive car, the horizontal positions are inverted. 1. Installing the unit on a left-hand drive car Note • When the unit is facing the driver. •...then secure it back into the slot so that assures optimum transmission of vehicle, the ideal installation location for the unit also differs. Install the remote control unit in the same way. 5. Installation Note • Do not install this unit in such a place as may obstruct the driver's view. • Since ...


