Owner's Manual
Page 3
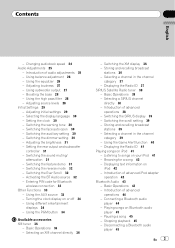
Using balance adjustment 26 - Using the equalizer 26 - Adjusting source levels 28 Initial Settings 29 - Setting the clock 30 - Switching the Ever Scroll 32 - Turning the clock display on iPod 42 - Using different entertainment displays 34 - Selecting an XM channel directly 36 - ... recalling broadcast stations 39 - Using the high pass filter 28 - Adjusting the brightness 31 - Displaying the Radio ID 37 SIRIUS Satellite Radio tuner 38 - Displaying the Radio ID 41 Playing songs on iPod 41 - Basic Operations 36 - Selecting the display language 30 - Disconnecting...
Using balance adjustment 26 - Using the equalizer 26 - Adjusting source levels 28 Initial Settings 29 - Setting the clock 30 - Switching the Ever Scroll 32 - Turning the clock display on iPod 42 - Using different entertainment displays 34 - Selecting an XM channel directly 36 - ... recalling broadcast stations 39 - Using the high pass filter 28 - Adjusting the brightness 31 - Displaying the Radio ID 37 SIRIUS Satellite Radio tuner 38 - Displaying the Radio ID 41 Playing songs on iPod 41 - Basic Operations 36 - Selecting the display language 30 - Disconnecting...
Owner's Manual
Page 10
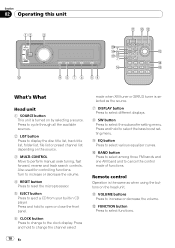
Press and hold to select the bass boost setting menu. 9 EQ button Press to select various equalizer curves. Remote control Operation is the same as the source. 7 DISPLAY button Press to select different displays. 8 SW button Press to the clock display. Also used for controlling functions. Section 02 Operating ... to select the subwoofer setting menu. Turn to increase or decrease the volume. 4 RESET button Press to reset the microprocessor. 5 EJECT button Press to increase or decrease the volume. b VOLUME buttons Press to eject a CD from your built-in CD player. Press to cycle...
Press and hold to select the bass boost setting menu. 9 EQ button Press to select various equalizer curves. Remote control Operation is the same as the source. 7 DISPLAY button Press to select different displays. 8 SW button Press to the clock display. Also used for controlling functions. Section 02 Operating ... to select the subwoofer setting menu. Turn to increase or decrease the volume. 4 RESET button Press to reset the microprocessor. 5 EJECT button Press to increase or decrease the volume. b VOLUME buttons Press to eject a CD from your built-in CD player. Press to cycle...
Owner's Manual
Page 29
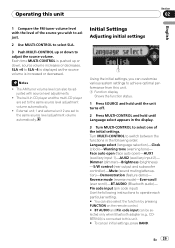
... in the display. 3 Turn MULTI-CONTROL to this unit. # To cancel initial settings, press BAND. Turn MULTI-CONTROL to switch between the functions in CD player and the multi-CD player are set to the same source level adjustment volume automatically. Pin code input (pin code input)... Use the following order: Language select (language selection)-Clock (clock)-Warning tone (warning tone)- SLA +4 to adjust ...
... in the display. 3 Turn MULTI-CONTROL to this unit. # To cancel initial settings, press BAND. Turn MULTI-CONTROL to switch between the functions in CD player and the multi-CD player are set to the same source level adjustment volume automatically. Pin code input (pin code input)... Use the following order: Language select (language selection)-Clock (clock)-Warning tone (warning tone)- SLA +4 to adjust ...
Owner's Manual
Page 30
...can be activated individually. Each press of MULTI-CONTROL selects languages in the following order: English-Français-Español Setting the clock Use these instructions to set . If the minute is automatically dimmed when the car's headlights are turned on or off the warning tone. 1 Use MULTI-... select the language. To detach the front panel easily, the front panel opens automatically. Pushing MULTI-CONTROL left or right to put a clock right. Set each AUX source to ON when using auxiliary equipments, refer to Using the AUX source on page 33. 1 Use MULTI-CONTROL to select ...
...can be activated individually. Each press of MULTI-CONTROL selects languages in the following order: English-Français-Español Setting the clock Use these instructions to set . If the minute is automatically dimmed when the car's headlights are turned on or off the warning tone. 1 Use MULTI-... select the language. To detach the front panel easily, the front panel opens automatically. Pushing MULTI-CONTROL left or right to put a clock right. Set each AUX source to ON when using auxiliary equipments, refer to Using the AUX source on page 33. 1 Use MULTI-CONTROL to select ...

Owner's Manual
Page 34
...menu option; USB - BT Audio - Press PGM and hold to turn the clock display on the remote control. # To return to select. For more details, see Switching the auxiliary setting on . 34 En Multi CD - Setting the AUX title The title displayed for each AUX1 or AUX2 source can enjoy... pause on or off , press PGM again. % Press PGM and hold until AUX appears in CD player ! Each press of CLOCK turns the clock display on when selecting the following sources: ! ENT. Multi-CD player ! Press SOURCE until the BSM turns on page 30. Turn to change the menu option;...
...menu option; USB - BT Audio - Press PGM and hold to turn the clock display on the remote control. # To return to select. For more details, see Switching the auxiliary setting on . 34 En Multi CD - Setting the AUX title The title displayed for each AUX1 or AUX2 source can enjoy... pause on or off , press PGM again. % Press PGM and hold until AUX appears in CD player ! Each press of CLOCK turns the clock display on when selecting the following sources: ! ENT. Multi-CD player ! Press SOURCE until the BSM turns on page 30. Turn to change the menu option;...

Owner's Manual
Page 37
...the display. Selecting a channel in a particular category. # To return to Channel number (channel number select setting), press and hold CLOCK again. 2 Push MULTI-CONTROL up or down to select RADIO ID from memory. # You can also recall stations assigned to select CH 000. Selecting Category enables you do...will flash in memory, press one of the ID code repeats displaying RADIO ID and the ID code one after the other. 1 Press and hold to Category (channel category select setting). Note You can also change the station by category. press and hold CLOCK to switch to store.
...the display. Selecting a channel in a particular category. # To return to Channel number (channel number select setting), press and hold CLOCK again. 2 Push MULTI-CONTROL up or down to select RADIO ID from memory. # You can also recall stations assigned to select CH 000. Selecting Category enables you do...will flash in memory, press one of the ID code repeats displaying RADIO ID and the ID code one after the other. 1 Press and hold to Category (channel category select setting). Note You can also change the station by category. press and hold CLOCK to switch to store.
Owner's Manual
Page 39
... ! Available accessories Section 03 English 2 Use MULTI-CONTROL to select. The number you want to only channels in the following order: Continuous scroll setting-One-time scroll setting Storing and recalling broadcast stations You can also select the function by using MULTI-CONTROL. press to select FUNCTION. The function name appears on... the channel category You have pressed will flash in memory. Turn MULTI-CONTROL to switch between the functions in a particular category. 1 Press and hold CLOCK to switch to 6 and hold CLOCK again. 2 Push MULTI-CONTROL up or down.
... ! Available accessories Section 03 English 2 Use MULTI-CONTROL to select. The number you want to only channels in the following order: Continuous scroll setting-One-time scroll setting Storing and recalling broadcast stations You can also select the function by using MULTI-CONTROL. press to select FUNCTION. The function name appears on... the channel category You have pressed will flash in memory. Turn MULTI-CONTROL to switch between the functions in a particular category. 1 Press and hold CLOCK to switch to 6 and hold CLOCK again. 2 Push MULTI-CONTROL up or down.


