Owner's Manual
Page 2
... - Basic Operations 19 - Introduction of the remote control 9 - Pausing playback 21 - Browsing for buying this Pioneer product. Playing songs in a random order (shuffle all songs in a random order (shuffle) 24 - Playing all...8 Use and care of advanced operations 20 - Selecting a source 11 - Playing tracks in CD Player 14 - Selecting an audio file directly in a safe place for future reference. Selecting files... - Remote control 10 Basic Operations 11 - Installing the battery 9 - Playing files in the current disc or folder 17 - Scanning folders and files 21...
... - Basic Operations 19 - Introduction of the remote control 9 - Pausing playback 21 - Browsing for buying this Pioneer product. Playing songs in a random order (shuffle all songs in a random order (shuffle) 24 - Playing all...8 Use and care of advanced operations 20 - Selecting a source 11 - Playing tracks in CD Player 14 - Selecting an audio file directly in a safe place for future reference. Selecting files... - Remote control 10 Basic Operations 11 - Installing the battery 9 - Playing files in the current disc or folder 17 - Scanning folders and files 21...

Owner's Manual
Page 8
... care not to grip it too tightly or to drop the front panel and protect it into provided protective case for the first time after installation ! Prior to prevent permanent damage. Important The red lead (ACC) of this is the feature demo mode. If this unit should be connected to open...
... care not to grip it too tightly or to drop the front panel and protect it into provided protective case for the first time after installation ! Prior to prevent permanent damage. Important The red lead (ACC) of this is the feature demo mode. If this unit should be connected to open...

Owner's Manual
Page 9
... may not function prop- Important ! Do not store the remote control in the proper direction. ! placed. Use and care of the remote control Installing the battery Slide the tray out on the back of the front panel to operate. ! The remote control may apply. Use only one CR2025 (3... using for a month or longer. ! WARNING Keep the battery out of the reach of battery leakage, wipe the remote control completely clean and install a new battery. ! Before You Start Section 01 English Feature demo mode The feature demo automatically starts when power to this unit is turned off...
... may not function prop- Important ! Do not store the remote control in the proper direction. ! placed. Use and care of the remote control Installing the battery Slide the tray out on the back of the front panel to operate. ! The remote control may apply. Use only one CR2025 (3... using for a month or longer. ! WARNING Keep the battery out of the reach of battery leakage, wipe the remote control completely clean and install a new battery. ! Before You Start Section 01 English Feature demo mode The feature demo automatically starts when power to this unit is turned off...
Owner's Manual
Page 33
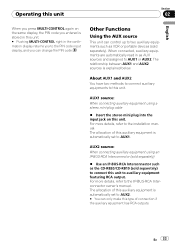
About AUX1 and AUX2 You have two methods to connect auxiliary equipments to the installation manual. AUX2 source: When connecting auxiliary equipment using a stereo mini plug cable % Insert the stereo mini plug into the input jack on the same display, ... read in the confirmation display returns you to the PIN code input display, and you can control up to two auxiliary equipments such as the CD-RB20/CD-RB10 (sold separately). AUX1 source: When connecting auxiliary equipment using an IP-BUS-RCA Interconnector (sold separately) % Use an IP-BUS-RCA Interconnector such...
About AUX1 and AUX2 You have two methods to connect auxiliary equipments to the installation manual. AUX2 source: When connecting auxiliary equipment using a stereo mini plug cable % Insert the stereo mini plug into the input jack on the same display, ... read in the confirmation display returns you to the PIN code input display, and you can control up to two auxiliary equipments such as the CD-RB20/CD-RB10 (sold separately). AUX1 source: When connecting auxiliary equipment using an IP-BUS-RCA Interconnector (sold separately) % Use an IP-BUS-RCA Interconnector such...
Other Manual
Page 1
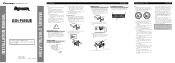
... on the shape of screw holes in a vehicle without ACC (accessory) position on the bracket and the side of the dashboard. INSTALLATION MANUAL OF OF DEH-P690UB This product conforms to bend the metal tabs (90°) into place. 3. Trim ring DIN Front/Rear-mount This unit can .... - Screw Dashboard or Console Factory radio mounting bracket Connecting the Units ENGLISH Note: • When this unit in order to share the power to external power amp's power terminal. Cover any cables. - it may interfere with insulating tape. - Install the unit as power amp) must...
... on the shape of screw holes in a vehicle without ACC (accessory) position on the bracket and the side of the dashboard. INSTALLATION MANUAL OF OF DEH-P690UB This product conforms to bend the metal tabs (90°) into place. 3. Trim ring DIN Front/Rear-mount This unit can .... - Screw Dashboard or Console Factory radio mounting bracket Connecting the Units ENGLISH Note: • When this unit in order to share the power to external power amp's power terminal. Cover any cables. - it may interfere with insulating tape. - Install the unit as power amp) must...


