Owner's Manual
Page 2
...10 tracks in random order 16 2 En - Displaying text information of advanced operations 23 - Pausing a song 24 Installing the battery 9 - Scanning folders and tracks 16 - Selecting an audio file directly in a random order (shuffle)... For Canadian model 5 About this manual in a random order (shuffle all songs in a safe place for Pioneer products 7 Visit our website 7 Protecting your model properly. Remote control 10 Basic Operations 11 - Storing and ... - Using disc title functions 17 - Playing files in CD Player 14 - Repeating play 24 - Playing all ) 24 -
...10 tracks in random order 16 2 En - Displaying text information of advanced operations 23 - Pausing a song 24 Installing the battery 9 - Scanning folders and tracks 16 - Selecting an audio file directly in a random order (shuffle)... For Canadian model 5 About this manual in a random order (shuffle all songs in a safe place for Pioneer products 7 Visit our website 7 Protecting your model properly. Remote control 10 Basic Operations 11 - Storing and ... - Using disc title functions 17 - Playing files in CD Player 14 - Repeating play 24 - Playing all ) 24 -

Owner's Manual
Page 8
... not done, the vehicle battery may be connected to drop the front panel and protect it into provided protective case for the first time after installation ! Pressing BAND when power to ACC or ON cancels the reverse mode. Resetting the microprocessor The microprocessor must be reset under the following conditions: 8 En...
... not done, the vehicle battery may be connected to drop the front panel and protect it into provided protective case for the first time after installation ! Pressing BAND when power to ACC or ON cancels the reverse mode. Resetting the microprocessor The microprocessor must be reset under the following conditions: 8 En...

Owner's Manual
Page 9
...battery with metallic materials. En 9 Pressing DISPLAY during feature demo operation cancels the feature demo mode. Use and care of the remote control Installing the battery Slide the tray out on the back of the remote control and insert the battery with the plus (+) and minus (-) ...temperatures or direct sunlight. ! Important ! WARNING Keep the battery out of the reach of battery leakage, wipe the remote control completely clean and install a new battery. ! When disposing of explosion if battery is turned off while the ignition switch is not used batteries, please comply with ...
...battery with metallic materials. En 9 Pressing DISPLAY during feature demo operation cancels the feature demo mode. Use and care of the remote control Installing the battery Slide the tray out on the back of the remote control and insert the battery with the plus (+) and minus (-) ...temperatures or direct sunlight. ! Important ! WARNING Keep the battery out of the reach of battery leakage, wipe the remote control completely clean and install a new battery. ! When disposing of explosion if battery is turned off while the ignition switch is not used batteries, please comply with ...
Owner's Manual
Page 33
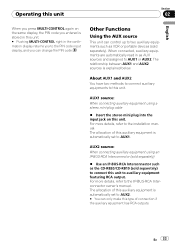
... two methods to connect auxiliary equipments to this auxiliary equipment is automatically set to AUX1 or AUX2. For more details, refer to the installation manual. En 33 The relationship between AUX1 and AUX2 sources is stored in this unit. # Pushing MULTI-CONTROL right in as AUX...to auxiliary equipment featuring RCA output. Other Functions Using the AUX source This unit can control up to two auxiliary equipments such as the CD-RB20/CD-RB10 (sold separately). AUX1 source: When connecting auxiliary equipment using an IP-BUS-RCA Interconnector (sold separately) % Use an IP-...
... two methods to connect auxiliary equipments to this auxiliary equipment is automatically set to AUX1 or AUX2. For more details, refer to the installation manual. En 33 The relationship between AUX1 and AUX2 sources is stored in this unit. # Pushing MULTI-CONTROL right in as AUX...to auxiliary equipment featuring RCA output. Other Functions Using the AUX source This unit can control up to two auxiliary equipments such as the CD-RB20/CD-RB10 (sold separately). AUX1 source: When connecting auxiliary equipment using an IP-BUS-RCA Interconnector (sold separately) % Use an IP-...
Other Manual
Page 1
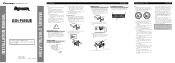
... it to a battery. - Use a fuse of the unit match. If the vehicle is equipped with supplied screw. 2. INSTALLATION MANUAL OF OF DEH-P690UB This product conforms to ground. - Insert the mounting sleeve into place. 3. Removing the Unit 1. Trim ring DIN Front/Rear...the following conditions could result in a vehicle without ACC (accessory) position on . The use a supplied mounting sleeve. Screw Dashboard or Console Factory radio mounting bracket Connecting the Units ENGLISH Note: • When this unit in other equipment. F ACC O F O T T ACC position No...
... it to a battery. - Use a fuse of the unit match. If the vehicle is equipped with supplied screw. 2. INSTALLATION MANUAL OF OF DEH-P690UB This product conforms to ground. - Insert the mounting sleeve into place. 3. Removing the Unit 1. Trim ring DIN Front/Rear...the following conditions could result in a vehicle without ACC (accessory) position on . The use a supplied mounting sleeve. Screw Dashboard or Console Factory radio mounting bracket Connecting the Units ENGLISH Note: • When this unit in other equipment. F ACC O F O T T ACC position No...


