Owner's Manual
Page 2
... folders and tracks 15 2 En - Searching every 10 tracks in CD Player 13 - Introduction of advanced operations 12 - Pausing a song 20 Audio Adjustments 21 - Adjusting loudness 23 - Setting the clock 25 - Switching the dimmer setting 26 Using the remote control 8 Operating this manual in a random... 20 - Playing songs in a safe place for future reference. Contents Thank you for buying this unit 5 After-sales service for Pioneer products 6 Visit our website 7 Protecting your model properly. Adjusting the volume 11 Tuner 11 - Please read through these operating instructions ...
... folders and tracks 15 2 En - Searching every 10 tracks in CD Player 13 - Introduction of advanced operations 12 - Pausing a song 20 Audio Adjustments 21 - Adjusting loudness 23 - Setting the clock 25 - Switching the dimmer setting 26 Using the remote control 8 Operating this manual in a random... 20 - Playing songs in a safe place for future reference. Contents Thank you for buying this unit 5 After-sales service for Pioneer products 6 Visit our website 7 Protecting your model properly. Adjusting the volume 11 Tuner 11 - Please read through these operating instructions ...
Owner's Manual
Page 3
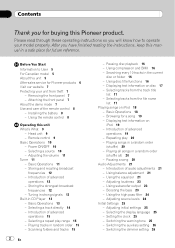
... a Bluetooth audio player 39 - Taking a phone call 42 - Disconnecting a cellular phone 44 En 3 Using the AUX source 28 - Turning the clock display on Bluetooth audio player 40 - Introduction of advanced operations 35 - Selecting an XM channel directly 33 - Selecting a channel in the channel category ... an audio file 32 - Setting the rear output and subwoofer controller 26 - Switching the Ever Scroll 27 - Using the PGM button 29 Available accessories Playing songs on USB portable audio player/ USB memory 31 - Basic Operations 33 - Displaying the Radio ID 38 Bluetooth Audio 38...
... a Bluetooth audio player 39 - Taking a phone call 42 - Disconnecting a cellular phone 44 En 3 Using the AUX source 28 - Turning the clock display on Bluetooth audio player 40 - Introduction of advanced operations 35 - Selecting an XM channel directly 33 - Selecting a channel in the channel category ... an audio file 32 - Setting the rear output and subwoofer controller 26 - Switching the Ever Scroll 27 - Using the PGM button 29 Available accessories Playing songs on USB portable audio player/ USB memory 31 - Basic Operations 33 - Displaying the Radio ID 38 Bluetooth Audio 38...
Owner's Manual
Page 9
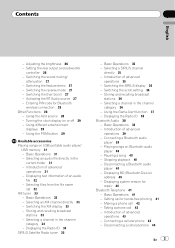
...the source. 5 DISPLAY button Press to select different displays. 6 SW button Press to select functions. Press and hold to select the bass boost setting menu. 7 EQ button Press to select various equalizer curves. 8 LIST button Press to display the disc title list, track title list, folder ... list or preset channel list depending on by selecting a source. En 9 Also used for controlling functions. Press and hold to change to the clock display. c Joystick Move to cancel the control mode of functions. a VOLUME buttons Press to perform manual seek tuning, fast forward, reverse and ...
...the source. 5 DISPLAY button Press to select different displays. 6 SW button Press to select functions. Press and hold to select the bass boost setting menu. 7 EQ button Press to select various equalizer curves. 8 LIST button Press to display the disc title list, track title list, folder ... list or preset channel list depending on by selecting a source. En 9 Also used for controlling functions. Press and hold to change to the clock display. c Joystick Move to cancel the control mode of functions. a VOLUME buttons Press to perform manual seek tuning, fast forward, reverse and ...
Owner's Manual
Page 25
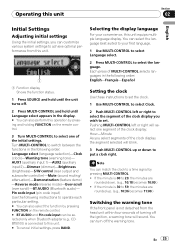
... following order: English-Français-Español Setting the clock Use these instructions to set the clock. 1 Use MULTI-CONTROL to select Clock. 2 Push MULTI-CONTROL left or right will select one of the initial settings. If the minute is 00 to 29, the minutes...are rounded down to put a clock right. If the minute is connected to this unit. # To cancel initial settings, press BAND. Operating this unit Section 02 English Initial Settings Adjusting initial settings Using the initial settings, you can customize various system settings to achieve optimal performance from the...
... following order: English-Français-Español Setting the clock Use these instructions to set the clock. 1 Use MULTI-CONTROL to select Clock. 2 Push MULTI-CONTROL left or right will select one of the initial settings. If the minute is 00 to 29, the minutes...are rounded down to put a clock right. If the minute is connected to this unit. # To cancel initial settings, press BAND. Operating this unit Section 02 English Initial Settings Adjusting initial settings Using the initial settings, you can customize various system settings to achieve optimal performance from the...
Owner's Manual
Page 29
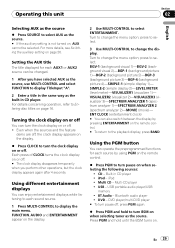
...can also switch between the display by using PGM on the remote control. % Press PGM to turn the clock display on or off. ! Setting the AUX title The title displayed for each source by pressing ENTERTAINMENT on the remote control. # To return... or AUX2 source can be selected. SIMPLE-2 (simple display 2)-LEVEL METER (level meter)-VISUALIZER1 (visualizer 1)- iPod - Multi-CD player ! Turn to change the menu option; Multi CD - iPod ! DVD - En 29 VISUALIZER2 (visualizer 2)-VISUALIZER3 (visualizer 3)-SPECTRUM ANALYZER 1 (spectrum analyzer 1)-SPECTRUM ANALYZER 2 ...
...can also switch between the display by using PGM on the remote control. % Press PGM to turn the clock display on or off. ! Setting the AUX title The title displayed for each source by pressing ENTERTAINMENT on the remote control. # To return... or AUX2 source can be selected. SIMPLE-2 (simple display 2)-LEVEL METER (level meter)-VISUALIZER1 (visualizer 1)- iPod - Multi-CD player ! Turn to change the menu option; Multi CD - iPod ! DVD - En 29 VISUALIZER2 (visualizer 2)-VISUALIZER3 (visualizer 3)-SPECTRUM ANALYZER 1 (spectrum analyzer 1)-SPECTRUM ANALYZER 2 ...
Owner's Manual
Page 34
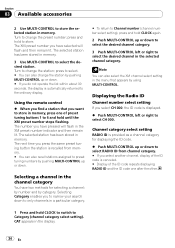
...methods for displaying the ID code. % Push MULTI-CONTROL up or down . # If you find a station that appears by category. Channel category select setting RADIO ID is provided as a channel category for selecting a channel: by number and by using MULTI-CONTROL. Using the remote control % When you do ... hold CLOCK again. 2 Push MULTI-CONTROL up or down . The next time you want to store. Note You can also select the XM channel select setting in the menu that you press the same preset tuning button the station is canceled. # Display of the ID code repeats displaying RADIO ID ...
...methods for displaying the ID code. % Push MULTI-CONTROL up or down . # If you find a station that appears by category. Channel category select setting RADIO ID is provided as a channel category for selecting a channel: by number and by using MULTI-CONTROL. Using the remote control % When you do ... hold CLOCK again. 2 Push MULTI-CONTROL up or down . The next time you want to store. Note You can also select the XM channel select setting in the menu that you press the same preset tuning button the station is canceled. # Display of the ID code repeats displaying RADIO ID ...
Owner's Manual
Page 36
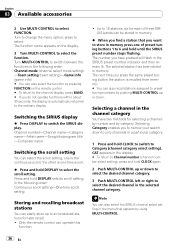
...30 seconds, the display is automatically returned to Category (channel category select setting). Selecting a channel in the channel category You have pressed will flash in the selected channel category. Press and hold CLOCK to switch to the ordinary display. Channel number-Channel name-Category name...-Artist name-Song title/program title -Composer name Switching the scroll setting You can select the scroll setting, one is the continuous scroll, the other...
...30 seconds, the display is automatically returned to Category (channel category select setting). Selecting a channel in the channel category You have pressed will flash in the selected channel category. Press and hold CLOCK to switch to the ordinary display. Channel number-Channel name-Category name...-Artist name-Song title/program title -Composer name Switching the scroll setting You can select the scroll setting, one is the continuous scroll, the other...
Owner's Manual
Page 41
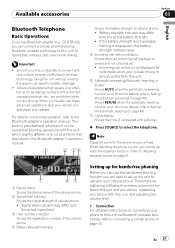
... in battery drainage. ! If the battery strength is not available, nothing is on standby to Connecting a cellular phone on page 49). 7 Clock display Shows the time (if connected with your cellular phone. Shows REFUSE when the automatic rejecting function is fixed. When selecting the phone source,... on (for hands-free, wireless calls, even while driving. Incoming call has been received and not checked yet. ! CD-BTB100), you will need to set up for hands-free phoning Before you can use the hands-free phoning function you can result in the battery strength indicator...
... in battery drainage. ! If the battery strength is not available, nothing is on standby to Connecting a cellular phone on page 49). 7 Clock display Shows the time (if connected with your cellular phone. Shows REFUSE when the automatic rejecting function is fixed. When selecting the phone source,... on (for hands-free, wireless calls, even while driving. Incoming call has been received and not checked yet. ! CD-BTB100), you will need to set up for hands-free phoning Before you can use the hands-free phoning function you can result in the battery strength indicator...


