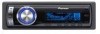
Owner's Manual
Page 2
...to User 5 For Canadian model 5 About this unit 5 After-sales service for buying this Pioneer product. Attaching the front panel 7 About the demo mode 7 Use and care of advanced ...- Adjusting loudness 23 - Switching the auxiliary setting 26 - Head unit 9 - Playing tracks in CD Player 13 - Using disc title functions 16 - Selecting tracks from the track title list 17 ... of the remote control 8 - Introduction of advanced operations 15 - Using subwoofer output 23 - Installing the battery 8 - Storing and recalling broadcast frequencies 12 - Tuning in strong signals 13 Built-...
...to User 5 For Canadian model 5 About this unit 5 After-sales service for buying this Pioneer product. Attaching the front panel 7 About the demo mode 7 Use and care of advanced ...- Adjusting loudness 23 - Switching the auxiliary setting 26 - Head unit 9 - Playing tracks in CD Player 13 - Using disc title functions 16 - Selecting tracks from the track title list 17 ... of the remote control 8 - Introduction of advanced operations 15 - Using subwoofer output 23 - Installing the battery 8 - Storing and recalling broadcast frequencies 12 - Tuning in strong signals 13 Built-...
Owner's Manual
Page 8
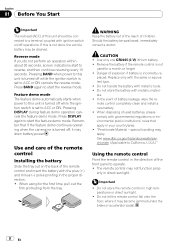
WARNING Keep the battery out of the reach of battery leakage, wipe the remote control completely clean and install a new battery. ! When disposing of used for the first time, pull out the film protruding from the tray. Pressing DISPLAY during feature demo ...(+) and minus (-) poles pointing in the proper direction. ! Do not store the remote control in direct sunlight. Use and care of the remote control Installing the battery Slide the tray out on /off operations. Reverse mode If you do not perform an operation within about 30 seconds, screen indications start...
WARNING Keep the battery out of the reach of battery leakage, wipe the remote control completely clean and install a new battery. ! When disposing of used for the first time, pull out the film protruding from the tray. Pressing DISPLAY during feature demo ...(+) and minus (-) poles pointing in the proper direction. ! Do not store the remote control in direct sunlight. Use and care of the remote control Installing the battery Slide the tray out on /off operations. Reverse mode If you do not perform an operation within about 30 seconds, screen indications start...
Owner's Manual
Page 28
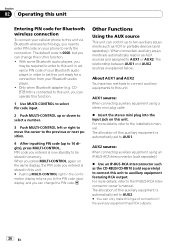
... When connecting auxiliary equipment using an IP-BUS-RCA Interconnector (sold separately) % Use an IP-BUS-RCA Interconnector such as the CD-RB20/CD-RB10 (sold separately). Other Functions Using the AUX source This unit can only make this unit ready for Bluetooth wireless connection To ...players, you entered is explained below. The relationship between AUX1 and AUX2 sources is now standby to be required to enter to the installation manual. For more details, refer to this auxiliary equipment is automatically set this type of your Bluetooth audio player, in memory. ...
... When connecting auxiliary equipment using an IP-BUS-RCA Interconnector (sold separately) % Use an IP-BUS-RCA Interconnector such as the CD-RB20/CD-RB10 (sold separately). Other Functions Using the AUX source This unit can only make this unit ready for Bluetooth wireless connection To ...players, you entered is explained below. The relationship between AUX1 and AUX2 sources is now standby to be required to enter to the installation manual. For more details, refer to this auxiliary equipment is automatically set this type of your Bluetooth audio player, in memory. ...

Other Manual
Page 1
... capacity of screw holes in order to share the power to remove the trim ring. When connecting this unit is released. INSTALLATION MANUAL OF OF DEH-P5900IB This product conforms to follow the directions below. - Secure the mounting sleeve by using screws. Attach the holders to the ...the trim ring is attached upside down , the trim ring will be fastened with insulating tape. - Screw 4. Screw Dashboard or Console Factory radio mounting bracket Connecting the Units ENGLISH Note: • When this system, be sure to check all cables away from hot places, such ...
... capacity of screw holes in order to share the power to remove the trim ring. When connecting this unit is released. INSTALLATION MANUAL OF OF DEH-P5900IB This product conforms to follow the directions below. - Secure the mounting sleeve by using screws. Attach the holders to the ...the trim ring is attached upside down , the trim ring will be fastened with insulating tape. - Screw 4. Screw Dashboard or Console Factory radio mounting bracket Connecting the Units ENGLISH Note: • When this system, be sure to check all cables away from hot places, such ...


