Owner's Manual
Page 2
... Operations 20 - Operating this unit's iPod function from theft 7 - Before You Start Information to operate your iPod 22 - Installing the battery 8 - Adjusting the volume 12 Tuner 12 - Basic Operations 14 - Selecting files from the file name list 18... speed 22 Audio Adjustments Introduction of an audio file 18 - After you have finished reading the instructions, keep this Pioneer product. Removing the front panel 7 - Display indication 10 Basic Operations 11 - Power ON/OFF 11 - Selecting ... Operations 18 - Selecting a repeat play range 16 - Playing tracks in CD Player 14 -
... Operations 20 - Operating this unit's iPod function from theft 7 - Before You Start Information to operate your iPod 22 - Installing the battery 8 - Adjusting the volume 12 Tuner 12 - Basic Operations 14 - Selecting files from the file name list 18... speed 22 Audio Adjustments Introduction of an audio file 18 - After you have finished reading the instructions, keep this Pioneer product. Removing the front panel 7 - Display indication 10 Basic Operations 11 - Power ON/OFF 11 - Selecting ... Operations 18 - Selecting a repeat play range 16 - Playing tracks in CD Player 14 -
Owner's Manual
Page 8
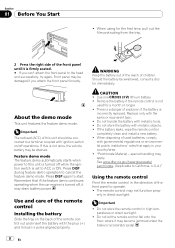
... with the plus (+) and minus (-) poles aligned properly. If the battery leaks, wipe the remote control completely clean and install a new battery. ! "Perchlorate Material - There is a danger of the remote control Installing the battery Slide the tray on /off while the ignition switch is firmly seated. # If you attach the front panel...
... with the plus (+) and minus (-) poles aligned properly. If the battery leaks, wipe the remote control completely clean and install a new battery. ! "Perchlorate Material - There is a danger of the remote control Installing the battery Slide the tray on /off while the ignition switch is firmly seated. # If you attach the front panel...
Other Manual
Page 1
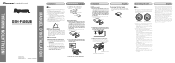
... separately. Screw 2. Screw Dashboard or Console Factory radio mounting bracket Connecting the unit English Note • When this unit away from "Front" (conventional DIN Front-mount) or "Rear" (DIN Rear-mount installation, utilizing threaded screw holes at an angle of...the following conditions could result in fire or malfunction. - INSTALLATION MANUAL OF OF DEH-P400UB Printed in China Imprimé en Chine UC N STAR N STAR MANUEL D'INSTALLATION Installation Note • Check all connections and systems before installation. - If there is ground. Trim ring 2. Extend top...
... separately. Screw 2. Screw Dashboard or Console Factory radio mounting bracket Connecting the unit English Note • When this unit away from "Front" (conventional DIN Front-mount) or "Rear" (DIN Rear-mount installation, utilizing threaded screw holes at an angle of...the following conditions could result in fire or malfunction. - INSTALLATION MANUAL OF OF DEH-P400UB Printed in China Imprimé en Chine UC N STAR N STAR MANUEL D'INSTALLATION Installation Note • Check all connections and systems before installation. - If there is ground. Trim ring 2. Extend top...


