Owner's Manual
Page 2
... model 3 About this Pioneer product. Adjusting the volume 7 - Turning the unit off 7 Tuner 8 - Playing tracks in strong signals 8 - Adjusting equalizer curves 11 - Adjusting initial settings 12 - Remote control ...play 9 - Setting the clock 12 - Playing a disc 8 - Using the equalizer 11 - Adjusting loudness 11 - DIN Front-mount 15 - DIN Rear-mount 16 Fastening the front panel (DEH-2000MP) 16 Additional ...unit 3 After-sales service for future reference. After you will know how to the radio 8 - Attaching the front panel 4 Use and care of discs and player 17 Dual...
... model 3 About this Pioneer product. Adjusting the volume 7 - Turning the unit off 7 Tuner 8 - Playing tracks in strong signals 8 - Adjusting equalizer curves 11 - Adjusting initial settings 12 - Remote control ...play 9 - Setting the clock 12 - Playing a disc 8 - Using the equalizer 11 - Adjusting loudness 11 - DIN Front-mount 15 - DIN Rear-mount 16 Fastening the front panel (DEH-2000MP) 16 Additional ...unit 3 After-sales service for future reference. After you will know how to the radio 8 - Attaching the front panel 4 Use and care of discs and player 17 Dual...
Owner's Manual
Page 6
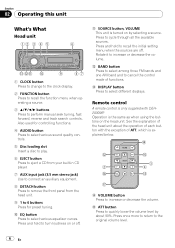
...AUDIO button Press to select various sound quality controls. 5 Disc loading slot Insert a disc to play. 6 EJECT button Press to eject a CD from your built-in CD player. 7 AUX input jack (3.5 mm stereo jack) Use to connect an auxiliary equipment. 8 DETACH button Press to remove the front panel...button Press to cancel the control mode of each button with DEH2000MP. Rotate it to select different displays. Press and hold to recall the initial setting menu when the sources are off . d DISPLAY button Press to increase or decrease the volume. Section 02 Operating this unit What's What...
...AUDIO button Press to select various sound quality controls. 5 Disc loading slot Insert a disc to play. 6 EJECT button Press to eject a CD from your built-in CD player. 7 AUX input jack (3.5 mm stereo jack) Use to connect an auxiliary equipment. 8 DETACH button Press to remove the front panel...button Press to cancel the control mode of each button with DEH2000MP. Rotate it to select different displays. Press and hold to recall the initial setting menu when the sources are off . d DISPLAY button Press to increase or decrease the volume. Section 02 Operating this unit What's What...
Owner's Manual
Page 7
Tuner Band and frequency are displayed. 2 Preset number/track number indicator Shows the track number or preset number. ! Audio and initial setup Function names and setup status are displayed. ! Press SOURCE repeatedly to switch between the following cases, the sound source will light. 3 MP3/... % Use VOLUME to select a source. Built-in CD Player (Audio CD) Elapsed play time is no disc in the unit. - h PAUSE button Press to off . To retract the antenna, turn the source off (refer to . When AUX (auxiliary input) is set to turn pause on the left of the currently playing...
Tuner Band and frequency are displayed. 2 Preset number/track number indicator Shows the track number or preset number. ! Audio and initial setup Function names and setup status are displayed. ! Press SOURCE repeatedly to switch between the following cases, the sound source will light. 3 MP3/... % Use VOLUME to select a source. Built-in CD Player (Audio CD) Elapsed play time is no disc in the unit. - h PAUSE button Press to off . To retract the antenna, turn the source off (refer to . When AUX (auxiliary input) is set to turn pause on the left of the currently playing...
Owner's Manual
Page 12
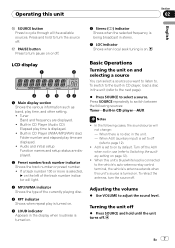
... clock display you can also cancel initial settings by holding down SOURCE until function name appears in the display. 3 Press FUNCTION to adjust the source volume. Other Functions Adjusting initial settings Using the initial settings, you wish to set . Section 02 Operating this unit.... Pressing c or d will select one of the clock display: Hour-Minute 3 Press a or b to set the clock. Activate the auxiliary setting when using auxiliary equipment connected...
... clock display you can also cancel initial settings by holding down SOURCE until function name appears in the display. 3 Press FUNCTION to adjust the source volume. Other Functions Adjusting initial settings Using the initial settings, you wish to set . Section 02 Operating this unit.... Pressing c or d will select one of the clock display: Hour-Minute 3 Press a or b to set the clock. Activate the auxiliary setting when using auxiliary equipment connected...


