Owner's Manual
Page 2
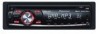
...- Displaying text information on and selecting a source 7 - Adjusting initial settings 12 - DIN Rear-mount 16 Fastening the front panel (DEH-2000MP) 16 Additional Information Error messages 17 Handling guideline of a hierarchy 18 - Example of discs and player 17 Dual Discs 17 Compressed audio...instructions so you have finished reading the instructions, keep this Pioneer product. After you will know how to operate your unit from theft 4 - Before You Start Information to the radio 8 - Removing the front panel 4 - Installing the battery 5 - Using the remote control 5 Operating ...
...- Displaying text information on and selecting a source 7 - Adjusting initial settings 12 - DIN Rear-mount 16 Fastening the front panel (DEH-2000MP) 16 Additional Information Error messages 17 Handling guideline of a hierarchy 18 - Example of discs and player 17 Dual Discs 17 Compressed audio...instructions so you have finished reading the instructions, keep this Pioneer product. After you will know how to operate your unit from theft 4 - Before You Start Information to the radio 8 - Removing the front panel 4 - Installing the battery 5 - Using the remote control 5 Operating ...
Owner's Manual
Page 5
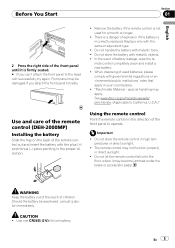
Remove the battery if the remote control is not used batteries, please comply with metallic objects. ! mote control completely clean and install a new battery. ! When disposing of used for a month or longer. ! Do not store the remote control in the direction of the front ...equivalent type. ! Should the battery be damaged if you can't attach the front panel to California, U.S.A.)" Use and care of the remote control (DEH-2000MP) Installing the battery Slide the tray on the back of the remote control out and insert the battery with the plus (+) and minus (-) poles pointing ...
Remove the battery if the remote control is not used batteries, please comply with metallic objects. ! mote control completely clean and install a new battery. ! When disposing of used for a month or longer. ! Do not store the remote control in the direction of the front ...equivalent type. ! Should the battery be damaged if you can't attach the front panel to California, U.S.A.)" Use and care of the remote control (DEH-2000MP) Installing the battery Slide the tray on the back of the remote control out and insert the battery with the plus (+) and minus (-) poles pointing ...
Owner's Manual
Page 13
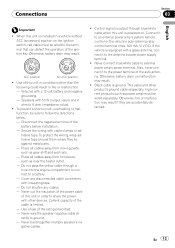
...they lie against metal parts. - Connections Section 03 English N STAR N STAR Important ! Disconnect the negative terminal of this unit is installed in conditions other devices. Connect it to follow the directions below. - If the vehicle is output through a hole into the engine compartment... short-circuit, overheating or malfunction, be wired to a battery. - Never cut the insulation of the power cable of the battery before installation. - This cable and other product's ground cable (especially, high-current products such as power amp) must be sure to the antenna ...
...they lie against metal parts. - Connections Section 03 English N STAR N STAR Important ! Disconnect the negative terminal of this unit is installed in conditions other devices. Connect it to follow the directions below. - If the vehicle is output through a hole into the engine compartment... short-circuit, overheating or malfunction, be wired to a battery. - Never cut the insulation of the power cable of the battery before installation. - This cable and other product's ground cable (especially, high-current products such as power amp) must be sure to the antenna ...
Owner's Manual
Page 15
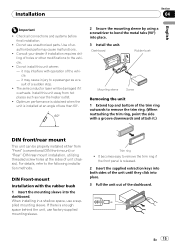
...DIN front/rear mount This unit can be damaged if it may cause malfunctions. ! it overheats. Installation Section 04 English Important ! The semiconductor laser will be properly installed either from hot places such as a result of unit chassis). Dashboard Rubber bush Mounting sleeve Screw Removing... the unit 1 Extend top and bottom of the vehicle. - DIN Front-mount Installation with the rubber bush 1 Insert the mounting sleeve into place. 3 Pull the unit out of the unit until they click into the...
...DIN front/rear mount This unit can be damaged if it may cause malfunctions. ! it overheats. Installation Section 04 English Important ! The semiconductor laser will be properly installed either from hot places such as a result of unit chassis). Dashboard Rubber bush Mounting sleeve Screw Removing... the unit 1 Extend top and bottom of the vehicle. - DIN Front-mount Installation with the rubber bush 1 Insert the mounting sleeve into place. 3 Pull the unit out of the unit until they click into the...
Owner's Manual
Page 16
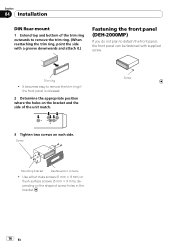
... panel (DEH-2000MP) If you do not plan to remove the trim ring if the front panel is released. 2 Determine the appropriate position where the holes on each side. Screw 3 Tighten two screws on the bracket and the side of the unit match. Screw Mounting bracket Dashboard or console ! Section 04 Installation DIN...
... panel (DEH-2000MP) If you do not plan to remove the trim ring if the front panel is released. 2 Determine the appropriate position where the holes on each side. Screw 3 Tighten two screws on the bracket and the side of the unit match. Screw Mounting bracket Dashboard or console ! Section 04 Installation DIN...


