

Owner's Manual
Page 2
... and selecting a source 7 - Adjusting loudness 11 - Switching the auxiliary setting 12 Connections Connection Diagram 14 Installation DIN front/rear mount 15 - Compressed audio compatibility 18 Specifications 20 2 En Remote control 6 - Storing...front panel (DEH-2000MP) 16 Additional Information Error messages 17 Handling guideline of the remote control (DEH2000MP) 5 - Before You Start Information to User 3 For Canadian model 3 About this unit What's What 6 - Installing the battery...you have finished reading the instructions, keep this Pioneer product. After you will know how to the...
... and selecting a source 7 - Adjusting loudness 11 - Switching the auxiliary setting 12 Connections Connection Diagram 14 Installation DIN front/rear mount 15 - Compressed audio compatibility 18 Specifications 20 2 En Remote control 6 - Storing...front panel (DEH-2000MP) 16 Additional Information Error messages 17 Handling guideline of the remote control (DEH2000MP) 5 - Before You Start Information to User 3 For Canadian model 3 About this unit What's What 6 - Installing the battery...you have finished reading the instructions, keep this Pioneer product. After you will know how to the...
Owner's Manual
Page 5
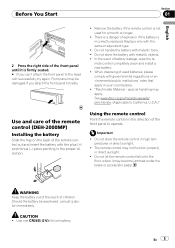
... battery. ! See www.dtsc.ca.gov/hazardouswaste/ perchlorate. (Applicable to California, U.S.A.)" Use and care of the remote control (DEH-2000MP) Installing the battery Slide the tray on the back of explosion if the battery is a danger of the remote control out and insert the battery with ...
... battery. ! See www.dtsc.ca.gov/hazardouswaste/ perchlorate. (Applicable to California, U.S.A.)" Use and care of the remote control (DEH-2000MP) Installing the battery Slide the tray on the back of explosion if the battery is a danger of the remote control out and insert the battery with ...
Owner's Manual
Page 13
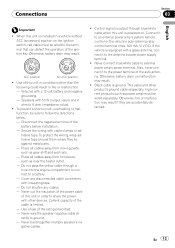
...cables away from hot places, such as gear shift and seat rails. - Never cut the insulation of the power cable of this unit is installed in fire or malfunction. - Control signal is output through a hole into the engine compartment to connect to 8 ohm (impedance value). ! ...in a vehicle without ACC (accessory) position on . Disconnect the negative terminal of the rating prescribed. - Use a fuse of the battery before installation. - Never wire the speaker negative cable directly to external power amp's power terminal. Black cable is powered on the ignition switch, red cable ...
...cables away from hot places, such as gear shift and seat rails. - Never cut the insulation of the power cable of this unit is installed in fire or malfunction. - Control signal is output through a hole into the engine compartment to connect to 8 ohm (impedance value). ! ...in a vehicle without ACC (accessory) position on . Disconnect the negative terminal of the rating prescribed. - Use a fuse of the battery before installation. - Never wire the speaker negative cable directly to external power amp's power terminal. Black cable is powered on the ignition switch, red cable ...
Owner's Manual
Page 15
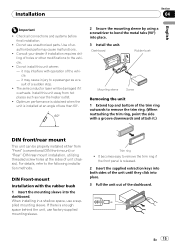
...and attach it.) DIN front/rear mount This unit can be damaged if it may cause malfunctions. ! The semiconductor laser will be properly installed either from hot places such as a result of less than 60°. 60° 2 Secure the mounting sleeve by using a screwdriver... out of the unit until they click into the dashboard. Trim ring ! It becomes easy to the following installation methods. Check all connections and systems before final installation. ! Install this unit where : - Optimum performance is obtained when the unit is released. 2 Insert the supplied extraction ...
...and attach it.) DIN front/rear mount This unit can be damaged if it may cause malfunctions. ! The semiconductor laser will be properly installed either from hot places such as a result of less than 60°. 60° 2 Secure the mounting sleeve by using a screwdriver... out of the unit until they click into the dashboard. Trim ring ! It becomes easy to the following installation methods. Check all connections and systems before final installation. ! Install this unit where : - Optimum performance is obtained when the unit is released. 2 Insert the supplied extraction ...
Owner's Manual
Page 16
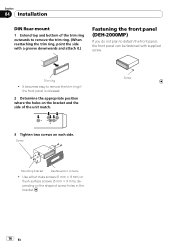
...ring ! It becomes easy to detach the front panel, the front panel can be fastened with a groove downwards and attach it.) Fastening the front panel (DEH-2000MP) If you do not plan to remove the trim ring if the front panel is released. 2 Determine the appropriate position where the holes on the... bracket and the side of the unit match. Section 04 Installation DIN Rear-mount 1 Extend top and bottom of the trim ring outwards to remove the trim ring. (When reattaching the trim ring, point the side...
...ring ! It becomes easy to detach the front panel, the front panel can be fastened with a groove downwards and attach it.) Fastening the front panel (DEH-2000MP) If you do not plan to remove the trim ring if the front panel is released. 2 Determine the appropriate position where the holes on the... bracket and the side of the unit match. Section 04 Installation DIN Rear-mount 1 Extend top and bottom of the trim ring outwards to remove the trim ring. (When reattaching the trim ring, point the side...


