
Owner's Manual
Page 1
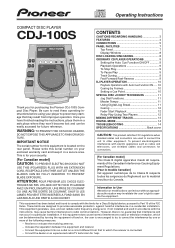
...located on your player to read these operating instructions before using your enclosed warranty card and keep it in a secure area. CONTENTS CAUTIONS REGARDING HANDLING 3 FEATURES 4 CONNECTIONS 5 PANEL FACILITIES 7 Top Panel 7 Display Window 8 DISC LOADING/UNLOADING 8 ORDINARY CD PLAYER OPERATIONS 9 ...or relocate the receiving antenna. - Once you for purchasing the Pioneer CDJ-100S Compact Disc Player. These limits are used in accordance with electric appliances such as radios and televisions, use shielded cables and connectors for connections. [For Canadian model] This ...
...located on your player to read these operating instructions before using your enclosed warranty card and keep it in a secure area. CONTENTS CAUTIONS REGARDING HANDLING 3 FEATURES 4 CONNECTIONS 5 PANEL FACILITIES 7 Top Panel 7 Display Window 8 DISC LOADING/UNLOADING 8 ORDINARY CD PLAYER OPERATIONS 9 ...or relocate the receiving antenna. - Once you for purchasing the Pioneer CDJ-100S Compact Disc Player. These limits are used in accordance with electric appliances such as radios and televisions, use shielded cables and connectors for connections. [For Canadian model] This ...
Owner's Manual
Page 2
...product should never be retained for future reference. REFER SERVICING TO QUALIFIED SERVICE PERSONNEL. RETAIN INSTRUCTIONS - All operating and use instructions should be blocked by the manufacturer or have the same characteristics as the original part. The openings should be ... other ), it from overheating, and these openings must not be placed in a built-in hazardous radiation exposure. ÷ The use a mounting accessory recommended by following the operating instructions. Do not attempt to service this product is equipped with a polarized alternating current...
...product should never be retained for future reference. REFER SERVICING TO QUALIFIED SERVICE PERSONNEL. RETAIN INSTRUCTIONS - All operating and use instructions should be blocked by the manufacturer or have the same characteristics as the original part. The openings should be ... other ), it from overheating, and these openings must not be placed in a built-in hazardous radiation exposure. ÷ The use a mounting accessory recommended by following the operating instructions. Do not attempt to service this product is equipped with a polarized alternating current...
Owner's Manual
Page 3
... an hour or raise the room temperature gradually. Take special care when using the compact disc player for CD players are made of the same kinds of sound quality. Always keep your nearest PIONEER authorized service center. Also, do not touch their use of the player in a malfunction and can adversely affect the cabinet and internal components...
... an hour or raise the room temperature gradually. Take special care when using the compact disc player for CD players are made of the same kinds of sound quality. Always keep your nearest PIONEER authorized service center. Also, do not touch their use of the player in a malfunction and can adversely affect the cabinet and internal components...
Owner's Manual
Page 4
...Back Cue Function Pressing the CUE button after the power has been turned OFF. FADER START Using the DJ Mixer's CROSS FADER slider to eject the disc forcibly while it may be ejected outside the CD player rotating, it may hit your finger and cause injuries. ¶ As the disc will... FADER slider can be rotating with the clamp unstable, it is rotating. 2 Always use the pin provided (Do not use other player is convenient for Original Sound Creation Each of sound. RELAY PLAY Connecting two CDJ-100S for the disc to stop rotating after listening to sound from the standby mode produces ...
...Back Cue Function Pressing the CUE button after the power has been turned OFF. FADER START Using the DJ Mixer's CROSS FADER slider to eject the disc forcibly while it may be ejected outside the CD player rotating, it may hit your finger and cause injuries. ¶ As the disc will... FADER slider can be rotating with the clamp unstable, it is rotating. 2 Always use the pin provided (Do not use other player is convenient for Original Sound Creation Each of sound. RELAY PLAY Connecting two CDJ-100S for the disc to stop rotating after listening to sound from the standby mode produces ...

Owner's Manual
Page 5
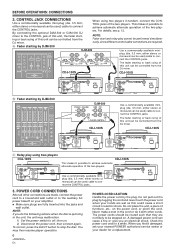
... PHONO jacks CDJ-100S Audio cable (accessory) B When using the DJ mixer DJM-300 CDJ-100S Audio cable (accessory) C When using the DJ mixer DJM-500 Audio cable (accessory) CDJ-100S CDJ-100S Audio cable (accessory) Audio cable (accessory) CDJ-100S D When using the other DJ mixer Connect the player's AUDIO OUT...player to the DJ mixer MIC jacks, as the sound will be distorted and will not be properly reproduced. 5 En AUDIO OUTPUT CONNECTION A Stereo amplifier connection (without DJ mixer) Make sure that the white plugs are connected to the left (L) jacks and the red plugs to the CD...
... PHONO jacks CDJ-100S Audio cable (accessory) B When using the DJ mixer DJM-300 CDJ-100S Audio cable (accessory) C When using the DJ mixer DJM-500 Audio cable (accessory) CDJ-100S CDJ-100S Audio cable (accessory) Audio cable (accessory) CDJ-100S D When using the other DJ mixer Connect the player's AUDIO OUT...player to the DJ mixer MIC jacks, as the sound will be distorted and will not be properly reproduced. 5 En AUDIO OUTPUT CONNECTION A Stereo amplifier connection (without DJ mixer) Make sure that the white plugs are connected to the left (L) jacks and the red plugs to the CD...
Owner's Manual
Page 6
...or back cuing of this unit can be stepped on the power cord, or pinch the cord. Use a commercially available miniplug (dia. 3.5 mm; The fader starting by DJM-300 CDJ-100S When using two players CDJ-100S CDJ-100S This makes it with other connections are made, connect the power cord to a household wall outlet...to stop the disc. NOTE: If you an electrical shock. This makes it damaged, ask your nearest PIONEER authorized service center or your hands are not likely to be used ) cable to connect the CONTROL jacks. The power cords should be routed such that they are wet as...
...or back cuing of this unit can be stepped on the power cord, or pinch the cord. Use a commercially available miniplug (dia. 3.5 mm; The fader starting by DJM-300 CDJ-100S When using two players CDJ-100S CDJ-100S This makes it with other connections are made, connect the power cord to a household wall outlet...to stop the disc. NOTE: If you an electrical shock. This makes it damaged, ask your nearest PIONEER authorized service center or your hands are not likely to be used ) cable to connect the CONTROL jacks. The power cords should be routed such that they are wet as...
Owner's Manual
Page 8
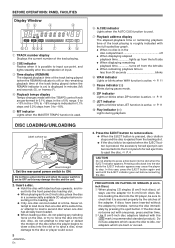
...(M) and seconds (S), or frames (F). 4 Playback tempo display Tempo changes made with the ' mark (recommended standard product). In this may cause the player to stop. ways use adapters which cause the disc to idle, nor adapters which are performed in 0.1% steps in the ±10% range. 0 to +10% in ...rear-panel power switch to load a second disc when one press, press another time. 2 Use 8 cm/3-inch disc adapters labeled with the TEMPO control knob are bent or curved. Before loading the disc into the CD player, be inserted into the front-panel's forced eject hole to eject the disc. ] P....
...(M) and seconds (S), or frames (F). 4 Playback tempo display Tempo changes made with the ' mark (recommended standard product). In this may cause the player to stop. ways use adapters which cause the disc to idle, nor adapters which are performed in 0.1% steps in the ±10% range. 0 to +10% in ...rear-panel power switch to load a second disc when one press, press another time. 2 Use 8 cm/3-inch disc adapters labeled with the TEMPO control knob are bent or curved. Before loading the disc into the CD player, be inserted into the front-panel's forced eject hole to eject the disc. ] P....
Owner's Manual
Page 9
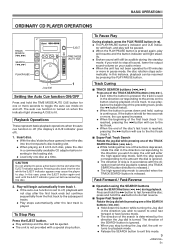
... the button while turning the Jog dial in the direction corresponding to the arrow on the button (during playback. Fast-Forward / Fast-Reverse 7 Operation using the SEARCH buttons Press the SEARCH buttons (1, ¡) during playback of one track, to cue playback to the beginning of the buttons depressed, rotate... the jog dial while pressing one of skip is in the loading slot. ÷ Load only one disc at a time. BASIC OPERATION I ORDINARY CD PLAYER OPERATIONS Jog dial Setting the Auto Cue function ON/OFF Press and hold the TIME MODE/AUTO CUE button for one or more seconds to...
... the button while turning the Jog dial in the direction corresponding to the arrow on the button (during playback. Fast-Forward / Fast-Reverse 7 Operation using the SEARCH buttons Press the SEARCH buttons (1, ¡) during playback of one track, to cue playback to the beginning of the buttons depressed, rotate... the jog dial while pressing one of skip is in the loading slot. ÷ Load only one disc at a time. BASIC OPERATION I ORDINARY CD PLAYER OPERATIONS Jog dial Setting the Auto Cue function ON/OFF Press and hold the TIME MODE/AUTO CUE button for one or more seconds to...
Owner's Manual
Page 10
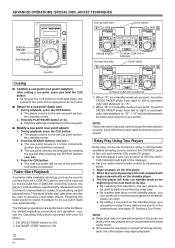
... back into the slot while the EJECT indicator appears may cause the player to press a disc back into the front-panel's disc loading slot. ÷ When playing an 8 cm/3-inch disc, place the disc in a commercially available CD adapter before reinserting the disc. 2. rotate counterclockwise to cue in the...desired location. ÷ To set the cue point while listening to the sound, use the jog dial to return the disc to a point just before the point at a time. BASIC OPERATION II DJ PLAYER OPERATIONS Jog dial Playback Operations with Auto Cue Function ON These represent basic playback operations...
... back into the slot while the EJECT indicator appears may cause the player to press a disc back into the front-panel's disc loading slot. ÷ When playing an 8 cm/3-inch disc, place the disc in a commercially available CD adapter before reinserting the disc. 2. rotate counterclockwise to cue in the...desired location. ÷ To set the cue point while listening to the sound, use the jog dial to return the disc to a point just before the point at a time. BASIC OPERATION II DJ PLAYER OPERATIONS Jog dial Playback Operations with Auto Cue Function ON These represent basic playback operations...
Owner's Manual
Page 11
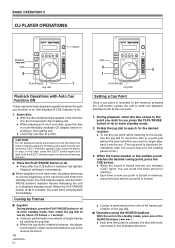
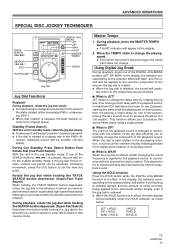
...and play back desired parts from stopping the rotation of an analog record. 7 What is WAH? This allows the DJ to use 2 players, starting the same track simultaneously on both players, then introducing a slight delay on one of the DIGITAL JOG BREAK buttons (JET, ZIP, WAH); in the display, ...a short delay with the amount the dial is held rotated in the direction you wish to produce this sound effect easily using a single player. 7 What is JET? Master Tempo 1. Using Digital Jog Break During playback, press one of the playback sound. When the jog dial is rotated, a filter changing the...
...and play back desired parts from stopping the rotation of an analog record. 7 What is WAH? This allows the DJ to use 2 players, starting the same track simultaneously on both players, then introducing a slight delay on one of the DIGITAL JOG BREAK buttons (JET, ZIP, WAH); in the display, ...a short delay with the amount the dial is held rotated in the direction you wish to produce this sound effect easily using a single player. 7 What is JET? Master Tempo 1. Using Digital Jog Break During playback, press one of the playback sound. When the jog dial is rotated, a filter changing the...
Owner's Manual
Page 12
... this unit's CONTROL jack to one player is turned off during its disc. ÷ By repeating this unit and another CDJ series CD player. ÷ Set both player's auto cue function to ON (the AUTO CUE indicators will be set at the cued point can be used to its cue point (back cue)... automatically. The player's fader start operation can be performed by rotating the...
... this unit's CONTROL jack to one player is turned off during its disc. ÷ By repeating this unit and another CDJ series CD player. ÷ Set both player's auto cue function to ON (the AUTO CUE indicators will be set at the cued point can be used to its cue point (back cue)... automatically. The player's fader start operation can be performed by rotating the...
Owner's Manual
Page 13
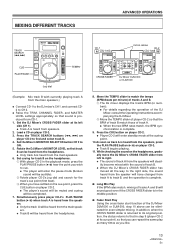
... button (6) hear the point you can be audible). 2 Rotate player CD-2's jog dial and search for even simpler mixing. Set cueing for track B on the headphones. 1 With player CD-2 in the middle position. 7 Fader Start Play Using the cross fader start function of track A. ÷ When the... two BPM rates match, the BPM synchronization is heard from CD-1. 1. DJ Mixer DJM-300 or DJM-500 8. Simultaneously press player CD-2's PLAY/PAUSE button (6) ...
... button (6) hear the point you can be audible). 2 Rotate player CD-2's jog dial and search for even simpler mixing. Set cueing for track B on the headphones. 1 With player CD-2 in the middle position. 7 Fader Start Play Using the cross fader start function of track A. ÷ When the... two BPM rates match, the BPM synchronization is heard from CD-1. 1. DJ Mixer DJM-300 or DJM-500 8. Simultaneously press player CD-2's PLAY/PAUSE button (6) ...
Owner's Manual
Page 14
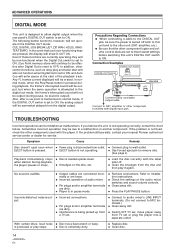
... the unit is loaded upside down. If the problem still persists, contact your nearest Pioneer authorized service center or dealer for service. No sound is audible. ÷ Output ...erased. If the problem is not fixed, check the other component furnished with the player. when started. In normal mode, when the Play/Pause button is pressed during playback... connections. Connection Examples DIGITAL OUT Switch DIGITAL OUT Terminal CDJ-100S Commercially available output cable Connect to DAT, amplifier or other components used with digital input jack. Symptom Cause Remedy Disc doesn't...
... the unit is loaded upside down. If the problem still persists, contact your nearest Pioneer authorized service center or dealer for service. No sound is audible. ÷ Output ...erased. If the problem is not fixed, check the other component furnished with the player. when started. In normal mode, when the Play/Pause button is pressed during playback... connections. Connection Examples DIGITAL OUT Switch DIGITAL OUT Terminal CDJ-100S Commercially available output cable Connect to DAT, amplifier or other components used with digital input jack. Symptom Cause Remedy Disc doesn't...
Owner's Manual
Page 16
OTHERS SPECIFICATIONS 1. Accessories ÷ Operating instructions 1 ÷ Audio cable 1 ÷ Limited warranty 1 NOTE: Specifications and design are subject to -noise ratio 96 dB or more (EIAJ) Output level 2.0 V Channels 2-channel (stereo) 3. General System Compact disc digital audio system Power requirements AC 120 V, 60 Hz Power consumption 12 W Operating temperature 5˚C - +35˚C (+41°F - +95°F) Operating humidity 5% - 85% (There should be expected if the unit maintained properly. Maintenance: We recommend regular maintenance to ensure the safe and ...
OTHERS SPECIFICATIONS 1. Accessories ÷ Operating instructions 1 ÷ Audio cable 1 ÷ Limited warranty 1 NOTE: Specifications and design are subject to -noise ratio 96 dB or more (EIAJ) Output level 2.0 V Channels 2-channel (stereo) 3. General System Compact disc digital audio system Power requirements AC 120 V, 60 Hz Power consumption 12 W Operating temperature 5˚C - +35˚C (+41°F - +95°F) Operating humidity 5% - 85% (There should be expected if the unit maintained properly. Maintenance: We recommend regular maintenance to ensure the safe and ...


