
Owner's Manual
Page 2
Contents Before Using this Product 2 About this Product 2 Precaution 2 Connecting the Units 3 Connecting the Power Cord and Controller Unit 4 Connecting the System (1 5 Connecting the System (2 7 Connecting the Audio/Video equipment 9 Installation 10 Installing Hide-away Unit 10 Installing Controller Unit 11 Part Names And Applications 14 Controller Unit 14 Hide-away Unit 15 Specifications 16 1
Contents Before Using this Product 2 About this Product 2 Precaution 2 Connecting the Units 3 Connecting the Power Cord and Controller Unit 4 Connecting the System (1 5 Connecting the System (2 7 Connecting the Audio/Video equipment 9 Installation 10 Installing Hide-away Unit 10 Installing Controller Unit 11 Part Names And Applications 14 Controller Unit 14 Hide-away Unit 15 Specifications 16 1
Owner's Manual
Page 3
... states the viewing of the parking brake, and be sure to install the display correctly so that it is visible to high vol- WARNING • Connect the product to a display that is visible to the driver, use with the functions and their operation by reading through the manual before you read...
... states the viewing of the parking brake, and be sure to install the display correctly so that it is visible to high vol- WARNING • Connect the product to a display that is visible to the driver, use with the functions and their operation by reading through the manual before you read...
Owner's Manual
Page 4
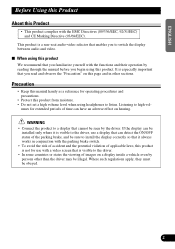
... If the insulation of the wiring melts or gets torn, there is for details on the fuse holder. • Always grip the Controller unit when connecting an RCA pin plug. 3 Re-install any moving parts, such as near the heater outlet. If you do, the protection circuit may fail to ...battery cable before beginning installation. • After completing installation and wiring, double check that get hot, such as the gear shift, handbrake and seat rails. Connecting the Units Note: • This product is a danger of the wiring short-circuiting to use only a fuse of the rating prescribed on...
... If the insulation of the wiring melts or gets torn, there is for details on the fuse holder. • Always grip the Controller unit when connecting an RCA pin plug. 3 Re-install any moving parts, such as near the heater outlet. If you do, the protection circuit may fail to ...battery cable before beginning installation. • After completing installation and wiring, double check that get hot, such as the gear shift, handbrake and seat rails. Connecting the Units Note: • This product is a danger of the wiring short-circuiting to use only a fuse of the rating prescribed on...
Owner's Manual
Page 5
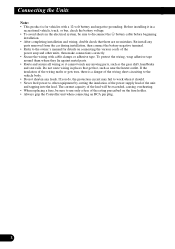
Controller unit 3 m Controller unit rear side Groove Cord Route the controller unit cord inside the slot groove on the controller unit rear side. ENGLISH Connecting the Power Cord and Controller Unit Hide-away unit ESPAÑOL DEUTSCH FRANÇAIS ITALIANO NEDERLANDS Fuse holder (1 A) 2 m Red To electric terminal controlled by ignition switch (12V DC) ON/OFF. 2 m Black (ground) To vehicle (metal) body. Do not pull strongly, excessively bend or stretch the cord. 4
Controller unit 3 m Controller unit rear side Groove Cord Route the controller unit cord inside the slot groove on the controller unit rear side. ENGLISH Connecting the Power Cord and Controller Unit Hide-away unit ESPAÑOL DEUTSCH FRANÇAIS ITALIANO NEDERLANDS Fuse holder (1 A) 2 m Red To electric terminal controlled by ignition switch (12V DC) ON/OFF. 2 m Black (ground) To vehicle (metal) body. Do not pull strongly, excessively bend or stretch the cord. 4
Owner's Manual
Page 6
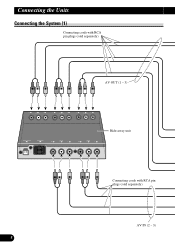
Connecting the Units Connecting the System (1) Connecting cords with RCA pin plugs (sold separately) AV OUT (1 - 3) Hide-away unit Connecting cords with RCA pin plugs (sold separately) AV IN (2 - 3) 5
Connecting the Units Connecting the System (1) Connecting cords with RCA pin plugs (sold separately) AV OUT (1 - 3) Hide-away unit Connecting cords with RCA pin plugs (sold separately) AV IN (2 - 3) 5
Owner's Manual
Page 8
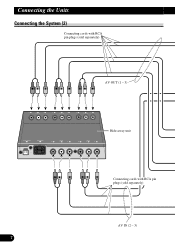
CAoTnintlec(tEinnggtlhisehU) nits Connecting the System (2) Connecting cords with RCA pin plugs (sold separately) AV OUT (1 - 3) Hide-away unit Connecting cords with RCA pin plugs (sold separately) AV IN (2 - 3) 7
CAoTnintlec(tEinnggtlhisehU) nits Connecting the System (2) Connecting cords with RCA pin plugs (sold separately) AV OUT (1 - 3) Hide-away unit Connecting cords with RCA pin plugs (sold separately) AV IN (2 - 3) 7
Owner's Manual
Page 10
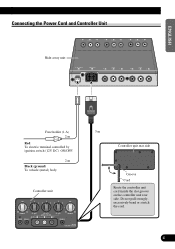
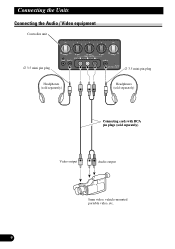
Connecting the Units Connecting the Audio / Video equipment Controller unit ∅ 3.5 mini pin plug Headphones (sold separately) ∅ 3.5 mini pin plug Headphones (sold separately) Connecting cords with RCA pin plugs (sold separately) Video output Audio output 8mm video, vehicle-mounted portable video, etc. 9
Connecting the Units Connecting the Audio / Video equipment Controller unit ∅ 3.5 mini pin plug Headphones (sold separately) ∅ 3.5 mini pin plug Headphones (sold separately) Connecting cords with RCA pin plugs (sold separately) Video output Audio output 8mm video, vehicle-mounted portable video, etc. 9
Owner's Manual
Page 11
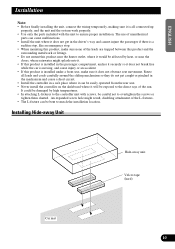
... rays of the sun. Installing Hide-away Unit Hide-away unit Velcro tape (hard) Car mat 10 FRANÇAIS ITALIANO NEDERLANDS Route all connected up properly, and the unit and the system work properly. • Use only the parts included with screws, be careful not to overtighten ... the controller unit with the unit to ensure proper installation. ENGLISH ESPAÑOL DEUTSCH Installation Note: • Before finally installing the unit, connect the wiring temporarily, making sure it is all leads and cords carefully around the sliding mechanism so they do not get in the driver's way...
... rays of the sun. Installing Hide-away Unit Hide-away unit Velcro tape (hard) Car mat 10 FRANÇAIS ITALIANO NEDERLANDS Route all connected up properly, and the unit and the system work properly. • Use only the parts included with screws, be careful not to overtighten ... the controller unit with the unit to ensure proper installation. ENGLISH ESPAÑOL DEUTSCH Installation Note: • Before finally installing the unit, connect the wiring temporarily, making sure it is all leads and cords carefully around the sliding mechanism so they do not get in the driver's way...
Owner's Manual
Page 15
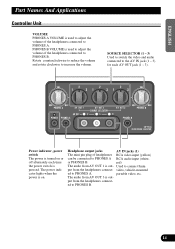
... to increase the volume. SOURCE SELECTOR (1 - 3) Used to switch the video and audio connected to the AV IN jack (1 - 3) for each time the power switch is pressed. red) The audio from the headphones connect- Used to PHONES A RCA audio input (white, or PHONES B. Headphone output jacks AV ... pin plug of headphones RCA video input (yellow) can be connected to connect 8mm put from AV OUT 3 is out- The audio from the headphones connect- PHONES B VOLUME is used to adjust the volume of the headphones connected to PHONES B. ESPAÑOL DEUTSCH FRANÇAIS ITALIANO ...
... to increase the volume. SOURCE SELECTOR (1 - 3) Used to switch the video and audio connected to the AV IN jack (1 - 3) for each time the power switch is pressed. red) The audio from the headphones connect- Used to PHONES A RCA audio input (white, or PHONES B. Headphone output jacks AV ... pin plug of headphones RCA video input (yellow) can be connected to connect 8mm put from AV OUT 3 is out- The audio from the headphones connect- PHONES B VOLUME is used to adjust the volume of the headphones connected to PHONES B. ESPAÑOL DEUTSCH FRANÇAIS ITALIANO ...
Owner's Manual
Page 16
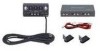
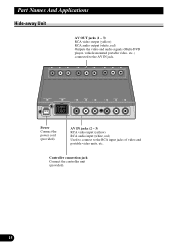
Power Connect the power cord (provided). Part Names And Applications Hide-away Unit AV OUT jacks (1 - 3) RCA video output (yellow) RCA audio output (white, red) Outputs the video and audio signals (Multi-DVD player, vehicle-mounted portable video, etc.) connected to the RCA input jacks of video and portable video units, etc. Controller connection jack Connect the controller unit (provided). 15 AV IN jacks (2 - 3) RCA video input (yellow) RCA audio input (white, red) Used to connect to the AV IN jack.
Power Connect the power cord (provided). Part Names And Applications Hide-away Unit AV OUT jacks (1 - 3) RCA video output (yellow) RCA audio output (white, red) Outputs the video and audio signals (Multi-DVD player, vehicle-mounted portable video, etc.) connected to the RCA input jacks of video and portable video units, etc. Controller connection jack Connect the controller unit (provided). 15 AV IN jacks (2 - 3) RCA video input (yellow) RCA audio input (white, red) Used to connect to the AV IN jack.


