
Owner's Manual
Page 3
...; Switching the Speaker Input Mode AUX Title Input 84 Muting Function 84 • Mobile Navigation Unit Muting • Cellular Telephone Muting Troubleshooting 85 Terms 88 Installation 89 Specifications 101 2
...; Switching the Speaker Input Mode AUX Title Input 84 Muting Function 84 • Mobile Navigation Unit Muting • Cellular Telephone Muting Troubleshooting 85 Terms 88 Installation 89 Specifications 101 2

Owner's Manual
Page 7
... that enables the Driver to watch the Video or DVD. Where such regulations apply, they must be sure to record this product. WARNING • NEVER install the display in a location that you benefit fully from a DVD-Video disc or other sections. When Using a Display connected to Rear Video Output This product...
... that enables the Driver to watch the Video or DVD. Where such regulations apply, they must be sure to record this product. WARNING • NEVER install the display in a location that you benefit fully from a DVD-Video disc or other sections. When Using a Display connected to Rear Video Output This product...

Owner's Manual
Page 8
...to be audible. • Protect this product from where you purchased the product for its after installation. CUSTOMER SERVICE CUSTOMER SERVICE DEPARTMENT DEPARTMENT P.O. Pioneer Electronics of the 50-Disc Type Multi-CD Player are described in this manual. grammed. Box ... service (including warranty conditions) or any other pointed instrument. When using this product for repair without advance contact. 7 U.S.A. 7 CANADA Pioneer Electronics Service, Inc. When strange (incorrect) messages appear on the display. • To reset the microprocessor, press the RESET button ...
...to be audible. • Protect this product from where you purchased the product for its after installation. CUSTOMER SERVICE CUSTOMER SERVICE DEPARTMENT DEPARTMENT P.O. Pioneer Electronics of the 50-Disc Type Multi-CD Player are described in this manual. grammed. Box ... service (including warranty conditions) or any other pointed instrument. When using this product for repair without advance contact. 7 U.S.A. 7 CANADA Pioneer Electronics Service, Inc. When strange (incorrect) messages appear on the display. • To reset the microprocessor, press the RESET button ...

Owner's Manual
Page 9
... remote controller is equipped with a remote controller for a month or longer. • If the event of battery leakage, wipe the remote controller completely clean and install a new bat- Precaution: • Do not store the remote controller in high temperatures or direct sunlight. • The controller may become jammed under the brake...
... remote controller is equipped with a remote controller for a month or longer. • If the event of battery leakage, wipe the remote controller completely clean and install a new bat- Precaution: • Do not store the remote controller in high temperatures or direct sunlight. • The controller may become jammed under the brake...
Owner's Manual
Page 61
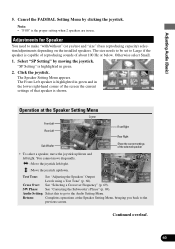
... the joystick. The size needs to be set to make "with/without" (or yes/no) and "size" (bass reproducing capacity) selection/adjustments depending on the installed speakers. Adjustments for Speaker You need to Large if the speaker is capable of reproducing sounds of that speaker is highlighted in green and in...
... the joystick. The size needs to be set to make "with/without" (or yes/no) and "size" (bass reproducing capacity) selection/adjustments depending on the installed speakers. Adjustments for Speaker You need to Large if the speaker is capable of reproducing sounds of that speaker is highlighted in green and in...

Owner's Manual
Page 62
... steps 3 - 7 for output level by moving the joystick up/down. Precaution: • Low frequency range is not output if the subwoofer is installed. and are displayed and you want to "LARGE" if the speaker is capable of "Adjusting the Speakers' Output Levels using a Test Tone" or ..."Adjusting the Speakers' Output Level". 7. This completes adjustment to by moving the joystick. tent, or if no subwoofer is installed. • When playing a 2-channel mono source with PRO LOGIC switched ON, there are automatically set for the Rear Left and Right. 6. When you...
... steps 3 - 7 for output level by moving the joystick up/down. Precaution: • Low frequency range is not output if the subwoofer is installed. and are displayed and you want to "LARGE" if the speaker is capable of "Adjusting the Speakers' Output Levels using a Test Tone" or ..."Adjusting the Speakers' Output Level". 7. This completes adjustment to by moving the joystick. tent, or if no subwoofer is installed. • When playing a 2-channel mono source with PRO LOGIC switched ON, there are automatically set for the Rear Left and Right. 6. When you...

Owner's Manual
Page 66
... All audio functions are intended for effectiveness of your audio settings. 1. Click the joystick. Select "DIRECT" by moving the joystick. "DIRECT" is installed. stick. Each click toggles the Dynamic Range Control On/Off. Click the joystick. Each click toggles DIRECT ON/OFF. Switch the SFC mode On... sounds. Click the joystick. Each click toggles the selected SFC mode On/Off. Audio is heard only over the center speaker if installed and the center speaker setting is effective only on , "DIRECT ON" appears in the center of presence and spaciousness. Note: •...
... All audio functions are intended for effectiveness of your audio settings. 1. Click the joystick. Select "DIRECT" by moving the joystick. "DIRECT" is installed. stick. Each click toggles the Dynamic Range Control On/Off. Click the joystick. Each click toggles DIRECT ON/OFF. Switch the SFC mode On... sounds. Click the joystick. Each click toggles the selected SFC mode On/Off. Audio is heard only over the center speaker if installed and the center speaker setting is effective only on , "DIRECT ON" appears in the center of presence and spaciousness. Note: •...
Owner's Manual
Page 70
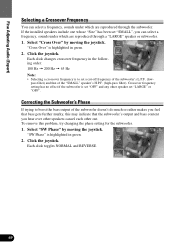
... REVERSE. 69 Fine Adjusting Audio (Expert) Selecting a Crossover Frequency You can select a frequency, sounds under which are reproduced through a "LARGE" speaker or subwoofer. 1. If the installed speakers include one whose "Size" has been set "SMALL", you hear over other speakers cancel each other speaker set "OFF" and any other out. "Cross...
... REVERSE. 69 Fine Adjusting Audio (Expert) Selecting a Crossover Frequency You can select a frequency, sounds under which are reproduced through a "LARGE" speaker or subwoofer. 1. If the installed speakers include one whose "Size" has been set "SMALL", you hear over other speakers cancel each other speaker set "OFF" and any other out. "Cross...
Owner's Manual
Page 86
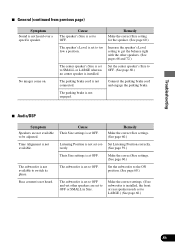
... are not connected correctly. Increase the volume. (See page 10.) The front, rear, left and right speakers are plugged in level balance. The volume is installed. Request repairs. 7 General Symptom The power switch does not work . Remedy Check whether the cables are not properly adjusted in correctly and firmly. The remote...
... are not connected correctly. Increase the volume. (See page 10.) The front, rear, left and right speakers are plugged in level balance. The volume is installed. Request repairs. 7 General Symptom The power switch does not work . Remedy Check whether the cables are not properly adjusted in correctly and firmly. The remote...
Owner's Manual
Page 87
...LARGE whereas no subwoofer is not engaged. 7 Audio/DSP Symptom Speakers are set to the ON position. (See page 60.) The subwoofer is installed. Cause Their Size settings is at OFF. Set the subwoofer to OFF or SMALL in Size. Troubleshooting 7 General (continued from previous page) Symptom...not available to OFF. Make the correct settings. (If no center speaker is set to OFF. Set Listening Position correctly. The parking brake is installed, the front or rear speaker needs set to too low a position. Bass content is not available to LARGE.) (See page 60.) 86 ...
...LARGE whereas no subwoofer is not engaged. 7 Audio/DSP Symptom Speakers are set to the ON position. (See page 60.) The subwoofer is installed. Cause Their Size settings is at OFF. Set the subwoofer to OFF or SMALL in Size. Troubleshooting 7 General (continued from previous page) Symptom...not available to OFF. Make the correct settings. (If no center speaker is set to OFF. Set Listening Position correctly. The parking brake is installed, the front or rear speaker needs set to too low a position. Bass content is not available to LARGE.) (See page 60.) 86 ...

Owner's Manual
Page 88
... (continued from the DVD player only. Cause The center speaker setting is at SMALL or LARGE whereas no effects. Cause The remote control is installed. Dolby Pro Logic is heard over the center speaker only.) (See page 65.) Switching Dynamic Range Control ON has no center speaker is not...audio source is mono and Dolby Pro Logic is switched on, sound is switched on Dolby Digital sounds. (See page 65.) 7 DVD Player (if installed) Symptom The DVD player's remote control does not operate. The feature is not Dolby Digital coded. Make the correct output setting. (See the manual ...
... (continued from the DVD player only. Cause The center speaker setting is at SMALL or LARGE whereas no effects. Cause The remote control is installed. Dolby Pro Logic is heard over the center speaker only.) (See page 65.) Switching Dynamic Range Control ON has no center speaker is not...audio source is mono and Dolby Pro Logic is switched on, sound is switched on Dolby Digital sounds. (See page 65.) 7 DVD Player (if installed) Symptom The DVD player's remote control does not operate. The feature is not Dolby Digital coded. Make the correct output setting. (See the manual ...

Owner's Manual
Page 89
..., thereby offering better quality audio than music CDs Optical Digital Input By receiving optical digital input audio signals in a digital signal format, the chance is installed in the course of 5.1) audio. This is an input designed to this product's optical digital input to the digital output on a DVD player with an...
..., thereby offering better quality audio than music CDs Optical Digital Input By receiving optical digital input audio signals in a digital signal format, the chance is installed in the course of 5.1) audio. This is an input designed to this product's optical digital input to the digital output on a DVD player with an...

Owner's Manual
Page 90
...clamps or adhesive tape. Please ground this lead separately from the vehicle for details on the fuse holder. • Since a unique BPTL circuit is installed in the speakers catching fire, emitting smoke or becoming damaged. • When this product's source is switched ON, a control signal is a ...handbrake and seat rails. If you ground the products together and the ground becomes detached, there is output through a hole into the lead. Before installing it in a recreational vehicle, truck, or bus, check the battery voltage. • To avoid shorts in places that does not have an ACC...
...clamps or adhesive tape. Please ground this lead separately from the vehicle for details on the fuse holder. • Since a unique BPTL circuit is installed in the speakers catching fire, emitting smoke or becoming damaged. • When this product's source is switched ON, a control signal is a ...handbrake and seat rails. If you ground the products together and the ground becomes detached, there is output through a hole into the lead. Before installing it in a recreational vehicle, truck, or bus, check the battery voltage. • To avoid shorts in places that does not have an ACC...

Owner's Manual
Page 91
...cooling fan side of both products and connect cords that have the same function. When connecting this product to another product, refer to the supplied Installation manuals of this product. • Cords for this unit will not transfer signals properly and so this product and those for instance, a door....hand brake, or seat sliding mechanism. Insert the clamp in the direction indicated in moving parts such as near the heater outlet. RESET Installation 90 If it is used to secure the optical cable when using it 90 degrees to bend the optical cable sharply. Optical cable Routing...
...cooling fan side of both products and connect cords that have the same function. When connecting this product to another product, refer to the supplied Installation manuals of this product. • Cords for this unit will not transfer signals properly and so this product and those for instance, a door....hand brake, or seat sliding mechanism. Insert the clamp in the direction indicated in moving parts such as near the heater outlet. RESET Installation 90 If it is used to secure the optical cable when using it 90 degrees to bend the optical cable sharply. Optical cable Routing...
Owner's Manual
Page 92
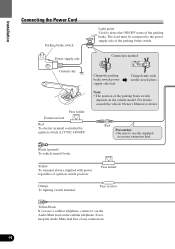
... cellular telephone. For details, consult the vehicle Owner's Manual or dealer. Red Precaution: • Be sure to the power supply side of the parking brake. Installation Connecting the Power Cord Parking brake switch Power supply side Light green Used to detect the ON/OFF status of the parking brake switch. Connection...
... cellular telephone. For details, consult the vehicle Owner's Manual or dealer. Red Precaution: • Be sure to the power supply side of the parking brake. Installation Connecting the Power Cord Parking brake switch Power supply side Light green Used to detect the ON/OFF status of the parking brake switch. Connection...

Owner's Manual
Page 93
...; Right + Rear speaker ≠ Do not connect anything to the speaker leads that are the same color, so identify them by checking the attached labels. Installation This Product Precaution: • Center speaker and subwoofer cords are not connected to speakers. 92
...; Right + Rear speaker ≠ Do not connect anything to the speaker leads that are the same color, so identify them by checking the attached labels. Installation This Product Precaution: • Center speaker and subwoofer cords are not connected to speakers. 92

Owner's Manual
Page 94
... Front speaker Rear speaker Rear speaker Center speaker Subwoofer Perform these connections when using a different amp (sold separately power amp using the RCA output jacks. Installation Connecting to a Sold Separately Power Amp This product can be connected to a sold separately). 93 This Product Rear output Front output Center output Subwoofer output...
... Front speaker Rear speaker Rear speaker Center speaker Subwoofer Perform these connections when using a different amp (sold separately power amp using the RCA output jacks. Installation Connecting to a Sold Separately Power Amp This product can be connected to a sold separately). 93 This Product Rear output Front output Center output Subwoofer output...

Owner's Manual
Page 95
Speaker Input Jack Connection This product also can be connected to a car stereo without RCA output jacks by using the speaker input jack. This Product Speaker input terminal Gray Gray/black White White/black Car stereo with speaker output jacks. + Right ≠ Front speaker + Left ≠ Installation 94
Speaker Input Jack Connection This product also can be connected to a car stereo without RCA output jacks by using the speaker input jack. This Product Speaker input terminal Gray Gray/black White White/black Car stereo with speaker output jacks. + Right ≠ Front speaker + Left ≠ Installation 94

Owner's Manual
Page 96
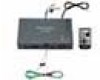
Connecting the System (A) Installation This Product Gray Green Yellow Red Black Blue 3 m AV cable (supplied) Red RGB cable (supplied ) 1.5 m Yellow/black To Yellow/black lead (GUIDE ON) on the navigation system. Optical cable (supplied ) Gray DVD control cable (supplied) IP-BUS STAND ALONE IP-BUS cable (supplied with the Multi-DVD player) RCA cable (supplied with the Multi-DVD player) Green 3 m 3 m IP-BUS cable (supplied) Multi-DVD player (sold separately) 6 m Blue To Front video output Black Yellow Black (FRONT VIDEO OUTPUT) 95
Connecting the System (A) Installation This Product Gray Green Yellow Red Black Blue 3 m AV cable (supplied) Red RGB cable (supplied ) 1.5 m Yellow/black To Yellow/black lead (GUIDE ON) on the navigation system. Optical cable (supplied ) Gray DVD control cable (supplied) IP-BUS STAND ALONE IP-BUS cable (supplied with the Multi-DVD player) RCA cable (supplied with the Multi-DVD player) Green 3 m 3 m IP-BUS cable (supplied) Multi-DVD player (sold separately) 6 m Blue To Front video output Black Yellow Black (FRONT VIDEO OUTPUT) 95

Owner's Manual
Page 97
V.SEL cable (supplied with the display) Installation Speaker Unit (supplied with the display) Multi-CD player (sold separately) *1 Blue Display with an IP-BUS cable (sold separately) Blue IP-BUS cable (supplied ...
V.SEL cable (supplied with the display) Installation Speaker Unit (supplied with the display) Multi-CD player (sold separately) *1 Blue Display with an IP-BUS cable (sold separately) Blue IP-BUS cable (supplied ...


