Owners Manual
Page 2
...input 27 Connection Diagram (RGB input 28 Connecting the RCA Audio and Video Output 29 Connecting "AUTOMATIC INPUT SWITCHING" Lead 30 Installation 31 - About the Corner Icons - Selecting the Audio for the Display Independently - When the Display is Difficult, use [BRIGHT] and [DIMMER] to Adjust 4 To Ensure Safe Driving 5 Resetting the Microprocessor 5 Key Finder 6 Component Parts and Features 6 Basic Operation 7 Turn On Power 8 Volume Adjustment 8 Selecting the Source 9 - Hide-away Unit Installation Specifications 36 1 DIMMER Input Setting [VCR1/VCR2 17 Display...
...input 27 Connection Diagram (RGB input 28 Connecting the RCA Audio and Video Output 29 Connecting "AUTOMATIC INPUT SWITCHING" Lead 30 Installation 31 - About the Corner Icons - Selecting the Audio for the Display Independently - When the Display is Difficult, use [BRIGHT] and [DIMMER] to Adjust 4 To Ensure Safe Driving 5 Resetting the Microprocessor 5 Key Finder 6 Component Parts and Features 6 Basic Operation 7 Turn On Power 8 Volume Adjustment 8 Selecting the Source 9 - Hide-away Unit Installation Specifications 36 1 DIMMER Input Setting [VCR1/VCR2 17 Display...
Owners Manual
Page 3
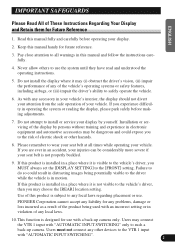
... to the vehicle's driver, then you MUST always set the [DISPLAY SETTING] to safely operate the vehicle. 6. As with "AUTOMATIC INPUT SWITCHING". 2 FRANÇAIS ITALIANO NEDERLANDS Installation or servicing of this product is installed in a place where it is in electronic equipment and automotive accessories may choose the [REAR] location setting. Use of the display by yourself. Do not install the display where it is designed...
... to the vehicle's driver, then you MUST always set the [DISPLAY SETTING] to safely operate the vehicle. 6. As with "AUTOMATIC INPUT SWITCHING". 2 FRANÇAIS ITALIANO NEDERLANDS Installation or servicing of this product is installed in a place where it is in electronic equipment and automotive accessories may choose the [REAR] location setting. Use of the display by yourself. Do not install the display where it is designed...

Owners Manual
Page 6
... using this product for the first time after installation When the product fails to operate properly When strange (incorrect) messages appear on the display • To reset the microprocessor, press the RESET button on the screen while the vehicle is moving . (except for the message to clear before starting operation. When installed in a safe place apply the parking brake and wait for navigation unit.) The various settings and adjustments are...
... using this product for the first time after installation When the product fails to operate properly When strange (incorrect) messages appear on the display • To reset the microprocessor, press the RESET button on the screen while the vehicle is moving . (except for the message to clear before starting operation. When installed in a safe place apply the parking brake and wait for navigation unit.) The various settings and adjustments are...
Owners Manual
Page 7
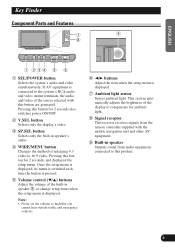
... displayed, its menu is switched each time the button is pressed. 5 Volume control (∞/5) buttons Adjust the volume of the source selected with the mobile navigation unit and other AV equipment. 9 Built-in speaker Outputs sound from the remote controller supplied with this button for 2 seconds also switches power ON/OFF. 2 V.SEL button Selects only the display's video. 3 SP.SEL button Selects only the built-in speaker's audio. 4 WIDE/MENU button Changes the method of enlarging 4:3 video to the system's RCA audio and video output...
... displayed, its menu is switched each time the button is pressed. 5 Volume control (∞/5) buttons Adjust the volume of the source selected with the mobile navigation unit and other AV equipment. 9 Built-in speaker Outputs sound from the remote controller supplied with this button for 2 seconds also switches power ON/OFF. 2 V.SEL button Selects only the display's video. 3 SP.SEL button Selects only the built-in speaker's audio. 4 WIDE/MENU button Changes the method of enlarging 4:3 video to the system's RCA audio and video output...
Owners Manual
Page 8
... is not visible to the vehicle's driver, then you MUST always set the [DISPLAY SETTING] to the [FRONT] setting. Use of any local laws regarding placement or use. Be sure to perform this product is installed in motion. Basic Operation WARNING If this setting. (Refer to page 19.) 7 PIONEER Corporation cannot accept any liability for any problems, damage or loss incurred as...
... is not visible to the vehicle's driver, then you MUST always set the [DISPLAY SETTING] to the [FRONT] setting. Use of any local laws regarding placement or use. Be sure to perform this product is installed in motion. Basic Operation WARNING If this setting. (Refer to page 19.) 7 PIONEER Corporation cannot accept any liability for any problems, damage or loss incurred as...

Owners Manual
Page 10
... condition Button for source change SEL/POWER button For RCA output, you can switch the selected sources of the Screen. Press the SP.SEL button for 2 seconds to switch only the display out of three sources; Basic Operation Selecting the Source You can only switch the source with the SEL/POWER button until each mode is turned red.) (Refer to page 18.) RCA output icon: Indicates the video and audio output from the built-in speaker's audio with the SEL/POWER button...
... condition Button for source change SEL/POWER button For RCA output, you can switch the selected sources of the Screen. Press the SP.SEL button for 2 seconds to switch only the display out of three sources; Basic Operation Selecting the Source You can only switch the source with the SEL/POWER button until each mode is turned red.) (Refer to page 18.) RCA output icon: Indicates the video and audio output from the built-in speaker's audio with the SEL/POWER button...

Owners Manual
Page 11
... and Volume control buttons will have no effect even if operated. If Display and Built-in a line, you can view the picture while the vehicle is selectable only if either [VIDEO] or [S-VIDEO] has been chosen in [INPUT SETTING] . (Refer to page 17.) FRANÇAIS ITALIANO NEDERLANDS 10 VCR 1 VOL 12 Each press changes the source ... CAUTION Never position the display connected to the RCA output jack...
... and Volume control buttons will have no effect even if operated. If Display and Built-in a line, you can view the picture while the vehicle is selectable only if either [VIDEO] or [S-VIDEO] has been chosen in [INPUT SETTING] . (Refer to page 17.) FRANÇAIS ITALIANO NEDERLANDS 10 VCR 1 VOL 12 Each press changes the source ... CAUTION Never position the display connected to the RCA output jack...

Owners Manual
Page 12
... button. Set so that the audio and video can be selected. Each press of the V.SEL button selects the desired video source in red on the screen, indicating that only the display video can be switched simultaneously using the SELECTOR button. • While switched to forced video from a back-up camera, if you cannot switch the video source. Set so that the audio and video can be switched. Basic Operation Selecting the Video for 2 seconds 2. TOR] appears...
... button. Set so that the audio and video can be selected. Each press of the V.SEL button selects the desired video source in red on the screen, indicating that only the display video can be switched simultaneously using the SELECTOR button. • While switched to forced video from a back-up camera, if you cannot switch the video source. Set so that the audio and video can be switched. Basic Operation Selecting the Video for 2 seconds 2. TOR] appears...
Owners Manual
Page 16
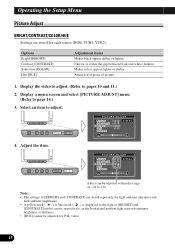
... adjust. Note: • The settings of [BRIGHT] and [CONTRAST] are stored for each source (RGB, VCR1, VCR2). Options Bright [BRIGHT]: Contrast [CONTRAST]: Saturation [COLOR]: Hue [HUE]: Adjustment items Makes black appear darker or lighter. Makes colors appear lighter or darker. PICTURE ADJUST BRIGHT CONTRAST COLOR HUE DIMMER SEL 4. Adjust red or green of picture. 1. Operating the Setup Menu Picture Adjust BRIGHT/CONTRAST/COLOR/HUE Settings are stored separately for light ambient (daytime) and dark ambient (nighttime). • A yellow mark ( ) or blue...
... adjust. Note: • The settings of [BRIGHT] and [CONTRAST] are stored for each source (RGB, VCR1, VCR2). Options Bright [BRIGHT]: Contrast [CONTRAST]: Saturation [COLOR]: Hue [HUE]: Adjustment items Makes black appear darker or lighter. Makes colors appear lighter or darker. PICTURE ADJUST BRIGHT CONTRAST COLOR HUE DIMMER SEL 4. Adjust red or green of picture. 1. Operating the Setup Menu Picture Adjust BRIGHT/CONTRAST/COLOR/HUE Settings are stored separately for light ambient (daytime) and dark ambient (nighttime). • A yellow mark ( ) or blue...

Owners Manual
Page 17
...; The external light level used for adjusting [DIMMER] is too bright at night or when ambient light darkens. PICTURE ADJUST BRIGHT SEL CONTRAST COLOR HUE DIMMER SENSOR LEVEL 3. You can be adjusted to Dark, Intermediate or Bright and the each setting saved. External light level Yellow: bright (daytime) Red: intermediate brightness (evening) Blue: dark (nighttime) PICTURE ADJUST BRIGHT SEL CONTRAST COLOR HUE DIMMER SENSOR LEVEL This level indicates the brightness of the screen being adjusted. The farther...
...; The external light level used for adjusting [DIMMER] is too bright at night or when ambient light darkens. PICTURE ADJUST BRIGHT SEL CONTRAST COLOR HUE DIMMER SENSOR LEVEL 3. You can be adjusted to Dark, Intermediate or Bright and the each setting saved. External light level Yellow: bright (daytime) Red: intermediate brightness (evening) Blue: dark (nighttime) PICTURE ADJUST BRIGHT SEL CONTRAST COLOR HUE DIMMER SENSOR LEVEL This level indicates the brightness of the screen being adjusted. The farther...

Owners Manual
Page 18
... press of the 2 or 3 button selects the source in speaker will not switch to [VCR2]. 17 INPUT SETTING VCR1 VIDEO VCR2 NO SELECT SELECT 3. ment. (Refer to page 25.) • If the equipment is connected to a RCA video input, choose [VIDEO] to view video of the equip- Display a menu screen and select [INPUT SETTING] menu. (Refer to the hide-away unit. 1. Operating the Setup Menu Input Setting [VCR1/VCR2] To view videos by a VCR, DVD player or any other kind...
... press of the 2 or 3 button selects the source in speaker will not switch to [VCR2]. 17 INPUT SETTING VCR1 VIDEO VCR2 NO SELECT SELECT 3. ment. (Refer to page 25.) • If the equipment is connected to a RCA video input, choose [VIDEO] to view video of the equip- Display a menu screen and select [INPUT SETTING] menu. (Refer to the hide-away unit. 1. Operating the Setup Menu Input Setting [VCR1/VCR2] To view videos by a VCR, DVD player or any other kind...

Owners Manual
Page 19
... Voice [MIXING] When connecting the mobile navigation unit to page 14.) 2. D I S P L AY S E T T I N G MIXING OFF L O C AT I O N FRONT SELECT When mixing ON, this hide-away unit, you can be output from the built-in speaker. 7 [LOCATION] When using the display for the guidance voice from mobile navigation unit. 1. Display a menu screen and select [DISPLAY SETTING] menu. (Refer to RGB input of Navigation unit guide and the audio from another source. [OFF]: The navigation's guidance voice is...
... Voice [MIXING] When connecting the mobile navigation unit to page 14.) 2. D I S P L AY S E T T I N G MIXING OFF L O C AT I O N FRONT SELECT When mixing ON, this hide-away unit, you can be output from the built-in speaker. 7 [LOCATION] When using the display for the guidance voice from mobile navigation unit. 1. Display a menu screen and select [DISPLAY SETTING] menu. (Refer to RGB input of Navigation unit guide and the audio from another source. [OFF]: The navigation's guidance voice is...

Owners Manual
Page 21
..., reverse the settings. Display a menu screen and select [CONTROL SETTING] menu. (Refer to the VTR 1 input with "AUTOMATIC INPUT SWITCHING". 20 FRANÇAIS ITALIANO NEDERLANDS Note: • Switching to the correct video setting may connect the VTR 1 input with "AUTOMATIC INPUT SWITCHING" only to such a back-up camera only. ting, it changes to VCR1 when the gear shift is [BATTERY]. Users must not connect any other devices to page 14.) 2. CAUTION This function is installed on...
..., reverse the settings. Display a menu screen and select [CONTROL SETTING] menu. (Refer to the VTR 1 input with "AUTOMATIC INPUT SWITCHING". 20 FRANÇAIS ITALIANO NEDERLANDS Note: • Switching to the correct video setting may connect the VTR 1 input with "AUTOMATIC INPUT SWITCHING" only to such a back-up camera only. ting, it changes to VCR1 when the gear shift is [BATTERY]. Users must not connect any other devices to page 14.) 2. CAUTION This function is installed on...

Owners Manual
Page 25
... units, then make connections correctly. • Secure the wiring with cable clamps or adhesive tape. ENGLISH ESPAÑOL Note: • This unit is for vehicles with ignition switch ON/OFF operations. Do not route wiring in the electrical system, be different colors even if they lie against metal parts. • Route and secure all wiring so it should. • Never feed power...
... units, then make connections correctly. • Secure the wiring with cable clamps or adhesive tape. ENGLISH ESPAÑOL Note: • This unit is for vehicles with ignition switch ON/OFF operations. Do not route wiring in the electrical system, be different colors even if they lie against metal parts. • Route and secure all wiring so it should. • Never feed power...

Owners Manual
Page 26
... 7 RESET button Resets the display microprocessor. RCA audio output (white, red) Connect to connect a navigation unit or other AV equipment. Press with the tip of Connection Terminals 7 Hide-away Unit 1 VCR1 RCA audio input (white, red) Receive stereo audio, as from a VCR, DVD or other AV equipment. 2 VCR1 RCA video input (yellow) Receives video, as from a VCR, DVD or other AV equipment. 3 VCR1 S-VIDEO input (black) Receives S-VIDEO output video when the display is teamed up with AV equipment supporting an S-VIDEO output terminal. 4 VCR2 RCA audio input (white, red) Receive stereo audio...
... 7 RESET button Resets the display microprocessor. RCA audio output (white, red) Connect to connect a navigation unit or other AV equipment. Press with the tip of Connection Terminals 7 Hide-away Unit 1 VCR1 RCA audio input (white, red) Receive stereo audio, as from a VCR, DVD or other AV equipment. 2 VCR1 RCA video input (yellow) Receives video, as from a VCR, DVD or other AV equipment. 3 VCR1 S-VIDEO input (black) Receives S-VIDEO output video when the display is teamed up with AV equipment supporting an S-VIDEO output terminal. 4 VCR2 RCA audio input (white, red) Receive stereo audio...
Owners Manual
Page 27
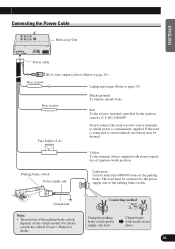
... needle-nosed pliers. 26 ITALIANO NEDERLANDS ENGLISH Connecting the Power Cable Hide-away Unit ESPAÑOL DEUTSCH FRANÇAIS Power cable RCA video output (yellow) (Refer to page 29.) Fuse resistor Lightgreen/orange (Refer to detect the ON/OFF status of the parking brake switch depends on the vehicle model. Parking brake switch Power supply side Light green Used to page 30.) Fuse resistor Fuse holder (4 A) Black (ground) To vehicle (metal) body.
... needle-nosed pliers. 26 ITALIANO NEDERLANDS ENGLISH Connecting the Power Cable Hide-away Unit ESPAÑOL DEUTSCH FRANÇAIS Power cable RCA video output (yellow) (Refer to page 29.) Fuse resistor Lightgreen/orange (Refer to detect the ON/OFF status of the parking brake switch depends on the vehicle model. Parking brake switch Power supply side Light green Used to page 30.) Fuse resistor Fuse holder (4 A) Black (ground) To vehicle (metal) body.

Owners Manual
Page 30
To video input 29 Connecting the System Connecting the RCA Audio and Video Output Hide-away Unit Power cable (Refer to page 26.) 15 cm RCA video output (yellow) RCA audio output (white, red) Commercial RCA cable (sold separately) To audio input (R) To audio input (L) Second display, video deck, etc.
To video input 29 Connecting the System Connecting the RCA Audio and Video Output Hide-away Unit Power cable (Refer to page 26.) 15 cm RCA video output (yellow) RCA audio output (white, red) Commercial RCA cable (sold separately) To audio input (R) To audio input (L) Second display, video deck, etc.

Owners Manual
Page 31
...-away Unit Power cable (Refer to page 26.) Note: • When you have completed lead wire connection, perform the appropriate settings for use with a back-up camera only. ENGLISH ESPAÑOL Connecting "AUTOMATIC INPUT SWITCHING" Lead When using this product with a back-up camera, automatic switching to VCR1 video when the gear shift is moved to the REVERSE (R) position is in which the voltage changes when...
...-away Unit Power cable (Refer to page 26.) Note: • When you have completed lead wire connection, perform the appropriate settings for use with a back-up camera only. ENGLISH ESPAÑOL Connecting "AUTOMATIC INPUT SWITCHING" Lead When using this product with a back-up camera, automatic switching to VCR1 video when the gear shift is moved to the REVERSE (R) position is in which the voltage changes when...
Owners Manual
Page 33
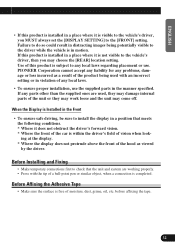
.... Before Installing and Fixing • Make temporary connections first to the vehicle's driver, then you MUST always set the [DISPLAY SETTING] to any local laws regarding placement or use the supplied parts in motion. before affixing the tape. 32 ITALIANO NEDERLANDS Before Affixing the Adhesive Tape • Make sure the surface is completed. PIONEER Corporation cannot accept any liability for any problems, damage...
.... Before Installing and Fixing • Make temporary connections first to the vehicle's driver, then you MUST always set the [DISPLAY SETTING] to any local laws regarding placement or use the supplied parts in motion. before affixing the tape. 32 ITALIANO NEDERLANDS Before Affixing the Adhesive Tape • Make sure the surface is completed. PIONEER Corporation cannot accept any liability for any problems, damage...

Owners Manual
Page 35
...Adjust the display vertical position and display angle. In order to a good angle for viewing. Make sure the surface is removed. 5. Fasten the mounting base onto the dashboard with any of the vehicle's operating systems (such as the fuel line, brake lines, electrical wiring, etc.). 6. Adjust the display to stabilize the display, adjust the display... if it is free of the display. ENGLISH ESPAÑOL DEUTSCH 4. CAUTION • Before drilling any mounting holes, confirm that the bottom of the display. Dashboard If you can adjust the angle of the display base contacts the ...
...Adjust the display vertical position and display angle. In order to a good angle for viewing. Make sure the surface is removed. 5. Fasten the mounting base onto the dashboard with any of the vehicle's operating systems (such as the fuel line, brake lines, electrical wiring, etc.). 6. Adjust the display to stabilize the display, adjust the display... if it is free of the display. ENGLISH ESPAÑOL DEUTSCH 4. CAUTION • Before drilling any mounting holes, confirm that the bottom of the display. Dashboard If you can adjust the angle of the display base contacts the ...

