Owner's Manual
Page 4
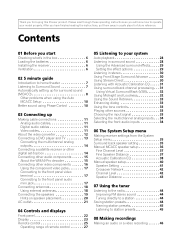
...46 Please read through these operating instructions so you start Checking what's in the box 6 Loading the batteries 6 Installing the receiver 6 Ventilation 6 02 5 minute guide Introduction to home theater 7 Listening to Surround Sound 7 Automatically setting up for surround...34 Selecting the front audio inputs 34 06 The System Setup menu Making receiver settings from the System Setup menu 35 Surround back speaker setting 35 Manual MCACC speaker setup 36 Fine Channel Level 37 Fine Speaker Distance 37 ... a safe place for future reference. After you for buying this Pioneer product.
...46 Please read through these operating instructions so you start Checking what's in the box 6 Loading the batteries 6 Installing the receiver 6 Ventilation 6 02 5 minute guide Introduction to home theater 7 Listening to Surround Sound 7 Automatically setting up for surround...34 Selecting the front audio inputs 34 06 The System Setup menu Making receiver settings from the System Setup menu 35 Surround back speaker setting 35 Manual MCACC speaker setup 36 Fine Channel Level 37 Fine Speaker Distance 37 ... a safe place for future reference. After you for buying this Pioneer product.
Owner's Manual
Page 7
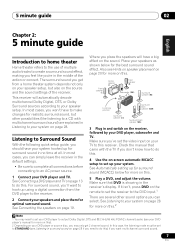
...options you don't know how to do this ). 2 Depending on your DVD player or source disc, you get from the DVD player to the receiver. 2 Connect your system hooked up using a digital connection from a home theater system depends not only on your DVD player, subwoofer and TV. Listening...the default settings. • Be sure to make changes for realistic surround sound, but also on page 19. Check the manual that DVD is showing in the receiver's display. Make sure that came with multichannel surround sound) are several other possibilities (like you're in no time at all...
...options you don't know how to do this ). 2 Depending on your DVD player or source disc, you get from the DVD player to the receiver. 2 Connect your system hooked up using a digital connection from a home theater system depends not only on your DVD player, subwoofer and TV. Listening...the default settings. • Be sure to make changes for realistic surround sound, but also on page 19. Check the manual that DVD is showing in the receiver's display. Make sure that came with multichannel surround sound) are several other possibilities (like you're in no time at all...
Owner's Manual
Page 8
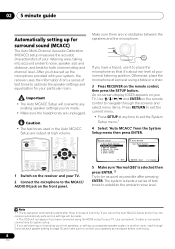
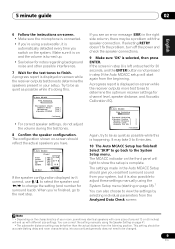
...your front speakers, or setting up a separate speaker system in the Auto MCACC Setup are unplugged. System Setup 1.Surr Back System 2.Auto MCACC 3.Manual MCACC 4.Manual SP Setup 5.Input Assign 6.Other Setup 2. The system outputs a series of test tones to exit the System Setup menu.1 4 Select 'Auto MCACC... pressing ENTER. Important • The Auto MCACC Setup will not appear if you have connected using a table or a chair. 3 Press RECEIVER on the receiver and your TV. 2 Connect the microphone to be made . • Make sure the headphones are output at any time to establish the...
...your front speakers, or setting up a separate speaker system in the Auto MCACC Setup are unplugged. System Setup 1.Surr Back System 2.Auto MCACC 3.Manual MCACC 4.Manual SP Setup 5.Input Assign 6.Other Setup 2. The system outputs a series of test tones to exit the System Setup menu.1 4 Select 'Auto MCACC... pressing ENTER. Important • The Auto MCACC Setup will not appear if you have connected using a table or a chair. 3 Press RECEIVER on the receiver and your TV. 2 Connect the microphone to be made . • Make sure the headphones are output at any time to establish the...
Owner's Manual
Page 9
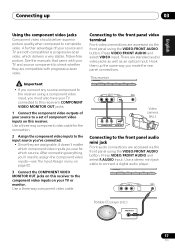
... Surround Analyzing Speaker System [ ] Speaker Distance [ ] Channel Level [ ] Acoustic Cal EQ [ ] :Cancel Again, try to determine the optimum receiver settings for surround back). When you see an error message (ERR) in step 9 the Auto MCACC setup will light to the next step. This... setting manually using a subwoofer, it is selected, then press ENTER. A progress report is turned up with the speaker connection. Try to view the settings by selecting individual parameters from the Analyzed Data Check screen: Note 1 • Depending on -screen while the receiver outputs ...
... Surround Analyzing Speaker System [ ] Speaker Distance [ ] Channel Level [ ] Acoustic Cal EQ [ ] :Cancel Again, try to determine the optimum receiver settings for surround back). When you see an error message (ERR) in step 9 the Auto MCACC setup will light to the next step. This... setting manually using a subwoofer, it is selected, then press ENTER. A progress report is turned up with the speaker connection. Try to view the settings by selecting individual parameters from the Analyzed Data Check screen: Note 1 • Depending on -screen while the receiver outputs ...
Owner's Manual
Page 17
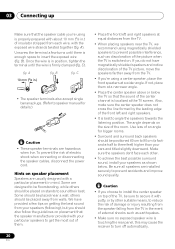
... the component video inputs on this receiver's COMPONENT VIDEO MONITOR OUT jacks. 1 Connect the component video outputs of your source to a set of component video inputs on your TV or monitor. See the manuals that came with your TV and source component to check whether they are accessed via the front panel...
... the component video inputs on this receiver's COMPONENT VIDEO MONITOR OUT jacks. 1 Connect the component video outputs of your source to a set of component video inputs on your TV or monitor. See the manuals that came with your TV and source component to check whether they are accessed via the front panel...
Owner's Manual
Page 20
... These speaker terminals are usually designed with a particular placement in .) • The speaker terminals also accept single banana plugs. (Refer to speaker manual for bigger rooms. • Surround and surround back speakers should be positioned 60 cm to 90 cm (a footand-a-half to three feet) higher than... event of external shocks such as earthquakes. • Make sure no exposed speaker wire is touching the rear panel, this may cause the receiver to turn off automatically. B). Once the wire is in position, tighten the terminal until there is enough space to insert the exposed wire ...
... These speaker terminals are usually designed with a particular placement in .) • The speaker terminals also accept single banana plugs. (Refer to speaker manual for bigger rooms. • Surround and surround back speakers should be positioned 60 cm to 90 cm (a footand-a-half to three feet) higher than... event of external shocks such as earthquakes. • Make sure no exposed speaker wire is touching the rear panel, this may cause the receiver to turn off automatically. B). Once the wire is in position, tighten the terminal until there is enough space to insert the exposed wire ...
Owner's Manual
Page 33
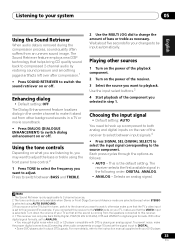
... are selected (except when STEREO is selected using the front panel tone control.2 1 Press TONE to select the frequency you connected this receiver (For example, if you want to watch, otherwise make sure that all the sound is the default setting. With other digital signal formats...• Press DIALOG (DIALOGUE ENHANCEMENT) to switch dialog enhancement on or off . For more details, refer to the instruction manual supplied with DTS is selected). The receiver selects the first available signal in the following order: DIGITAL; Wait about five seconds for your DVD player. 33 En Each...
... are selected (except when STEREO is selected using the front panel tone control.2 1 Press TONE to select the frequency you connected this receiver (For example, if you want to watch, otherwise make sure that all the sound is the default setting. With other digital signal formats...• Press DIALOG (DIALOGUE ENHANCEMENT) to switch dialog enhancement on or off . For more details, refer to the instruction manual supplied with DTS is selected). The receiver selects the first available signal in the following order: DIGITAL; Wait about five seconds for your DVD player. 33 En Each...
Owner's Manual
Page 35
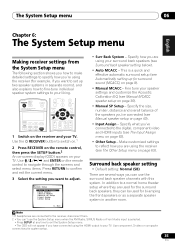
...Acoustic Calibration EQ (see Manual MCACC speaker setup on the remote control to navigate through the screens and select menu items. Press RETURN to confirm and exit the current menu. 3 Select the setting you 've connected (see Manual speaker setup on the receiver and your TV. System ...Setup 1.Surr Back System 2.Auto MCACC 3.Manual MCACC 4.Manual SP Setup 5.Input Assign 6.Other Setup • Surr Back System - Specify the size, number,...
...Acoustic Calibration EQ (see Manual MCACC speaker setup on the remote control to navigate through the screens and select menu items. Press RETURN to confirm and exit the current menu. 3 Select the setting you 've connected (see Manual speaker setup on the receiver and your TV. System ...Setup 1.Surr Back System 2.Auto MCACC 3.Manual MCACC 4.Manual SP Setup 5.Input Assign 6.Other Setup • Surr Back System - Specify the size, number,...
Owner's Manual
Page 36
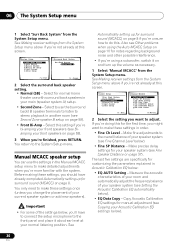
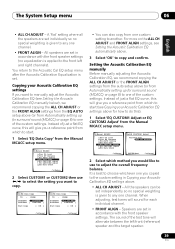
...; EQ Data Copy - Copy Acoustic Calibration EQ settings for the first time, you 're not already at this screen. See Making receiver settings from the System Setup menu above if you 're finished, press RETURN. The last five settings are specifically for your normal listening... 4.Manual SP Setup 5.Input Assign 6.Other Setup 1.Surround Back System Surr Back System Normal (SB) ] : Exit : Finish 2 Select the surround back speaker setting. • Normal (SB) - Select this setting if you should have to connect the setup microphone to adjust. See Making receiver settings ...
...; EQ Data Copy - Copy Acoustic Calibration EQ settings for the first time, you 're not already at this screen. See Making receiver settings from the System Setup menu above if you 're finished, press RETURN. The last five settings are specifically for your normal listening... 4.Manual SP Setup 5.Input Assign 6.Other Setup 1.Surround Back System Surr Back System Normal (SB) ] : Exit : Finish 2 Select the surround back speaker setting. • Normal (SB) - Select this setting if you should have to connect the setup microphone to adjust. See Making receiver settings ...
Owner's Manual
Page 37
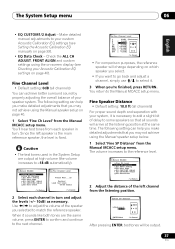
... comparison purposes, the reference speaker will arrive at the listening position at high volume (the volume increases to the Manual MCACC setup menu. You return to -18 dB automatically). 3.Manual MCACC a.Fine Ch Level b.Fine SP Distance c.EQ AUTO Setting d.EQ Data Copy e.EQ CUSTOM1 Adjust f .EQ... the on-screen display (see Checking your custom Acoustic Calibration EQ settings (see Setting the Acoustic Calibration EQ manually on page 40. 1 Select 'Fine Ch Level' from the Manual MCACC setup menu. The volume increases to match the reference speaker. When it . 3 When you selected...
... comparison purposes, the reference speaker will arrive at the listening position at high volume (the volume increases to the Manual MCACC setup menu. You return to -18 dB automatically). 3.Manual MCACC a.Fine Ch Level b.Fine SP Distance c.EQ AUTO Setting d.EQ Data Copy e.EQ CUSTOM1 Adjust f .EQ... the on-screen display (see Checking your custom Acoustic Calibration EQ settings (see Setting the Acoustic Calibration EQ manually on page 40. 1 Select 'Fine Ch Level' from the Manual MCACC setup menu. The volume increases to match the reference speaker. When it . 3 When you selected...
Owner's Manual
Page 38
...Speaker YES/NO [ ] 3c.EQ AUTO Setting Now Analyzing Surround Analyzing Channel Level [ ] Acoustic Cal EQ [ ] :Cancel :Cancel As the receiver outputs test tones, the frequency balance is automatically detected every time you selected to adjust the delay of you 're finished, press RETURN. Use ... settings are arriving simultaneously at each channel in terms of your room and neutralizing the ambient characteristics that suits your settings manually, you have already completed Automatically setting up , press ENTER to confirm and continue to make the two tones sound as...
...Speaker YES/NO [ ] 3c.EQ AUTO Setting Now Analyzing Surround Analyzing Channel Level [ ] Acoustic Cal EQ [ ] :Cancel :Cancel As the receiver outputs test tones, the frequency balance is automatically detected every time you selected to adjust the delay of you 're finished, press RETURN. Use ... settings are arriving simultaneously at each channel in terms of your room and neutralizing the ambient characteristics that suits your settings manually, you have already completed Automatically setting up , press ENTER to confirm and continue to make the two tones sound as...
Owner's Manual
Page 39
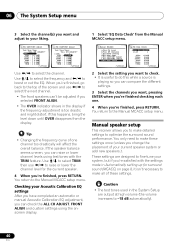
...alternate between the left and right channels). For more on the ALL CH ADJUST and FRONT ALIGN settings, see Setting the Acoustic Calibration EQ manually below), we recommend copying the ALL CH ADJUST or the FRONT ALIGN settings from the auto setup above (or from Automatically setting up for...to one of just a flat EQ curve, this will give you a reference point from which to start . 1 Select 'EQ Data Copy' from the Manual MCACC setup menu. 3.Manual MCACC a.Fine Ch Level b.Fine SP Distance c.EQ AUTO Setting d.EQ Data Copy e.EQ CUSTOM1 Adjust f .EQ CUSTOM2 Adjust g.EQ Data Check :Return...
...alternate between the left and right channels). For more on the ALL CH ADJUST and FRONT ALIGN settings, see Setting the Acoustic Calibration EQ manually below), we recommend copying the ALL CH ADJUST or the FRONT ALIGN settings from the auto setup above (or from Automatically setting up for...to one of just a flat EQ curve, this will give you a reference point from which to start . 1 Select 'EQ Data Copy' from the Manual MCACC setup menu. 3.Manual MCACC a.Fine Ch Level b.Fine SP Distance c.EQ AUTO Setting d.EQ Data Copy e.EQ CUSTOM1 Adjust f .EQ CUSTOM2 Adjust g.EQ Data Check :Return...
Owner's Manual
Page 40
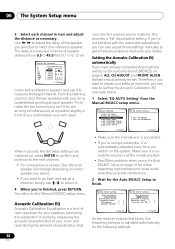
... adjusted if you selected FRONT ALIGN. • The OVER indicator shows in the display if the frequency adjustment is too drastic and might distort. Manual speaker setup This receiver allows you to make these settings. Caution • The test tones used in Automatically setting up for the current speaker. 4 When you're...
... adjusted if you selected FRONT ALIGN. • The OVER indicator shows in the display if the frequency adjustment is too drastic and might distort. Manual speaker setup This receiver allows you to make these settings. Caution • The test tones used in Automatically setting up for the current speaker. 4 When you're...
Owner's Manual
Page 41
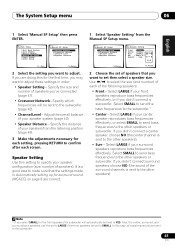
...In this setting to specify your speaker system (page 42). • Speaker Distance - System Setup 1.Surr Back System 2.Auto MCACC 3.Manual MCACC 4.Manual SP Setup 5.Input Assign 6.Other Setup 4.Manual SP Setup a.Speaker Setting b.Crossover Network c.Channel Level d.Speaker Distance : Exit :Return 2 Select the setting you didn't connect a center... sound of the surround channels is sent to the other speakers or subwoofer. Select LARGE if your speakers from the Manual SP Setup menu. English Deutsch Français Italiano Nederlands Español The System Setup menu 06 1 Select...
...In this setting to specify your speaker system (page 42). • Speaker Distance - System Setup 1.Surr Back System 2.Auto MCACC 3.Manual MCACC 4.Manual SP Setup 5.Input Assign 6.Other Setup 4.Manual SP Setup a.Speaker Setting b.Crossover Network c.Channel Level d.Speaker Distance : Exit :Return 2 Select the setting you didn't connect a center... sound of the surround channels is sent to the other speakers or subwoofer. Select LARGE if your speakers from the Manual SP Setup menu. English Deutsch Français Italiano Nederlands Español The System Setup menu 06 1 Select...
Owner's Manual
Page 42
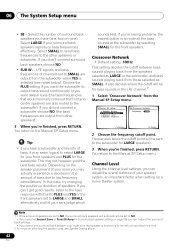
...surround back speakers you 're having problems, the easiest option is to route all the bass sounds to SMALL are output from the Manual SP Setup menu. 4.Manual SP Setup a.Speaker Setting b.Crossover Network c.Channel Level d.Speaker Distance 4b.Crossover Network Frequency 80Hz :Return :Finish 2 Choose the frequency..., make sure that would normally come out the front and center speakers are also routed to low frequency cancellations. You return to the Manual SP Setup menu. Note 1 • If the surround speakers are set to LARGE and SMALL alternatively and let your speaker system, ...
...surround back speakers you 're having problems, the easiest option is to route all the bass sounds to SMALL are output from the Manual SP Setup menu. 4.Manual SP Setup a.Speaker Setting b.Crossover Network c.Channel Level d.Speaker Distance 4b.Crossover Network Frequency 80Hz :Return :Finish 2 Choose the frequency..., make sure that would normally come out the front and center speakers are also routed to low frequency cancellations. You return to the Manual SP Setup menu. Note 1 • If the surround speakers are set to LARGE and SMALL alternatively and let your speaker system, ...
Owner's Manual
Page 43
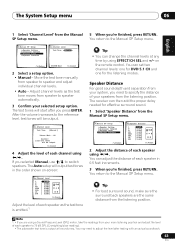
... press RETURN. The System Setup menu 06 English Deutsch Français Italiano Nederlands Español 1 Select 'Channel Level' from the Manual 5 When you are the same distance from the listening position. SP Setup menu. You return to switch speakers. If you press ENTER....specify the distance of each speaker using /. The receiver can set two channel levels: one for DVD 5.1 CH and one for effective surround sound. 1 Select 'Speaker Distance' from the Manual SP Setup menu. 4.Manual SP Setup a.Speaker Setting b.Crossover Network c.Channel Level d.Speaker ...
... press RETURN. The System Setup menu 06 English Deutsch Français Italiano Nederlands Español 1 Select 'Channel Level' from the Manual 5 When you are the same distance from the listening position. SP Setup menu. You return to switch speakers. If you press ENTER....specify the distance of each speaker using /. The receiver can set two channel levels: one for DVD 5.1 CH and one for effective surround sound. 1 Select 'Speaker Distance' from the Manual SP Setup menu. 4.Manual SP Setup a.Speaker Setting b.Crossover Network c.Channel Level d.Speaker ...
Owner's Manual
Page 44
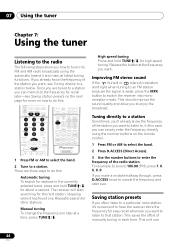
...to 106.00 (FM), press 1, 0, 6, 0, 0. For example, to tune to switch the receiver into mono reception mode. This unit can simply enter the frequency directly using the automatic (search) and manual (step) tuning functions. Tuning directly to a station Sometimes, you'll already know the frequency of ...Automatic tuning To search for stations in each time. There are tuned to a station you want . The receiver will start over. Repeat to enter the frequency of manually tuning in the currently selected band, press and hold TUNE/ for easy recall whenever you can ...
...to 106.00 (FM), press 1, 0, 6, 0, 0. For example, to tune to switch the receiver into mono reception mode. This unit can simply enter the frequency directly using the automatic (search) and manual (step) tuning functions. Tuning directly to a station Sometimes, you'll already know the frequency of ...Automatic tuning To search for stations in each time. There are tuned to a station you want . The receiver will start over. Repeat to enter the frequency of manually tuning in the currently selected band, press and hold TUNE/ for easy recall whenever you can ...
Owner's Manual
Page 46
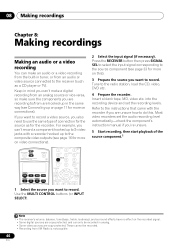
... from the built-in tuner, or from an audio or video source connected to the receiver (such as for the recorder. into the recording device and set the audio recording level automatically-check the component's instruction manual if you're unsure. 5 Start recording, then start playback of connection for the source as...
... from the built-in tuner, or from an audio or video source connected to the receiver (such as for the recorder. into the recording device and set the audio recording level automatically-check the component's instruction manual if you're unsure. 5 Start recording, then start playback of connection for the source as...
Owner's Manual
Page 55
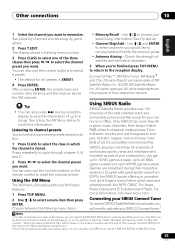
...for all , it down in which uniquely identifies your car, home or office. Entertainment Radio. For more than 55 channels of this manual. The label will have located the SID, write it 's completely commercial-free. Other connections 10 English Deutsch Français Italiano ...Playlist are broadcast during reception display to save the information of up to select channels you want. Connecting your SIRIUS Connect Tuner To receive SIRIUS Satellite Radio broadcasts, you will need to activate your SIRIUS Connect tuner.1 Note 1 In order to activate your radio subscription, ...
...for all , it down in which uniquely identifies your car, home or office. Entertainment Radio. For more than 55 channels of this manual. The label will have located the SID, write it 's completely commercial-free. Other connections 10 English Deutsch Français Italiano ...Playlist are broadcast during reception display to save the information of up to select channels you want. Connecting your SIRIUS Connect Tuner To receive SIRIUS Satellite Radio broadcasts, you will need to activate your SIRIUS Connect tuner.1 Note 1 In order to activate your radio subscription, ...
Owner's Manual
Page 60
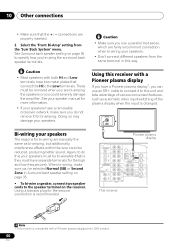
... a banana plug for the second connection is they must be reduced, producing better sound. Using this receiver with a Pioneer plasma display If you have a Pioneer plasma display1, you 've selected Normal (SB) or Second Zone in this way. These must have two metal plates that connect the ...Hi to the Low terminals. See your speaker manual for more information. • If your speakers have a removable crossover network, make ...
... a banana plug for the second connection is they must be reduced, producing better sound. Using this receiver with a Pioneer plasma display If you have a Pioneer plasma display1, you 've selected Normal (SB) or Second Zone in this way. These must have two metal plates that connect the ...Hi to the Low terminals. See your speaker manual for more information. • If your speakers have a removable crossover network, make ...


