Technical Manual
Page 1
...or stacked be performed by experienced, qualified experts. Verify that installation will be sure to take measures to prevent any danger of the panel(s) falling down or fall over . • Choose an installation or attachment location that has sufficient strength to fully withstand its weight... to the power or connection cords, take adequate safety measures. TECHNICAL MANUAL (Ver. 1.1) FOR PIONEER PLASMA DISPLAY MONITOR WHEN USED WITH VIDEO CARDS (EXPANSION SOLUTIONS CARDS) PLASMA DISPLAY MONITOR: PDP-607CMX VIDEO CARD: PDA-5003 / PDA-5004 TABLE TOP STAND: PDK-TS26 WALL MOUNT UNIT: PDK...
...or stacked be performed by experienced, qualified experts. Verify that installation will be sure to take measures to prevent any danger of the panel(s) falling down or fall over . • Choose an installation or attachment location that has sufficient strength to fully withstand its weight... to the power or connection cords, take adequate safety measures. TECHNICAL MANUAL (Ver. 1.1) FOR PIONEER PLASMA DISPLAY MONITOR WHEN USED WITH VIDEO CARDS (EXPANSION SOLUTIONS CARDS) PLASMA DISPLAY MONITOR: PDP-607CMX VIDEO CARD: PDA-5003 / PDA-5004 TABLE TOP STAND: PDK-TS26 WALL MOUNT UNIT: PDK...

Technical Manual
Page 2
... 58 4.3.8 Connection to INPUT3 58 4.3.9 Connection to INPUT4 58 4.3.10 About DTV set top box connection 59 4.3.11 Audio connections 60 4.4 Table Top Stand: PDK-TS26 64 4.4.1 Specifications 64 4.4.2 Installation coordinates for screws used to attach the stand to a surface... 70 4.6 Speaker System: PDP-S55-LR 72 4.6.1 Specifications 72 4.6.2 External Dimensions 73 4.6.3 Installation on the Plasma Display 74 2 BEFORE BEGINNING ADJUSTMENT/SETTING 5.1 Before Beginning Adjustment 78 5.1.1 Operation Mode 78 5.1.2 Combined Use of the Remote Control, Main-control Panel, and RS-232C Commands...
... 58 4.3.8 Connection to INPUT3 58 4.3.9 Connection to INPUT4 58 4.3.10 About DTV set top box connection 59 4.3.11 Audio connections 60 4.4 Table Top Stand: PDK-TS26 64 4.4.1 Specifications 64 4.4.2 Installation coordinates for screws used to attach the stand to a surface... 70 4.6 Speaker System: PDP-S55-LR 72 4.6.1 Specifications 72 4.6.2 External Dimensions 73 4.6.3 Installation on the Plasma Display 74 2 BEFORE BEGINNING ADJUSTMENT/SETTING 5.1 Before Beginning Adjustment 78 5.1.1 Operation Mode 78 5.1.2 Combined Use of the Remote Control, Main-control Panel, and RS-232C Commands...
Technical Manual
Page 4
... or PDA-5004 is installed are premised on the PDP607CMX being equipped with a star '#'. Precautions With the PDA-5003 or the PDA-5004 installed, the PDP-607CMX supports the following functions: Input/output terminals 7 PDA-5003 INPUT 1 Input • Component video signal • RGB signals from AV devices other than PCs INPUT...
... or PDA-5004 is installed are premised on the PDP607CMX being equipped with a star '#'. Precautions With the PDA-5003 or the PDA-5004 installed, the PDP-607CMX supports the following functions: Input/output terminals 7 PDA-5003 INPUT 1 Input • Component video signal • RGB signals from AV devices other than PCs INPUT...

Technical Manual
Page 26
Note Different temperature restrictions apply to each side of the panel. 26 For a wall-mount installation, allow adequate space (a clearance of the various limitations specified in this section. However, the figures listed above , below, and to ... not exceed 4 mm. Take note of 300 mm or more Ambient temperature 0 °C to 35 °C 0 °C to 40 °C ✩ Requirements when used with PDP-S55-LR speaker system When installed as a single unit, all requirements are the same as those listed above for mounting hardware. : Thermometer (temperature measurement point...
Note Different temperature restrictions apply to each side of the panel. 26 For a wall-mount installation, allow adequate space (a clearance of the various limitations specified in this section. However, the figures listed above , below, and to ... not exceed 4 mm. Take note of 300 mm or more Ambient temperature 0 °C to 35 °C 0 °C to 40 °C ✩ Requirements when used with PDP-S55-LR speaker system When installed as a single unit, all requirements are the same as those listed above for mounting hardware. : Thermometer (temperature measurement point...
Technical Manual
Page 28
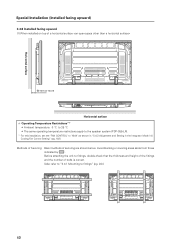
Special Installation (Embedding in the wall) 3.4.3 Embedding in the wall Carefully read the following imformation before trying to the speaker system (PDP-S55-LR). A Methods of Securing: Basic methods of bolts is correct. (Also refer to "3.4.1 Mounting to fittings, double-check that twisting, bending, or other deformation ...
Special Installation (Embedding in the wall) 3.4.3 Embedding in the wall Carefully read the following imformation before trying to the speaker system (PDP-S55-LR). A Methods of Securing: Basic methods of bolts is correct. (Also refer to "3.4.1 Mounting to fittings, double-check that twisting, bending, or other deformation ...

Technical Manual
Page 30
.... (Also refer to "3.4.1 Mounting to fittings" (pg. 24).) Installation is not possible 30 The methods indicated by . Before attaching the unit to the speaker system (PDP-S55-LR). Special Installation (Embedding in the wall) (2) Embedding in narrow, enclosed areas. ✩ Operating Temperature Restrictions • Ambient temperature: 0 °C to 40 °C •... more 50 mm or more 100 mm or more 100 mm or more Cation : Due to possible heat issues, we do not recommend installing the panel in walls with no space provided behind the unit.
.... (Also refer to "3.4.1 Mounting to fittings" (pg. 24).) Installation is not possible 30 The methods indicated by . Before attaching the unit to the speaker system (PDP-S55-LR). Special Installation (Embedding in the wall) (2) Embedding in narrow, enclosed areas. ✩ Operating Temperature Restrictions • Ambient temperature: 0 °C to 40 °C •... more 50 mm or more 100 mm or more 100 mm or more Cation : Due to possible heat issues, we do not recommend installing the panel in walls with no space provided behind the unit.
Technical Manual
Page 40
... more Horizontal surface ✩ Operating Temperature Restrictions (*1) • Ambient temperature: 0 °C to 35 °C • The same operating temperature restrictions apply to the speaker system (PDP-S55-LR). *1 For this installation, set the 'FAN CONTROL' to fittings" (pg. 24).) 40 Before attaching the unit to fittings, double-check that the thickness...
... more Horizontal surface ✩ Operating Temperature Restrictions (*1) • Ambient temperature: 0 °C to 35 °C • The same operating temperature restrictions apply to the speaker system (PDP-S55-LR). *1 For this installation, set the 'FAN CONTROL' to fittings" (pg. 24).) 40 Before attaching the unit to fittings, double-check that the thickness...

Technical Manual
Page 44
... for conventional displays. How to use with a variety of installation holes so it can be mounted in a vertical arrangement. 44 This panel can handle three line or two line audio, thus increasing the uses for video presentations. ¶ Table Top Stand: PDK-TS26 This...and lightweight. This structure simplifies attaching it can be used on different kinds of the plasma display 45 mm from its large screen area, brightness, and image quality, the Plasma Display (PDP-607CMX) is equipped with the 60-inch Plasma Display. 2-way speakers feature 5 cm (2 in.) tweeter and 8 cm (3-3/16 ...
... for conventional displays. How to use with a variety of installation holes so it can be mounted in a vertical arrangement. 44 This panel can handle three line or two line audio, thus increasing the uses for video presentations. ¶ Table Top Stand: PDK-TS26 This...and lightweight. This structure simplifies attaching it can be used on different kinds of the plasma display 45 mm from its large screen area, brightness, and image quality, the Plasma Display (PDP-607CMX) is equipped with the 60-inch Plasma Display. 2-way speakers feature 5 cm (2 in.) tweeter and 8 cm (3-3/16 ...
Technical Manual
Page 50
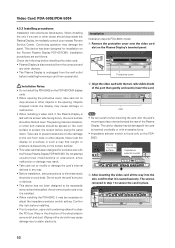
... depicts PDA-5003 model 1 Remove the protective cover over the video card slot on the Pioneer Plasma Display PDP-607CMX. rails Note • Be very careful when inserting the card. Avoid removing the card once it may damage the panel. Device mounting surface Impedance selector switch S-VIDEO INPUT3 VIDEO INPUT4 INPUT 3/4 AUDIO 75 Ω 2.2 kΩ...
... depicts PDA-5003 model 1 Remove the protective cover over the video card slot on the Pioneer Plasma Display PDP-607CMX. rails Note • Be very careful when inserting the card. Avoid removing the card once it may damage the panel. Device mounting surface Impedance selector switch S-VIDEO INPUT3 VIDEO INPUT4 INPUT 3/4 AUDIO 75 Ω 2.2 kΩ...
Technical Manual
Page 64
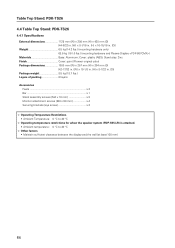
...✩ Operating Temperature Restrictions • Ambient Temperature: 0 °C to 40 °C ✩ Operating temperature restrictions for when the speaker system (PDP-S55-LR) is attached. • Ambient temperature: 0 °C to 40 °C ✩ Other factors • Maintain sufficient clearance between ...the display and the wall (at least 100 mm) 64 Stand stay: Zinc Finish Cover: paint (Pioneer original color) Package dimensions 1080 mm (W) × 257 mm (H) × 204 mm (D) (42-17/32 in. (W) × 10-1/8 in. ...
...✩ Operating Temperature Restrictions • Ambient Temperature: 0 °C to 40 °C ✩ Operating temperature restrictions for when the speaker system (PDP-S55-LR) is attached. • Ambient temperature: 0 °C to 40 °C ✩ Other factors • Maintain sufficient clearance between ...the display and the wall (at least 100 mm) 64 Stand stay: Zinc Finish Cover: paint (Pioneer original color) Package dimensions 1080 mm (W) × 257 mm (H) × 204 mm (D) (42-17/32 in. (W) × 10-1/8 in. ...
Technical Manual
Page 68
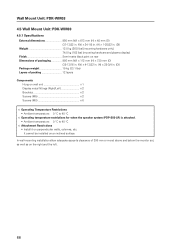
...M8 6 ✩ Operating Temperature Restrictions • Ambient temperature: 0 °C to 40 °C ✩ Operating temperature restrictions for when the speaker system (PDP-S55-LR) is attached. • Ambient temperature: 0 °C to 40 °C ✩ Attachment Restrictions • Install it on perpendicular walls, ...in. (H) × 1-25/32 in. (D)) Weight 12.0 kg (26.5 lbs) [mounting hardware only] 74.0 kg (163 lbs) [mounting hardware and plasma display] Finish Semi-matte black paint on rear Dimensions of packaging 986 mm (W) × 112 mm (H) × 730 mm (D) (38-13/16 in...
...M8 6 ✩ Operating Temperature Restrictions • Ambient temperature: 0 °C to 40 °C ✩ Operating temperature restrictions for when the speaker system (PDP-S55-LR) is attached. • Ambient temperature: 0 °C to 40 °C ✩ Attachment Restrictions • Install it on perpendicular walls, ...in. (H) × 1-25/32 in. (D)) Weight 12.0 kg (26.5 lbs) [mounting hardware only] 74.0 kg (163 lbs) [mounting hardware and plasma display] Finish Semi-matte black paint on rear Dimensions of packaging 986 mm (W) × 112 mm (H) × 730 mm (D) (38-13/16 in...
Technical Manual
Page 72
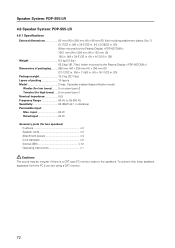
... from the PC if you are using a CRT monitor. 72 Speaker System: PDP-S55-LR 4.6 Speaker System: PDP-S55-LR 4.6.1 Specifications External dimensions 90 mm (W) × 880 mm (H) × 96 mm (D) (Not including attachment plates; input 60 W Rated input 20 W Accessory parts (for high tones) .... 5 cm ...cone type x1 Nominal impedance 6 Ω Frequency Range 60 Hz to the speakers. Qty: 1) (3-17/32 in. (W) × 34-21/32 in. (H) × 3-25/32 in. (D)) When mounted to the Plasma Display : 1651 mm (W) × 880 mm (H) × 122 mm (D) (65 in. (W)...
... from the PC if you are using a CRT monitor. 72 Speaker System: PDP-S55-LR 4.6 Speaker System: PDP-S55-LR 4.6.1 Specifications External dimensions 90 mm (W) × 880 mm (H) × 96 mm (D) (Not including attachment plates; input 60 W Rated input 20 W Accessory parts (for high tones) .... 5 cm ...cone type x1 Nominal impedance 6 Ω Frequency Range 60 Hz to the speakers. Qty: 1) (3-17/32 in. (W) × 34-21/32 in. (H) × 3-25/32 in. (D)) When mounted to the Plasma Display : 1651 mm (W) × 880 mm (H) × 122 mm (D) (65 in. (W)...
Technical Manual
Page 73
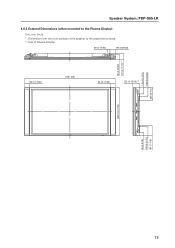
Speaker System: PDP-S55-LR 4.6.2 External Dimensions (when mounted to the Plasma Display) Unit: mm (inch) *1: Dimension from the front surface of the speaker to the attachment pieces. *2: Size of Plasma Display 39 (1-17/32) 99 (3-29/32) 96 (3-25/32) 119 (4-11/16) *1 90 (3-17/32) 1651 (65) 90 (3-17/32) 122 (4-13/16) *2 119 (4-11/16) 169 (6-21/32) 235 (9-1/4) 880 (34-21/32) 65 (2-9/16) 169 (6-21/32) 181 (7-1/8) 73
Speaker System: PDP-S55-LR 4.6.2 External Dimensions (when mounted to the Plasma Display) Unit: mm (inch) *1: Dimension from the front surface of the speaker to the attachment pieces. *2: Size of Plasma Display 39 (1-17/32) 99 (3-29/32) 96 (3-25/32) 119 (4-11/16) *1 90 (3-17/32) 1651 (65) 90 (3-17/32) 122 (4-13/16) *2 119 (4-11/16) 169 (6-21/32) 235 (9-1/4) 880 (34-21/32) 65 (2-9/16) 169 (6-21/32) 181 (7-1/8) 73
Technical Manual
Page 74
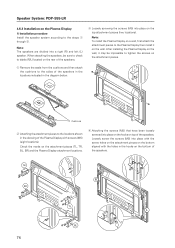
... (eight locations). Cushions 2 Attaching the attachment pieces to labels (R/L) located on the rear of the speakers. Speaker System: PDP-S55-LR 4.6.3 Installation on the Plasma Display 1) Installation procedure Install the speaker system according to the sides of the speakers. 74 When attaching the speakers, be impossible... to tighten the screws on the wall. Note: To install the Plasma Display on a wall, first attach the attachment pieces to the Plasma Display then install it may be sure to check to the locations shown in the drawing of ...
... (eight locations). Cushions 2 Attaching the attachment pieces to labels (R/L) located on the rear of the speakers. Speaker System: PDP-S55-LR 4.6.3 Installation on the Plasma Display 1) Installation procedure Install the speaker system according to the sides of the speakers. 74 When attaching the speakers, be impossible... to tighten the screws on the wall. Note: To install the Plasma Display on a wall, first attach the attachment pieces to the Plasma Display then install it may be sure to check to the locations shown in the drawing of ...
Technical Manual
Page 75
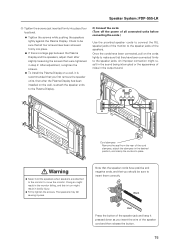
...in the desired position, and clamp the cords into place (four locations). ¶ Tighten the screws while pushing the speakers lightly against the Plasma Display. Black Red Press the button of the monitor to insert them after slightly loosening the screws that all connected units before connecting the ...cords.) Use the provided speaker cords to connect the R/L speaker jacks of the speaker jack and keep it is a large gap between the Plasma Display and the speakers, adjust them correctly. Speaker System: PDP-S55-LR 5 Tighten the screws just inserted firmly into place.
...in the desired position, and clamp the cords into place (four locations). ¶ Tighten the screws while pushing the speakers lightly against the Plasma Display. Black Red Press the button of the monitor to insert them after slightly loosening the screws that all connected units before connecting the ...cords.) Use the provided speaker cords to connect the R/L speaker jacks of the speaker jack and keep it is a large gap between the Plasma Display and the speakers, adjust them correctly. Speaker System: PDP-S55-LR 5 Tighten the screws just inserted firmly into place.
Technical Manual
Page 76
... well, and wipe the cabinet. If you want to the cabinet and speaker nets, do not stab the speaker nets with a dry colth. Speaker System: PDP-S55-LR 3) Care and Maintenance When the cabinet gets dirty... • Wipe with the cabinet for prolonged periods. If the cabinet is heavily soiled, soak...
... well, and wipe the cabinet. If you want to the cabinet and speaker nets, do not stab the speaker nets with a dry colth. Speaker System: PDP-S55-LR 3) Care and Maintenance When the cabinet gets dirty... • Wipe with the cabinet for prolonged periods. If the cabinet is heavily soiled, soak...
Technical Manual
Page 90
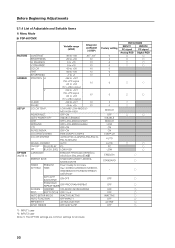
Before Beginning Adjustments 5.1.4 List of Adjustable and Settable Items 1) Menu Mode 7 PDP-607CMX *1: INPUT1 case *2: INPUT2 case (Note 1) The OPTION settings are common settings for all inputs. 90
Before Beginning Adjustments 5.1.4 List of Adjustable and Settable Items 1) Menu Mode 7 PDP-607CMX *1: INPUT1 case *2: INPUT2 case (Note 1) The OPTION settings are common settings for all inputs. 90
Technical Manual
Page 91
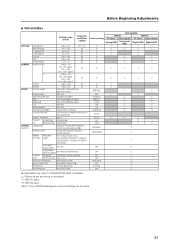
7 PDP-607CMX# Before Beginning Adjustments #: Applicable only when a PDA-5003/PDA-5004 is installed. : Cannot be set according to the signal. *1: INPUT1 case *2: INPUT2 case (Note 1) The OPTION settings are common settings for all inputs. 91
7 PDP-607CMX# Before Beginning Adjustments #: Applicable only when a PDA-5003/PDA-5004 is installed. : Cannot be set according to the signal. *1: INPUT1 case *2: INPUT2 case (Note 1) The OPTION settings are common settings for all inputs. 91

Technical Manual
Page 94
Before Beginning Adjustments 2) Integrator mode 7 PDP-607CMX (Note) The OPTION settings are common settings for all inputs. 94
Before Beginning Adjustments 2) Integrator mode 7 PDP-607CMX (Note) The OPTION settings are common settings for all inputs. 94

Technical Manual
Page 95
7 PDP-607CMX# Before Beginning Adjustments : Applicable only when a PDA-5003/PDA-5004 is installed. (Note) The OPTION settings are common settings for all inputs. 95
7 PDP-607CMX# Before Beginning Adjustments : Applicable only when a PDA-5003/PDA-5004 is installed. (Note) The OPTION settings are common settings for all inputs. 95


