

Owner's Manual
Page 6
... a Philips screwdriver if removing or attaching the stand. Shipped with both models Remote Control Batteries for Remote (2) Cleaning Cloth Power Cord (2 m/6.6 feet) Cable Clamps (4) Operating Instructions Certificate of all accessories shipped with your panel. If an item is listed on the back...easy. Service contact information is missing, please contact your installer to the Flat Panel Displays The Pioneer Flat Panel Display models include the 60-inch PRO-141FD and the 50-inch PRO-101FD (screen sizes measured diagonally). Please check contents before discarding or allowing your...
... a Philips screwdriver if removing or attaching the stand. Shipped with both models Remote Control Batteries for Remote (2) Cleaning Cloth Power Cord (2 m/6.6 feet) Cable Clamps (4) Operating Instructions Certificate of all accessories shipped with your panel. If an item is listed on the back...easy. Service contact information is missing, please contact your installer to the Flat Panel Displays The Pioneer Flat Panel Display models include the 60-inch PRO-141FD and the 50-inch PRO-101FD (screen sizes measured diagonally). Please check contents before discarding or allowing your...
Owner's Manual
Page 12
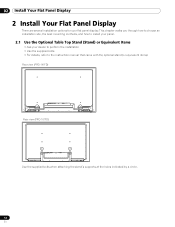
... items) Rear view (PRO-141FD) Rear view (PRO-101FD) Use the supplied bolts when attaching the stand's supports at the holes indicated by a circle. 12 En This chapter walks you through how to choose an installation site, the best mounting methods, and how to install your panel. 2.1 Use the Optional Table Top Stand (Stand) or Equivalent Items...
... items) Rear view (PRO-141FD) Rear view (PRO-101FD) Use the supplied bolts when attaching the stand's supports at the holes indicated by a circle. 12 En This chapter walks you through how to choose an installation site, the best mounting methods, and how to install your panel. 2.1 Use the Optional Table Top Stand (Stand) or Equivalent Items...
Owner's Manual
Page 14
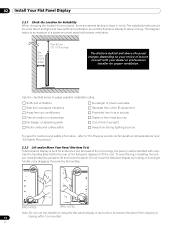
... it is an example of a stand-mounted panel with proper ventilation. To avoid flexing or twisting the unit, you need at least two people to lift and move the flat panel display by holding only a single handle or by dragging the panel by its handles. (PRO-141FD) (PRO-101FD) Note: Do not use ...the handles to hang the flat panel display or as anchors to prevent the panel from strong lighting sources For specific cautions and...
... it is an example of a stand-mounted panel with proper ventilation. To avoid flexing or twisting the unit, you need at least two people to lift and move the flat panel display by holding only a single handle or by dragging the panel by its handles. (PRO-141FD) (PRO-101FD) Note: Do not use ...the handles to hang the flat panel display or as anchors to prevent the panel from strong lighting sources For specific cautions and...
Owner's Manual
Page 15
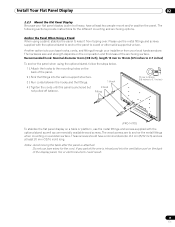
...Recommended hook: Nominal diameter 8 mm (3/8 inch), length 12 mm to 18 mm (0.5 inches to 0.7 inches) To anchor the panel when using a stand, stabilize the panel to a wall or other solid support structure. If any part of the wire is introduced into the ventilation port on the back...hooks and the fittings. 1.Hook 4 ) Tighten the cords until the panel is to the mounting holes on the composition and thickness of 4 mm (5/32 inch) and are to 0.7 inches) M8 (PRO-141FD) To stabilize the flat panel display on a wooden surface. The following sections provide instructions for the...
...Recommended hook: Nominal diameter 8 mm (3/8 inch), length 12 mm to 18 mm (0.5 inches to 0.7 inches) To anchor the panel when using a stand, stabilize the panel to a wall or other solid support structure. If any part of the wire is introduced into the ventilation port on the back...hooks and the fittings. 1.Hook 4 ) Tighten the cords until the panel is to the mounting holes on the composition and thickness of 4 mm (5/32 inch) and are to 0.7 inches) M8 (PRO-141FD) To stabilize the flat panel display on a wooden surface. The following sections provide instructions for the...
Owner's Manual
Page 16
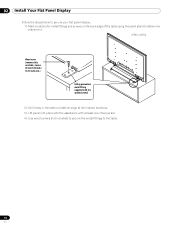
02 Install Your Flat Panel Display Follow the steps below to secure your flat panel display. 1 ) Mark locations for metal fittings and screws on the back edge of the table using the panel stand to determine placement. (PRO-141FD) Wood screw (commercially available, 4 mm x 20 mm (5/32 inch x 13/16... inch) min.) Falling prevention metal fitting (supplied with the optional stand) 2 ) Drill holes in the table or platform edge at...
02 Install Your Flat Panel Display Follow the steps below to secure your flat panel display. 1 ) Mark locations for metal fittings and screws on the back edge of the table using the panel stand to determine placement. (PRO-141FD) Wood screw (commercially available, 4 mm x 20 mm (5/32 inch x 13/16... inch) min.) Falling prevention metal fitting (supplied with the optional stand) 2 ) Drill holes in the table or platform edge at...

Owner's Manual
Page 83
...to improve heat radiation. This PRO-101FD for use only with your panel close to excessive vibrations or impact shock. Read all operating and user information provided with KRP-TS02 (Pioneer Corporation.) or KRP-SW01 (Pioneer Corporation.) stand. D3-4-2-1-7a_A_En VENTILATION CAUTION: ...with other equipment. D3-4-2-3-3_En CAUTION: This PRO-141FD for use only with items (such as a lighted candle) on thick carpet or a bed. Avoid installing the panel in a location with other sources of resulting in to clean your flat panel display. • Read & Retain Instructions...
...to improve heat radiation. This PRO-101FD for use only with your panel close to excessive vibrations or impact shock. Read all operating and user information provided with KRP-TS02 (Pioneer Corporation.) or KRP-SW01 (Pioneer Corporation.) stand. D3-4-2-1-7a_A_En VENTILATION CAUTION: ...with other equipment. D3-4-2-3-3_En CAUTION: This PRO-141FD for use only with items (such as a lighted candle) on thick carpet or a bed. Avoid installing the panel in a location with other sources of resulting in to clean your flat panel display. • Read & Retain Instructions...


